• Hey Guest!
    British Car Forum has been supporting enthusiasts for over 25 years by providing a great place to share our love for British cars. You can support our efforts by upgrading your membership for less than the dues of most car clubs. There are some perks with a member upgrade!

    **Upgrade Now**
    (PS: Upgraded members don't see this banner, nor will you see the Google ads that appear on the site.)
Tips
Tips

plate screws

TexasKnucklehead

Jedi Knight
Country flag
Offline
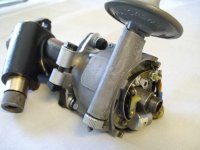
Securing the contact breaker plate to the distributor housing is two philips headed screws. In the three units I have, the screw heads are chewed up. The parts books show them, but don't define them. They appear to be #6-40. After going to several auto parts stores, sears harware, fastners, etc, I bought a pack of 25 for $10 including shipping. Everyone has #6-32, but -40s aren't so common, unless you want nylon. I spent more on gas driving around looking for them, but at least now in a few days, I'll be screwed.

Never underestimate the amount of time a simple job can take.
 
Isn't that how it always goes! Since you've done the leg-work why not recoup some of your effort by parting out the remainder of your 25 pack and offering them up for sale to members.
 
Sure, when they come in I'll give-em away at cost.

Speaking of things that take too much time, I just tried to set the points on the distributor not even installed onto my engine yet. It proved that I wasn't done building a good one from several used ones. The point gap is different on each of the lobes of the cam (also not available new) so I checked the others and one looks ok... I need to take it apart, clean it up, assemble it into the good housing (with screws that work)...
 
Yeah, that's where Pertronix is your friend. Are the lobes really worn, or maybe you are just seeing a little wobble in the distributor shaft?

I think I have about a half dozen donors stuffed away in boxes in case you want to test some more. Nothing in great shape, though.
 
I may test your parts for greatness, Randy. But I'm still looking at a possible good one. I uesd my new favorite tool, the dial guage, to see a huge difference between the height of the lobes in relation to the 'flats'. About 20/1000. It's not difficult to secure the housing in a vice, set the guage next to it, and rotate the shaft. It does not apear to be shaft related, but we'll see. The lobes are worn.
 
The lobe fer #1 is the only one that really counts, isn't it? :devilgrin: :jester:

May be time for an Advance Auto rebuild... :wink:

...unless you have enuff 'bodies' lyin' about that ya luck out and find an unworn one.
 
Randy called it, sort of. The shaft was bent. Luckily I had a good shaft in one of the units, a good plate in another and some of the hardware in another. The original cam seems OK, but it's froze to the shaft. There was a little dirt in there from the 20' of water it was under. Here's a before and after picture -the original housing was used to keep the date of 3-59 looking 'original'. -just another day in the garage, but it's nearly 100 out there now.
 

Attachments

  • 21648.jpg
    21648.jpg
    65 KB · Views: 233
Sheesh Tex, with work like that you are going to put Advanced Distributors out of business. Very nice!

BTW, what did you use for the vacuum capsule? I noticed TRF is now selling replica setups with the hex head like the originals.
 
As they say in Texas "mighty fine work"! Looks really good!

Dick
 
How does it work? What do you mean "work".
The tub is sitting on a cart with all the prefitted body panels stored away in the garage attic, the engine is in pieces waiting for some thrust washers and lifters, the head is in pieces on the bench waiting for new guides to go to the head shop, the rockers are on their way back from Rocker Arm Specialists, the carbs are bolted to an intake in a plastic bag in the spare bedroom, the toyota 5-speed is waiting in a box with the HVDA housing, and the completed frame is patiently waiting for a complete engine. I will not know how any of it works for... at least another... some time. But as far as I can tell, it should work better than when I got it.

For the vacuum unit, I got a couple "complete" pedestals off ebay and was able to free one up with some PBlaster and patience. I can't tell if it leaks vacuum, but when I pull the spring, it sucks from where the pipe goes. The LUCAS unit that came on the car has a hex nut at the pipe end, while the LUCAS one I'm using doesn't. I don't know which is more original but don't see a way to take it apart further -and still be able to get it back together.

I use trailer brite aluminum cleaner that works wonders. It oxidizes corrosion and scale leaving the metal completly dark grey after it's washed off. Then a little mothers billet polish, elbow grease, and it looks like new -but still 50 years old.

This little part of the project was done because I want to finish the engine and stuff it onto the frame with the transmission, before starting on anything bigger -like the tub/body work, but I'm waiting for parts.
 
Tex said:
I can't tell if it leaks vacuum, but when I pull the spring, it sucks from where the pipe goes.

This may sound daft BUT: You can test the thing by simply sucking on it and covering the opening with yer tongue. That will pull the spring back. If the diaphragm leaks it'll go back to the 'neutral' position kinda quickly. :wink:
 
TexasKnucklehead said:
How does it work? What do you mean "work".
The tub is sitting on a cart with all the prefitted body panels stored away in the garage attic, the engine is in pieces waiting for some thrust washers and lifters, the head is in pieces on the bench waiting for new guides to go to the head shop, the rockers are on their way back from Rocker Arm Specialists, the carbs are bolted to an intake in a plastic bag in the spare bedroom, the toyota 5-speed is waiting in a box with the HVDA housing, and the completed frame is patiently waiting for a complete engine. I will not know how any of it works for... at least another... some time. But as far as I can tell, it should work better than when I got it.

Sounds like my project 4A too. I have nearly all components restored in boxes, my chassis is done, the HVDA is ready, head done with Rocker Specialist rebuilt ... and it's been that way for 2 years. I have to get into doing the body, new floors, etc but it's holding back the project.

I tested my dizzy on the 3A so I now that it at least function after I rebuilt it.
 
My (25) stainless steel philips pan head #6-40x5/8 came today, -which are 1/8" longer than needed, but the closest I could find. I used a second lock washer, and threaded them in a little farther but all seems well. Much better than the chewed up bits that I had. If anyone needs a set of screws, drop me a PM. -I need to check the TR6...

Also I cleaned up the original vacuum unit -and took the nut off the end, which allows one of the springs to be removed (and a lot of junk to be cleaned out). I can't suck hard enough to pull that spring back through that tiny vacuum line. But I wasn't going to try after using penetrating oil, etc to get the thing freed. I can push the spring in, hold my hand over the hole before releasing the spring, wait, and release my hand, allowing the vacuum to release and the spring to return home. So I think the old one is working without a leak. I can't tell on the other because the inlet line is so small compared to the big hole when the nut is removed.

It finally occured to me that the vacuum line feeding the advance comes from the bottom of the front H6 carb. But I have a set of HS6's which do not have the same place to install the vacuum line. The front carb does have a line at the top, that might be used for vacuum -I don't know. Randy, I checked the picture where you checked clearance and yours has the same little port. Does anyne know if this can be used to supply the vacuum to the advance? (circled in the picture)

If I had a TR4 to try out the dizzy, I might. But I'd hate to start a trend that every part be swapped out on another car to be sure it worked. That sounds like a lot of effort and could easily double the work involved.
 

Attachments

  • 21663.jpg
    21663.jpg
    67.9 KB · Views: 148
Texas,

Yes, that's where the vacuum advance is connected on a TR4A with HS6 carbs. I believe there's a right-angle adapter that connects it to the vacuum line, but I'm away at a conference without access to my cars or parts catalogs. :smile:

Scott
 
TexasKnucklehead said:
If I had a TR4 to try out the dizzy, I might. But I'd hate to start a trend that every part be swapped out on another car to be sure it worked. That sounds like a lot of effort and could easily double the work involved.

Hey, that might work - I know someone who has a TR4! And it fits with my policy of swapping out old parts for new ones. I just don't have the policy of taking those new parts back off!

Seriously, if you want to check it out beforehand, drop me a note and we'll get together to make sure its working before you fire up your engine for the first time.
 
Scott's right, that is a ported vacuum for the dizzy advance. Original setup would have had a rubber "L" fitted to the thing, then to a nylon line to the dizzy. It doesn't much matter about the "L" fitting, just a good fit with a short piece of vacuum hose of the proper I.D. to mate the line to the port.

Just be aware that thin-wall rubber line can collapse with vacuum. You want actual thick walled vacuum hose for the application.
 
If you check out post 654127 in this thread, you can see what appears to be a still original setup with right-angle connector and routing of the copper vacuum line on a TR4A.

https://www.britishcarforum.com/bcforum/ubbthreads.php/topics/650336/4/Hello

This is how I did mine on the first TR4A. I recall managing to get replacement copper line from a local parts store and reusing the threaded connector.

Scott
 
Randy, that is a generous offer. I know you're busy with your TR3 project and would rather not spend your time double checking my work. I keep asking myself 'what could possibly go wrong'. Maybe when I try to fire it up, and it doesn't fire, I'll swap a few parts with you. Perhaps by the time I get to that point, you'll be there too -hopefully we'll be able to keep one car running out of the three.

I have the original (clogged) vacuum line. I see Moss has a nylon elbow #365-300, is that the one?
 
Back
Top