• Hey Guest!
    British Car Forum has been supporting enthusiasts for over 25 years by providing a great place to share our love for British cars. You can support our efforts by upgrading your membership for less than the dues of most car clubs. There are some perks with a member upgrade!

    **Upgrade Now**
    (PS: Upgraded members don't see this banner, nor will you see the Google ads that appear on the site.)
Tips
Tips

TR2/3/3A overdrive cable routing: and mounting the drive train

When I look at pic #3 in this post, it looks like your apron bow mounting tabs have been bent rearward...possibly accounting for the missing clearance. There is room to bend the mounts forward, or at least "straight".

I agree with John, I'd try and straighten the mounts a little bit and this will bring the cross bar ahead a little.

Cheers
Tush
 
[QUOT.E Thanks Steve, now I have a reason to get back on ebay...wing nuts!! I think you are enabling me.[/QUOTE]
john,
Your car is gorgeous. Did you eliminate the "helmet head " battery connectors on purpose?
 
[QUOT.E Thanks Steve, now I have a reason to get back on ebay...wing nuts!! I think you are enabling me.
john,
Your car is gorgeous. Did you eliminate the "helmet head " battery connectors on purpose?[/QUOTE]

No. These were the cables offered by TRF...and I never gave them much thought. I know the Judging Guide has a discussion about the original connectors, and says not to deduct for the clamp style, since the originals had many issues. They have a similar discussion about the fuel shut-off valve. Basically they use some common sense when it comes to factory parts that had safety issues. I have, since the picture, replaced the marine battery with an unmarked black battery...making the overall look a bit better, but still not completely original. Items like these (that wear out regularly) I get a little lax with, since they are easily changed if some later owner wanted to show the car.
 
Always there to pusha little John, but what about those cool plug wires and little holder dealie, Ibet TRF. The Brass wing not thing was told to me by Barry Nelson- he is a legendin the early tr2 and 3 world around here, but moved to New Mexico, and I losthis contact stuff in a computer move. Anyway,s the brass wing nut thing getsinteresting because the original J bolt is ÂĽ fine and all the available wing nutsthat size seem to be coarse thread.

Barry would concoursejudge around here and he could be painful. I almost said something about the Batterywith the boat picture, but figured I needed to watch me sense of critique becauseyou are way ahead of me with your detailing. I do plan to catch up.


Oh, sorry Steve,I forgot to mention the plug wires. No, these are carbon cores. I had about 4 old used sets that came with my $100 “magic pile” i bought a few years ago. These appeared the best of the bunch...but no telling where they came frome. And I’ve never had a problem with critiquing. Even if I dont change it, i put the part on my ebay watch list to buy and save! Plus, it helps the hobby anytime you post originality info.
 
There was a lot of body work done to straighten things and fit the pieces together ( about 20 years ago) as the car had been banged up enough to bend the frame and the Right suspension turret. So the bent looking tabs may be that way on purpose and I won't know until I put on the bonnet and apron as John suggested. (By measurement the crosspiece is perpendicular to whatever it is supposed to be (i.e. it is parallel to the bullhead!))
This weekend may tell all.

Thank you all again , and I too had worried about that battery! I bought a nice black one. I no longer can be picky but would like any future owner to have a good foundation: Just want to get it running and on the road for our pleasure It has been long journey.

thank you all

Michael
 
Ok John I do not have a life, so what about the little leather holder? Did you make it yourself?
Mike look at Johns by pass hose and how it never has a 90. You can take your hose to like Auto Zone and they will have something with more flexibility and match you that up, and then like you said if they are a little shorter the hose pulls away more. I could make my hose almost hit the spring if I push it up.
 
Time. I think, to end this very helpful discussion. Thank you all.

From the pics I have seen there is quite a variation in the fore and aft position of the motor, at least as judged from the closeness to the crosspiece. Some are at least 1/2 inch clear, some almost touching. I don't know if this relates to the transmission used.

John. I don't know if I answered your query about the spring (and pin) being tilted. It is at right angles to the crosspiece which is indeed slightly tilted ( top forward) to match the curvature of the wheel arch The bonnet fits exactly to the crosspiece. I could probably bend the spring unit to be a bit more vertical.

So I shall carry on as is, and if it still looks dangerously close with the engine running (this weekend?) I shall remove the 4 rear mounting bolts and see if I can slide the engine just a teeny bit backwards and then grind out the holes.

I hope, perhaps foolishly, that I won't have many more problems to solve ( and that the engine actually starts after 25 years or so).


Ha!

Poor little Buttercup! ref. both Sullivan and "Princess Bride"

Michael
 
Mike, be sure to post when you get her running...you're the second engine using the lock-n-stitch stud repair. I'm on your bleachers waiting to see her running!
 
Late follow-up.
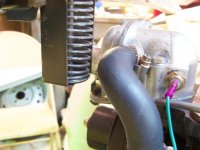
1. I noticed that the bonnet spring bracket was slightly tilted at the base, so that the spring was backward and the pin forward. I reversed this ( losing a cup washer into space in the process) and now both spring and pin are vertical. Did not see this possibilty earlier.

2. I unbolted the rear mount crosspiece form the frame, jacked up the gearbox, and found everything had slid rearward about 1/4 inch, maybe more. It looked tricky to extract the piece so I ground away with it in place until I could get a clear drop into the bolt holes. Then a longer bolt, and a tough flat washer to spread the load and be sure the lock washer had something to bite into, and a good yank on the wrench.

Does any one have experienced of removing that crosspiece without removing the drivetrain? It looks as though it would foul up on the overdrive. I would really like to replace it with a new one and better drilled holes!

any way, I am much happier with both changes. One day soon i shall venture to start the engine after its long dormancy.
 

Attachments

  • P1040177.jpg
    P1040177.jpg
    48.3 KB · Views: 81
  • P1040178.jpg
    P1040178.jpg
    32.4 KB · Views: 72
Last edited:
Back
Top