• Hi Guest!
    You can help ensure that British Car Forum (BCF) continues to provide a great place to engage in the British car hobby! If you find BCF a beneficial community, please consider supporting our efforts with a subscription.

    There are some perks with a member upgrade!
    **Upgrade Now**
    (PS: Subscribers don't see this gawd-aweful banner
Tips
Tips

TR6 Oil pan is going to leak: suggestions?

nichola

Jedi Hopeful
Country flag
Offline
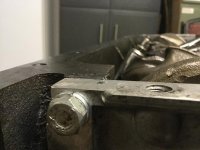
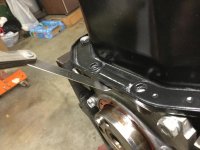
Check out the gap at the oil seal housing (pics). That’s a little more than .026 and I’m looking for suggestions. My first thought is to run a little extra gasket there, spanning the bottom of the seal housing.

From what I’m reading here and elsewhere it seems running RTV along oil pan flange but dry on the engine block side, sandwiching the gasket, is typical procedure to mount the pan. But that certainly wouldn’t address this gap at the seal housing.
 

Attachments

  • 405F1B93-C9CF-4A5D-AD6B-808BD3BA2B0B.jpg
    405F1B93-C9CF-4A5D-AD6B-808BD3BA2B0B.jpg
    46.8 KB · Views: 214
  • BC194A14-9264-461D-BC14-AC8C772B57E8.jpg
    BC194A14-9264-461D-BC14-AC8C772B57E8.jpg
    50.1 KB · Views: 217
  • 5A7A43BB-DABA-4531-B231-02BE0766A937.jpg
    5A7A43BB-DABA-4531-B231-02BE0766A937.jpg
    51.8 KB · Views: 196
It looks like you may need to do a little forming on the oil pan. Check it with a straight edge first to see if the lip is flat. Good luck.
 
:iagree:

What he said. The flange of the pan is quite prone to distortion due to over-tightening the mounting screws. You may find that you'll need to tap the surface back into shape - the good solid surface of a bench vise makes for a great surface to tap on.

Good luck!
Mickey
 
:iagree:

What he said. The flange of the pan is quite prone to distortion due to over-tightening the mounting screws. You may find that you'll need to tap the surface back into shape - the good solid surface of a bench vise makes for a great surface to tap on.

Good luck!
Mickey

Thanks guys. The pan is not dimpled, but was a bit up on the front end, doing a little teeter totter routine. By only torquing to 5 ft lbs it fit nice and flat. Just concerned with the rear seal housing gap. Going to make an extra gasket the length of the housing to take up the gap.
 
I don't think an additional paper gasket would be the answer....You are going to need something that will ooze into the crevices.
Permatex Ultra Gray Gasket Maker would be my choice if faced with that situation.
 
I don't think an additional paper gasket would be the answer....You are going to need something that will ooze into the crevices.
Permatex Ultra Gray Gasket Maker would be my choice if faced with that situation.

I have some and was going to use it for the pan side of gasket, dry on the block side. But at the housing I was going to housing, ultra gray, a straight gasket, ultra gray, pan gasket, and oil pan. I agree some ultra gray needs to fill in the gapsy. I’m sorta scratching my head wondering why that housing isn’t level with the block surface. Didn’t pay attention when I disassembled.
 
Don't remember, is there any play in the bolt holes of the housing or do the bolts shanks help center it?
Maybe the housing dropped down from the weight but held by the seal on the crank as you tighten the
bolts. Just a guess. And don't forget the copper washer on the top bolt.
 
Don't remember, is there any play in the bolt holes of the housing or do the bolts shanks help center it?
Maybe the housing dropped down from the weight but held by the seal on the crank as you tighten the
bolts. Just a guess. And don't forget the copper washer on the top bolt.

I just slid the seal over the crank and the bolts lined up, so I fastened it, and I did use the sealing washer at the top. After I saw the mismatch I loosened all the bolts and tried to slide it down but no go. Thought I might squeeze that seal a little off center but nope, and probably not a good idea anyway.
 
If this was my engine, I would fabricate a filler piece using shim stock of the appropriate thickness, match drill the attach holes and install the filler piece using sealant between the oil seal housing and the filler piece.

M.
 
If this was my engine, I would fabricate a filler piece using shim stock of the appropriate thickness, match drill the attach holes and install the filler piece using sealant between the oil seal housing and the filler piece.

M.

I like the metal shim suggestion. Thanks.
 
Oops... not going to use Ultra Gray, rather will use a gasket sealant (not a gasket maker). Here's the last item from Permatex on what NOT to do.

10. Using a gasket maker as a dressing on a conventional gasket.
This might be the most common gasketing error of all. Many mechanics will use an RTV gasket maker to hold a conventional or cut gasket in place during assembly. Some mechanics will even use the RTV gasket maker as a dressing, coating both sides of the gasket. Gasket makers are the wrong product for these applications – their formulations are too thick for use as a dressing. If you’re installing a conventional gasket, use a gasket sealant – they’re available in sprays, liquids, and tubes, with specialized formulas for a variety of applications.
 
I use a spray glue or the 3M emblem adhesive to keep gasket in place and small bead of rtv the rest on engine side. If I figure on not taking it apart again, I use old plain permatex, hardened type.
 
Back
Top