• Hi Guest!
    You can help ensure that British Car Forum (BCF) continues to provide a great place to engage in the British car hobby! If you find BCF a beneficial community, please consider supporting our efforts with a subscription.

    There are some perks with a member upgrade!
    **Upgrade Now**
    (PS: Subscribers don't see this gawd-aweful banner
Tips
Tips

Not as far along as I'd like, but...

motofiaccone

Senior Member
Offline
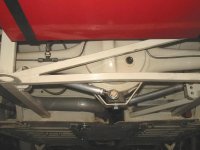
I wanted to have the motor in over the holiday, but alas: it wasn't to be. Instead, I got much of the-mite.com's frame bracing in. A more full description of what I did is on my website, but...

First, I had to shave down the frame rails so the supports would lay flat.

framemodtwo.jpg


Then I drilled out the seat frame rails/brake and fules line holders.

framemodthree.jpg


Then, I welded caps onto the open frame rails. It adds significant stregth and keeps water out.

framemodfour.jpg


Then, I clamped them into place and tacked them up.

framemodfive.jpg


And things got a little smokey. There was carpet on the cross frame rails that I forgot to remove. These promptly caught on fire as the welds penetrated and I was forced to use the fire extinguisher!

framemodsix.jpg


This is where having the-mite as a template really helps. I would have never thought to do an exhaust cutout. This was much easier done on the bench than the car.

framemodseven.jpg


More to follow. Thanks for reading!

--Chris
 
I forgot to mention how helpful this group is! A couple of weeks ago, a gent posted about his "bent" frame rails. This group noted that the rails are supposed to be bent for caster purposes--who knew? Anyway, this saved me a TON of trouble. I basically notched my frame rail supports and welded them back over. Again, something I would have missed if it weren't for this group. Cheers!

On that note...

Tony askes me a couple weeks back, "So Chris, if you shave off the seat frame rails, where will you run your lines?" Good point. I was planning to rivit them to the vertical frame rails, but then they would need to pass over the horizontal frame rail support. Not a good idea. I could have run them through the gearbox tunnel, but I don't like doing that. So again, this group saved me TONs of trouble.

So I drilled 3 holes in the passenger side horizontal brace. I didn't want to leave it open for rust and stregth reasons, so I cut some tubes.

framerailsa.jpg


And placed them into the cross brace.

framerailsb.jpg


Then welded them in, pretty no? I'm not the best, but I'm improving.

framerailsc.jpg


Interior view. That should be strong enough.

framerailsd.jpg


And finally, I hald welded it into place. I just have a little MIG welder, which is fine for projects like these. But running LOOONG beads like these frame rail supports require really take a toll on her. So I do a little bit at a time. One day, I'll step up to a 220 machine. I suppose I could have TIGed it, but...no way. I'd still be here.

framerailse.jpg


Thanks for following along. Like I said, I have much more info on my website. Contructive comments are always welcome. Have a good day.

--Chris
 
Looks great....you know, you could run all your wiring through some PVC piping & push the PVC pipe through those so no wiring is out in the weather, front to rear!
 
Looks like you got it down to me. Wish I could weld.
 
Just to elborate about the additional square tubing bracing used on this car, Tony the other day you mentioned maybe a racer would do this, probably not, well definately not. Don't get me wrong I don't see a problem with these, maybe a bit overkill, but each to their own, but a racer would never give up the additional gorund clearence, most serious spridget SCCA Spridget racers are now running thier exhaust thru the tranny tunnel to get extra cleareance and get the cars lower to ground, the last thing you's ever do to race car is add tubbing that would rob you of ground clearence. Here's shot of the Huffaker Buyeye from the bottom rear showing the exhaust exiting the tranny tunnel. A second photos show the car sitting on the ground, it was set up to have only two inches ground clearence at the roker rails, so you can sse no room to add anyhting under the car, even exhaust.
 

Attachments

  • 14909.jpg
    14909.jpg
    41.5 KB · Views: 268
  • 14910.jpg
    14910.jpg
    48.2 KB · Views: 266
The roads are so smooth and nice in Dallas, you only need about .5" of ground clearance. :devilgrin:

Seriously, this is one cool project. And getting cooler by the second. I am already getting a reading of 12 megafonzies.
 
Thru the tunnel is pretty neat for racing. But having an exhaust pipe 3" from my hip while sitting on HWY 75 N Dallas during rush hour in 100+F ? not a chance.

Very cool concept keep sending the updates.
Hey where the jack hole!!! :laugh:
 
Thanks gents! I got a ton of work done today, but I'm off to run errands with the fam. I'll try to get pics up tomorrow morning.

Mckinney Chris:

I'm actually in Frisco, though as far west as one can be and still be in Frisco. I'd love to see your spridget sometime.

--Chris
 
texas_bugeye said:
Thru the tunnel is pretty neat for racing. But having an exhaust pipe 3" from my hip while sitting on HWY 75 N Dallas during rush hour in 100+F ? not a chance.

Yeah, pretty much a racing-only deal, my response was more or less to Tony's repsonse about racing. On this car gorund clearence should be alot better, however I would probably notch those new tubing renforcment rails for a exhaust system.
 
Ok, a big update! I need to get back to work, so I'll keep this short. have a look at my website for the details. Basically, I finally got all the supports fully welded. I also (anxiously) cut out the gearbox tunnel. Luckily, nothing moved.

framea.jpg


frameb.jpg


framec.jpg


framed.jpg


framee.jpg


framef.jpg


frameg.jpg


frameh.jpg
 
framei.jpg


Also, I made my SWA car into a RWA car. Dug very kindly gave me a template from a gen I spridget, and I used a modified version of that. It worked perfectly; cheers Dug!!

For those interested, a SWA car has wider openings due to the square arch being proud of the fender itself. This means that the wheel opening needs to be about 2" larger. I am highly anxious to see if this looks good. God I hope it does!


wheelwellsa.jpg


wheelwellsb.jpg


wheelwellsb.jpg


wheelwellsc.jpg


wheelwellsd.jpg


So, obviously, I need to weld in a 7/8" wide piece to complete the fender. Basically, tie the inner fender to the outer fender. I'm out of the country on Thurs for a 10-day vaction, so it will have to wait until I return.
 
The sill for a SWA and RWA car are the same so why did you cut the back of the sill off? It looks like the template is on backwards - the BE has a return after the wheel.
 
I held the template to the car, and they are not the same. On my car, the rounded corner is on the rear. Oh, I see what you're talking about. I did that for profile purposes. I had to smooth just a bit off it.

--Chris
 
Back
Top