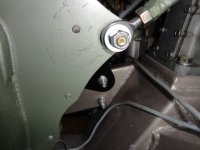
• Hi Guest!
    You can help ensure that British Car Forum (BCF) continues to provide a great place to engage in the British car hobby! If you find BCF a beneficial community, please consider supporting our efforts with a subscription.

    There are some perks with a member upgrade!
    **Upgrade Now**
    (PS: Subscribers don't see this gawd-aweful banner
Tips
Tips

norman nock fan shroud

Hoghead

Jedi Trainee
Offline
Can someone please post a pic of a Norman Nock style fan shroud

I bought one for my BJ8 from Kilmartin but all that I received is curved plate to go at the top of the rad over the fan blades - surely there is more to it than this.

How to mount this curved plate to the rad without drilling holes in the rad header tank?
The Kilmartin Fan Shroud is a two-piece unit. There's a Left and Right. The piece between them at the top is the original radiator Fan Shroud and it is soldered into place. Sounds like you go the wrong part.
 
How to mount this curved plate to the rad without drilling holes in the rad header tank?

As noted by Patrick this stock fan shroud [" curved Plate "] is soldered to the header tank. Based on your comments it seems that this part was missing on your car.?
 
Here is mine installed. There is a bracket on the bottom of the left and right pieces that attaches to the lower radiator bolts. I put a screw in the top of the left shroud piece into the standard top shroud to stabilize it. Cannot do it on the right side because it stands proud of the radiator hose.
 
I have the same shroud extensions, but I affixed the side pieces under the top shroud with two #10-32 screws each side. The R/H side clears the top radiator hose (just barely).
 
I have the same shroud extensions, but I affixed the side pieces under the top shroud with two #10-32 screws each side. The R/H side clears the top radiator hose (just barely).
Here's mine. I installed two 10-32 screws because I felt it better than just one because of the location and the fact that the factory fan shroud is only soldered on.
 

Attachments

  • DSC02009.JPG
    DSC02009.JPG
    146.5 KB · Views: 232
  • DSC02010.JPG
    DSC02010.JPG
    143.7 KB · Views: 213
  • DSC02011.JPG
    DSC02011.JPG
    144.8 KB · Views: 222
  • DSC02012.JPG
    DSC02012.JPG
    143.1 KB · Views: 212
  • DSC02015.JPG
    DSC02015.JPG
    138 KB · Views: 240
I improved on the stock sketchy design with a stretcher bar to push the two halves outward and maintain tension without screwing them to the shroud. Also made sheet metal closures to seal the gaps on either side of the radiator, as well as the gaps around the tank lip. The ends of the accessory shroud pieces are underneath the stock shroud. The stretcher bar pushes the ends outward and upward against the stock shroud.
View attachment 33823View attachment 33824
Copied from previous post in another thread.
 
Although I appreciate that a tightly encircling fan shroud is more efficient, I have found it to be unnecessary if a good radiator, unpressurized overflow, more aggressive fan then original, sleeve thermostat, and some easy additions are put in place. As I understand, the purpose of a fan shroud is to curtail air from leaking of the end of the fan blades and to tightly direct its flow. For those not incorporating fender vents or hood louvers, at speed, the engine compartment in the Healey builds a high pressure area and reduces flow through the radiator. An aggressive fan with a shroud will perform much better than an aggressive fan without a full shroud but pressure buildup will still take place and defuse and block proper directional air flow. This condition becomes exacerbated at speed when substantial air volume is pushed to enter between the radiator and frame cross member and between frame members into the forward portion of the engine compartment.

To diminish some of the underlying issues, I have taken an alternate approach and installed a simple set of vertical 4" panels along the sides of the radiator, a simple light weight panel attached to the frame bottom covering the forward portion of the engine compartment from the cross member to 6" before the pan, and a soft panel covering the lower radiator tank to the bottom attached panel. The purpose of the lower radiator cover and bottom panel is to prevent, or at least diminish, air from entering the engine compartment from below and building the high pressure bubble. The 2 vertical 4" panels attached to the side of the radiator are there to diminish air leakage from the ends of the fan blades (as a fan shroud) and direct inward air flow. Although relatively simple and inexpensive, these modifications are functionally efficient and inconspicuous. My experience has been that during 90+ degree day parades or high temperature speed runs, I have not overheated.

Although I don't diminish the benefits of a full fan shroud, I also can't see that it improves the presentation of the engine compartment or addresses a major underlying issue. As, I believe one of the members had stated, Keeping a Healey cool requires a radiator with a much robust core and an aggressive fan.

For those interested, a small article with detail (https://drive.google.com/file/d/0Bx4EjcJmfaScY0NLdlB0YjEwRFE/edit?usp=sharing).

All the best,
Ray (643BJ8P1)
 
Ray,
Thank you for the link to your paper on the cooling system. Very well done improvements!

Would like to add a few comments:

Radiator Cap – the stock cap can be used for recirculation with the addition of a thin rubber gasket. See:
https://www.pbase.com/stevegerow/image/126925316
I made this one, but some higher-pressure Moss caps come with the gasket, which can be easily transferred.

Stacked fin vs Folded-fin radiators – the original type radiator is around half as efficient at heat dissipation compared to the modern folded-fin replacement, although the older type is stronger.

Moss thermostat bypass blanking sleeve – in warmer climates where warmup time isn’t a factor, couldn’t the blanking sleeve be permanently fitted in addition to a normal or fail-open thermostat?

Testing for hot air recirculating – I fitted a bilge blower to my fresh air duct and it blows hot air, illustrative of the leakage from behind the radiator to in front. Am curious if your radiator side-baffles will prevent this. Since they're easy to fabricate, I may make a set and see how they work.
 
Ray,
...
Testing for hot air recirculating – I fitted a bilge blower to my fresh air duct and it blows hot air, illustrative of the leakage from behind the radiator to in front. Am curious if your radiator side-baffles will prevent this. Since they're easy to fabricate, I may make a set and see how they work.

If you haven't insulated the fresh air duct, it will pick up significant heat as the air travels through the engine compartment. I put a 3" aluminum dryer duct, wrapped with thin foam insulation inside the fresh air duct. It makes a significant difference.

I also have side baffles in front of the radiator, rather than behind. They are aluminum and extend forward to the back of the grille.
Got photos that you can post John?
 
Steve,

To answer your question on the use of a bypass as a permanent application(with a standard fail-open thermostat), it would sound logical to me as thepurpose of the sleeve is to block the bypass and the loss of as much as 25%radiator cooling effect when left open. My only concern is that the lastI read, the Moss offering was meant for an MGC and I don't know if there is adifference that would affect a Healey implementation (although the same unit islisted for use in a Healey).

Additionally, a Forum (this or another) member mentioned that it is possible tomove the lower radiator mount forward 1/4"-1/2" to provide additionalair flow intervention and increased radiator cooling. Although I have nottried this and can't validate its positive results, the presenter indicatedthat this minor adjustment would leave sufficient space between the fan and theradiator.

All the best,
Ray (64BJ8P1)

 
Steve/John,

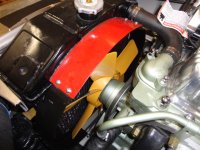
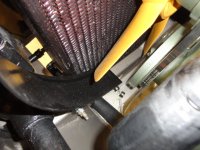
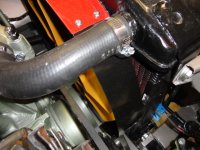
When initially installed, the ambient temperature was relatively temperate and the air coming through the cold air vent was as cool as expected. During the summers hottest days, and when participating in a Memorial Day Parade, I found that again, the temperature was as hot as expected since the ambient temperature was over 90F. Later, when using the blower through varied outside temperatures, I began to note that I was receiving only warm-hot air and decided I must be pulling air from the engine compartment and not from outside. As a test, I attached a piece of drier vent duct to an interior side of the grill and loosely attached it to the screen of the cold air duct with tape. This test indicated that, as initially thought, air was being pulled from the nearby area radiated by the radiator and possibly the engine compartment. My preliminary conclusion was drawn as the result of experiencing cooler then previous temperatures emitted from the cold air vent with the use of the drier duct and, during a short drive, the cooling result was even more dramatic.

John, I can't argue with your results, however, I have found the air exiting the cold air duct, accelerated by the bilge blower, is moving sufficiently fast as not to pick up much of the engine-radiated heat and is most likely being drawn in hot. Without the blower creating the increased air draw, the cold air emanating from vent is both insufficient to pull in the hot air even though its slower movement could give it time to pick up more heat from its pass-through surroundings. My conclusion is that the fan's increased draw is actually and pulling the hot air in.

My next project is to further examine a reasonable way to capitalize on these experiences, however must be postponed for a few months as I am due for an operation on my "throttle" foot. My initial thoughts are two fold, I do not expect that sealing air flow between the engine compartment on the left side of the radiator bulkhead and around the inlet of the cold air duct would be practical or completely possible so moving the air inlet forward, as in the initial experiment, would be the most promising approach. The placement of this inlet must be selected to allow clean cool air to enter the duct, whether stationary or on the move, with the least of alterations that can be easily and quickly reversed to recapture authenticity.

Your thoughts would be appreciated, so that the delivered document can be corrected and extended to meet reader expectations.

Ray (64BJ8P1)
 
Last edited:
I currently have my radiator and grille out preparatory to installing my Fiat dual master cylinder.

Will be making air intake duct extensions to reach between the intakes and the grille. The idea being to intake cool air and not recirculated hot air as is now the case as described above.

I agree with Ray - with a fresh air blower, the hot air flow is constant and don't believe it's being heated by the headers during its very brief passage through the intake duct.
 
I don't have the fresh air blower, yet. It's on my to-do list, along with an idea to get some of that cool(er) air to the passenger's side.
 
Back
Top