
 Hey Guest!

 Hey - did you know if you click on the title of a thread it will take you to the first unread post since you last visited that thread?
 but were afraid to ask:
  STOP!! Never post your email address in open forums. Bots can "harvest" your email! If you must share your email use a Private Message or use the
  smilie in place of the real @
 Pretty Please - add it to our Events forum(s) and add to the calendar! >>
bthompson
Jedi Warrior
Offline
It all started because I wanted a more accurate temp gauge.
So I got one off of the 'Bay. When I went to install it, after pulling the steering column and half the gauges, I figured, "Well, I've gone this far, I may as well pull all the gauges and clean them up..."
I may as well pull the dash...
I may as well order a new dash cover...
I may as well sort out the wiring harness...
I may as well clean all the vinyl...
You know, I may never have everything apart like this again. I may as well order some Eastwood vinyl dye and brighten the interior...
I may as well put new carpet in to match the vinyl...
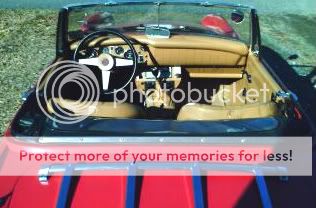
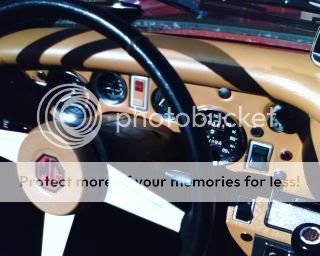
So here's what the end result of a new temp gauge is! <span style="font-style: italic">Everything</span>, from the dash to the horn button, the column surround to the shift gaiter, the seats to the doortops, has been re-dyed camel color. Autumn leaf looked too brown, biscuit too pale. I may have the only camel MG dash in the world. :banana:
The carpet is from the Home Depot, just a cheap outdoor carpeting, but the color matched well, and the diamond pattern added some nice visual interest. I sewed the whole thing myself, and it fits every curve like a glove. The <span style="font-style: italic">entire </span>thing is snapped in, even the rear shelf and wheelwells. No glue here: easy to take out and clean (or mop out).


So I got one off of the 'Bay. When I went to install it, after pulling the steering column and half the gauges, I figured, "Well, I've gone this far, I may as well pull all the gauges and clean them up..."
I may as well pull the dash...
I may as well order a new dash cover...
I may as well sort out the wiring harness...
I may as well clean all the vinyl...
You know, I may never have everything apart like this again. I may as well order some Eastwood vinyl dye and brighten the interior...
I may as well put new carpet in to match the vinyl...
So here's what the end result of a new temp gauge is! <span style="font-style: italic">Everything</span>, from the dash to the horn button, the column surround to the shift gaiter, the seats to the doortops, has been re-dyed camel color. Autumn leaf looked too brown, biscuit too pale. I may have the only camel MG dash in the world. :banana:
The carpet is from the Home Depot, just a cheap outdoor carpeting, but the color matched well, and the diamond pattern added some nice visual interest. I sewed the whole thing myself, and it fits every curve like a glove. The <span style="font-style: italic">entire </span>thing is snapped in, even the rear shelf and wheelwells. No glue here: easy to take out and clean (or mop out).


 Here's my method. I just worked panel by panel, bit by bit, and did one or two a day. I started on the unseen bits to get a feel for the technique first. (Over the wheelwells, under the door, etc.) By the time I got to the dash, it was a piece o' cake. :thumbsup: