• Hi Guest!
    You can help ensure that British Car Forum (BCF) continues to provide a great place to engage in the British car hobby! If you find BCF a beneficial community, please consider supporting our efforts with a subscription.

    There are some perks with a member upgrade!
    **Upgrade Now**
    (PS: Subscribers don't see this gawd-aweful banner
Tips
Tips

TR2/3/3A Motor mount replacement

GTP1960

Jedi Knight
Offline
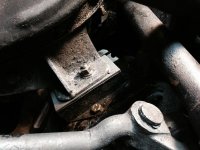
My old motor mounts were probably the original ones & had seen much better days, however, ( & surprisingly) though the top mounting plates were completely broken free from the rubber base, the car ran very well, with no noticeable vibration. Even after the tranny conversion.

During the process of converting to a TR6 type A OD tranny, I realized it was time to replace the mounts.
My problem originated with the passenger side mount alignment.
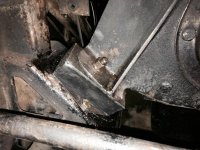
no matter what I've tried, ( levering the engine, jacking & moving, loosening bolts ,etc.)
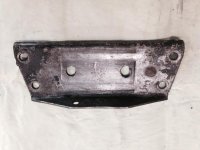
I can only get the front bolt in that base plate and it is out of alignment by about 1/4".
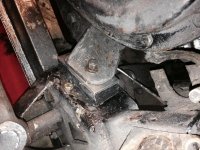
the formats of the plates are correct.
i have the drivers side mount bolted in correctly.

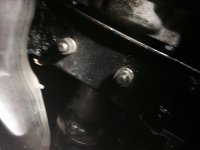
my current solution is to clamp the back flange of that plate with a heavy duty Stanley J1P1-HD mini-clamp. But I envision a short life for the mounts & worry about the engine alignment.

comments appreciated!
 

Attachments

  • image.jpg
    image.jpg
    66.9 KB · Views: 123
  • image.jpg
    image.jpg
    85 KB · Views: 122
Try placing a jack under the center of the front frame crosssover. This should flex the frame outward just enough to insert the last bolt. Of course, the upper crossover support will have to be loosened or removed.
 
Maybe I do not understand... but are you fixing the mounts to the engine side, then trying to bolt them to the frame side?

I have always raised the engine and fastened the mounts to the frame first - then lowered the engine first over one mount then the other somewhat rocking the engine (and leaving the first mount nut very loose) to coax the engine front plate over the stud on the other mount.
 
Geo,

yes, I fastened to the engine first. After trial And error, that way worked best for me.

how did you rock your engine?
did you have on a jack or suspended from a hoist?

i am using a jack.

Thx.
 
I do the mounting like you and bolt the mounts to the engine first. I do keep everything loose until everything is started. You probably saw that the mounts cannot flip flop they have to go in one way. I often use a tapered pin to help line up the holes and yes those mounts are always wanting to sage down into the wedge they rest in.
 
Geo,


i am using a jack.

Thx.

Take the jack out from under the engine and put it under the frame center. This will act to spread the frame so the mounts will settle into the wedge. Again, you will have to loosen the frame upper cross support to allow the frame to spread....
 
The TR6 transmission is slightly longer than the TR3 unit. If you have the transmission bolted up to the mount, the engine mounts will not be properly located. For correct alignment, the solution is to unbolt the transmission, attach the motor mounts and then slot the transmission mount holes to compensate for the difference in length. The driveshaft has enough free play on the splines to satisfy the difference in transmission location.
 
Thx John,

i just tried jacking the center frame & removing the upper cross piece. No change in position.

i am coming to the unpleasant conclusion that the engine is just pushed to far forward, probably due to the 6 tranny.
(note the torque in the drivers side engine mount)

i probably need to slot that rear tran. Mounting plate.
 

Attachments

  • image.jpg
    image.jpg
    90.8 KB · Views: 101
  • image.jpg
    image.jpg
    43.6 KB · Views: 109
Yeh I missed the fact you put in the bigger trans.

Me too...that's a whole 'nother set of issues!

You could always slot the engine mounting plate holes...but, then, I guess you run out of clearance on the radiator. Unless you are running an electric fan?
 
I'd better go with the "tried & true" method of slotting the trans. Mounting plate.
( irritating because I paid an arm & leg to have the transmission conversion done by a "professional")
my motto is " if you want it done right, spend a lot of money to have it done, then re do it yourself"
 
Yeah, well that "professional" probably got under there with a spud wrench and wracked the trans till it fit. That might be why your motor mounts are broken.
 
Well, it was the back trans. plate causing my problem.
Not only were the bolt holes to far forward but, it also has a substantial back flange that restricted the necessary push back of the tranny. To access the trans. plate requires removing seats, carpet, & hump. But on the other hand, it gave me a reason to restore the base of the seats & hump.

I had an epiphany while working on the plate: instead of cutting or bending the big back flange , I flipped the plate over so the flange was facing down and thought I was pretty smart, however I still need to modify the (new ) small front flange by trimming it down a little, as the transmission rest on it slightly.( don't want it scraping a hole in the housing).

so in short I --am moving forward, all-be-it one babystep at a time.
BTW: I did get the front mounts sorted correctly & Feel very good about that.

thx again for all the input
 

Attachments

  • image.jpg
    image.jpg
    48.4 KB · Views: 112
Back
Top