• Hi Guest!
    If you appreciate British Car Forum and our 25 years of supporting British car enthusiasts with technical and anicdotal information, collected from our thousands of great members, please support us with a low-cost subscription. You can become a supporting member for less than the dues of most car clubs.

    There are some perks with a member upgrade!
    **Upgrade Now**
    (PS: Subscribers don't see this gawd-aweful banner
Tips
Tips

motor installed

John,

<div class="ubbcode-block"><div class="ubbcode-header">Quote:]The RR's were discussed in more detail in the earlier parts of the thread. [/QUOTE]

Thanks for pointing me to the earlier postings in this thread. /bcforum/images/%%GRAEMLIN_URL%%/cheers.gif

With all of the other shovels-full-O-cash needed to finish the BN4.. the roller rockers will wait until I can justify the expense, although, based upon your performance observations, the law of diminishing returns seems to kick in pretty quickly for that investment... /bcforum/images/%%GRAEMLIN_URL%%/wink.gif
 
Keoke said:
Well John, thats one way to do it. However. for the bulk of the listers I want to dispell the complex task of mating the Tranny up with the engine in the car. IMOP, it is much easier to do as nothing moves but the tranny under your command. I will admit that you must be capable of lifting a complete tranny to accomplish this task. Mating up is contingent on your prparation work. I use a spare Pilot shaft to insure the spigot bearing and the clutch disk are aligned spot on. Further, in support of this method ,you certainly are not going to pull the engine tranny just to replace a clutch or its supporting items. So get use to it, after the first time its a piece of cake.--Fwiw---Keoke- /bcforum/images/%%GRAEMLIN_URL%%/cowboy.gif

Just jumped back in again on this thread. As the man said - a piece of cake. I would add that it is much easier with two people, one under the car doing the guiding and the other feeding the tranny in from the top, and yes you might have guessed it - the use of the timber plank. The engine has to be tilted insitue- back end up and I lodged the plank under the jack that tilts the engine and on an axle stand at the other end ( near the cross of the cross member) , this gave a steady platform to slide the tranny on and feed straight into the clutch, it is customary to twiddle the drive flange at the rear of the tranny to engage the clutch splines with the first motion shaft. QED And remember, follow up by bolting the bell housing to the engine flange straight away do not leave it till the next day, it could end up straining the first motion shaft. - Then go and have a beer and congratulate yourself.

Bob
 
Bob Hughes said:
I would add that it is much easier with two people, one under the car doing the guiding and the other feeding the tranny in from the top, and yes you might have guessed it - the use of the timber plank. The engine has to be tilted insitue- back end up and I lodged the plank under the jack that tilts the engine and on an axle stand at the other end ( near the cross of the cross member) , this gave a steady platform to slide the tranny on and feed straight into the clutch ...

How do you pick who gets to be the one who goes under? /bcforum/images/%%GRAEMLIN_URL%%/lol.gif

Since I need to 'get used to it' how about Keoke, Dave and others tell us step by step how you remove and/or replace the gearbox by yourself. I'm curious if y'all are using hoists and trans jacks or planks of wood and just 'man handle' the box in place. Also if you have the car up on jack stands for the job? Do you pull one or both the seats? This should be good for the archives so don't leave out any details.

Cheers,
John
 
Hi John,
It's not too bad with two people. Since there was only one of me, old & weak at that, I did it the hard way. I have a roll around lifter but unlike yours, the wheels are too high to let it go under the Healey, so I used a ceiling mounted "chain tugger." The roll around is still handy for other uses. Yours apparently has very low wheels.

Transmission removal --- See pics --
1- Support the back of the engine on a floor jack with it's rollers fore & aft.

2- Remove seats & all interior obstacles. I even removed the steering wheel before it went back in.

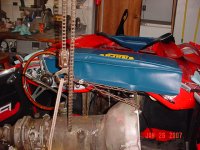
3- Placed a temporary drop center cross member (3/8" by 2" by long enough to span the frame members under the front of the transmission, for temporary support.

4- Unbolt the transmission, remove drive shaft etc.

5- Slide the transmission back & rotate it to clear the firewall opening. The U support holds up the front.

6- Slide the transmission back far enough to turn it sideways.

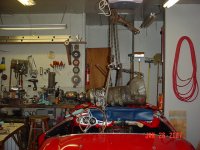
6- Attach a lifting sling to it.

7- Raise it high enough to clear the car. In this case I couldn't lift it high enough to clear the windshield & didn't have enough room to roll the car forward, so I removed the windshield & rolled the car back & out from under the transmission. (8 1/2 ft. ceiling.)

8- Changed hoists & rolled the hoist & transmission over to the work table & lowered it onto the table.

9- Installation is the reverse!!!

In retrospect, couple of comments. Starting with the back end of the car into the stall first, it wouldn't have needed to be lifted so high & the windshield could have stayed on.

When removing the engine There was the same lack of lifting height problem. The engine wouldn't clear the front shroud. I had to remove the front wheels, lower the floor jack, & use it to roll the car back & out from under the engine.

The "Oberg" tilt lifter takes up more lift height than necessary & a simple chain attached to the engine or transmission is adequate. The "Oberg" is now in the unused junk corner.

It could have been easier, & most folks would have less trouble.

Some years ago I pulled & replaced a Chrysler Hemi with transmission attached using the same setup & had no trouble at all.

To move the engine, transmission, around the shop I set it on an old "Champion Spark Plug" creeper of the wooden oak variety. These things will take a tremendous amount of weight. I even moved the Hemi around with it. Also, moved a 13" X 40" metal lathe on two of these creepers.

I think this covers the "high points".
D
 

Attachments

  • 8488.jpg
    8488.jpg
    148.4 KB · Views: 127
  • 8489.jpg
    8489.jpg
    152.2 KB · Views: 110
Hi John, I get the priviledge of being both on top as well as underneath,ain't never had no helper.

Here are the essential items required:

1} Several old phone books to cover the door cill.
2] Card board over the carpet on the floor.
3} 4 good jack stands.
4] One $20.00 small floor jack and one full size.
5] Short length of 2 X 4 ,
6[ Two fan belts to use as tranny lifting handles one small Dia and one standard size.

End of the story ,like I said earlier it's a piece of cake. /bcforum/images/%%GRAEMLIN_URL%%/grin.gif

OH ! Iorgot to mention if i'm in a hurry 4 Hrs to change out a clutch.
 
Keoke said:
Hi John, I get the priviledge of being both on top as well as underneath,ain't never had no helper.

Here are the essential items required:

1} Several old phone books to cover the door cill.
2] Card board over the carpet on the floor.
3} 4 good jack stands.
4] One $20.00 small floor jack and one full size.
5] Short length of 2 X 4 ,
6[ Two fan belts to use as tranny lifting handles one small Dia and one standard size.

End of the story ,like I said earlier it's a piece of cake. /bcforum/images/%%GRAEMLIN_URL%%/grin.gif

OH ! Iorgot to mention if i'm in a hurry 4 Hrs to change out a clutch.

Thats what I like about Keoke

He's all man ! !

By the way just for reference it is said that the rally crew changed Pat Moss's clutch in one hour, but there were a few of them.

Bob
 
Dave and Keoke .. thanks for all the good tips.

My back likes the idea of using a lift. A narrow but solid Transmission jack would also make the 'aligning part' go much easier.

Hopefully, I don't need to take it out for awhile but it's nice to know that when I do, I'll just give Keoke a call and he'll have the job done in 4 hours. /bcforum/images/%%GRAEMLIN_URL%%/grin.gif

/bcforum/images/%%GRAEMLIN_URL%%/cheers.gif

John
 
I too appreciate all the info and views expressed on this subject. /bcforum/images/%%GRAEMLIN_URL%%/cheers.gif

Should make re-assembly much easier. /bcforum/images/%%GRAEMLIN_URL%%/thankyousign.gif

Sopp
 
/bcforum/images/%%GRAEMLIN_URL%%/savewave.gif

But, But, But---OH well just be sure I'm Ina hurring mood the day you call.--Keoke-- /bcforum/images/%%GRAEMLIN_URL%%/grin.gif
 
Hey guys and gals,

After a 5+ years of restoration, I was able to get the Healey out on the road for a little test drive today! There are a few issues left to deal with on the motor .. mainly tuning and tweaking but it felt great to run it through the gears, take a few corners and even the brakes felt great. The interior is sparce right now but it shouldn't take too much more to get it road worthy.

There are so many people to thank for helping out over the years but in particular want to give a shout out to Greg, Dave, and Keoke here on the forum. /bcforum/images/%%GRAEMLIN_URL%%/bow.gif And thanks Basil for hosting this great forum /bcforum/images/%%GRAEMLIN_URL%%/banana.gif

Cheers,
John
 
So, how about a photo of you and your baby on the road (or at least the driveway)!

D--n, you beat me! My engine is in and started last Friday. Interior is done, but I now have to put the front shroud, wings and doors on the frame/substructure.

Way to go, John. I bet she is gorgeous.

Lin
1960 BT7 in restoration
1959 Bugeye
 
Excellent, a milestone to be sure! I’m not surprised it went well though, with your attention to details. Did you get the wheels aligned? I can bring my alignment tools down this Saturday after I’m done at Antonios.
 
WooHoo! I know that feeling (first time my car was legally driven on the road__and over 25 MPH__in 21 years was this past August).

Yes John, all we've seen are detail shots, how about some of the whole car and proud restorer?
 
Reid .. I'd be glad to put together an article once I wrap up the 'details'.

Lin .. not sure I can claim to have beat you. I wasn't exactly 'street legal' considering the bonnet was off, no license plate, etc. Glad to hear you are entering the home stretch too!

Greg .. would love to check alignment. That would be great if you could drop it off on Saturday. I can't promise you a ride yet .. I sent off the oil/water temp gage to MOMA yesterday so longer jaunts will be at least a few more weeks away.

Randy .. Yesterday's 'sneak a ride' was done without paparazzi but I will make sure to document the next outing. Hope by then to have the bonnet and front grille installed as she feels a bit naked without these parts (and don't want to leave too much to your imagination! /bcforum/images/%%GRAEMLIN_URL%%/grin.gif )

Cheers,
John
 
GregW said:
I’m not surprised it went well though, with your attention to details.

To be honest (and to help others out) the motor 'issues' were perplexing. I pre-oiled the motor but got no oil pressure on the gage after many cranking attempts. I pulled the filter and saw oil pumping out (good). I then watched the rockers. Found a big leak under the banjo and replaced the copper washer. Then I was getting oil to the rockers but still none on the gage. I PM'ed Dave Russell who suggested to check the gage with air pressure. I rigged up my air compressor to the gage and found out the gage was broken (was working before the restoration).

So I went to Pep Boys and bought a cheap gage to temporarily replace the Smiths unit. Finally I get oil pressure on cranking. Installed the plugs, crossed fingers and it fired on first try!

Ran the motor for 20 minutes at 2000 rpm. I did stop the motor once at 5 minutes because the water temp gage was not working and I was concerned about motor temperature. I had my wife use the hand held digital temperature gage on various areas around the temperature sensor and report the readings. I was also running a large shop fan in front of the radiator and kept the heater on max with the blower running. Anyway, I ran the motor for 15 more minutes and almost got sick from all the blow by and exhaust gases that were filling the garage (despite the open door of course). The motor was running pretty rough and obviously too rich but most disconcerting was rather low oil pressure (below 20psi once warmed up despite the 2000 rpm).

I conferred with Dave again and he suggested checking the oil relief valve and doing a compression check. The compression check showed 175-185 on all cylinders which means the rings had seated well. The pressure relief spring, although new, only measured 2.4" when the spec. is 2.68" I added a .27" nut behind the spring and upon restart had 60 psi at 2000rpm and 40 psi at idle! These numbers dropped by 50% after fully warm but I'm using straight 30 wt. for break-in oil so a change to 20-50w should help there.

Still to work on .. I have tried three different types of float needles on the front carb but still have some weeping from the float lid. This carb appears to be running rich as the the exhaust manifold temperatures are much lower than the rear manifolds. I also have an oil leak from the rear main area. Might be the round felt strips on the rear main bearing cap so will drop the pan and work on this area (and yes Greg .. you warned me about this area but I didn't think I could do anything after the main caps were installed)

Anyway .. live and learn.

Cheers,
John
 
John Loftus said:
I sent off the oil/water temp gage to MOMA yesterday so longer jaunts will be at least a few more weeks away.
So is a short jaunt dictated by how long it takes for the anti-freeze to squirt out where the temperature bulb usually screws in?
 
GregW said:
So is a short jaunt dictated by how long it takes for the anti-freeze to squirt out where the temperature bulb usually screws in?

We can go for a longer ride if you plug your finger into the dike (er .. hole). You don't mind sitting on the valve cover do you? Make sure you wear some pants made out of micro fiber .. wouldn't want the paint of the valve cover to get scratched! /bcforum/images/%%GRAEMLIN_URL%%/jester.gif
 
Back
Top