• Hey Guest!
    British Car Forum has been supporting enthusiasts for over 25 years by providing a great place to share our love for British cars. You can support our efforts by upgrading your membership for less than the dues of most car clubs. There are some perks with a member upgrade!

    **Upgrade Now**
    (PS: Upgraded members don't see this banner, nor will you see the Google ads that appear on the site.)
Tips
Tips

Masters Headlamp Wiring Harness

Brosky

Great Pumpkin
Offline
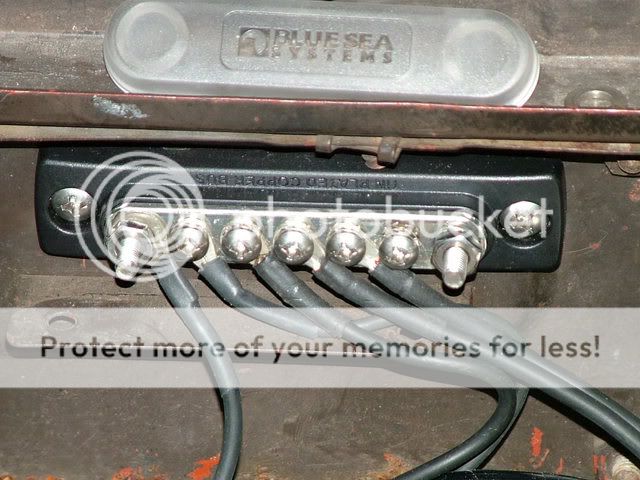
Well, thanks to Mike Masters, we are able to start the wiring process while the engine is out of the car. They do make a great quality product.

As luck would have it, there is a spare terminal on the red battery cable harness and that will be the perfect place to add this harness. We can fish the yellow power wire back through the firewall and out through the other side to connect right in with nothing exposed. The rest will be wrapped and run along the fender wells and the front of the car.

Erik began the new installation and hopefully, I will have blow by blow account on my web site detailing this later next week.

The harness for the Spal electric cooling fan will also be done along with this unit.
 
See? I told ya it was a blue/white wire!

But uuummm? Why are there no wires running thru
the firewall to the column switch and low bean switch?

Just wondering is all.

Oh yeah! If ya find a source for them "light up"
fuses, buy a bunch and send me some. I haven't found
any locally.

d
 
Paul, what feeds that harness, not stock wires I hope. Is that harness independent of the rest of the harness, totally?
And what about the headlight switch. The aftermarket (big 3) switches are notoriously cheap. Does Dan offer that as well?


Still want to know how in the heck you pulled the engine and left the tranny in place, and how in the heck do you plan on getting it back in place, stabbing it into the clutch and all. Please 'splain.....inquiring minds want to know..
 
Bill,
If the Masters headlight kit is anything like his whole harness, and it looks like it is, the relays take the load off of the headlight switch. That's one of the advantages of his whole wire harness. Lots of relays to take a load the switches don't do very well. As least that's how this 60 yo brain remembers what Dan told me 3 years ago.

And I bet Paul puts that engine back in very very carefully...that engine bay looks beautiful.
 
Bill,

The harness is feed power by the big yellow wire to the right, which will run directly to the solenoid/battery cable plug.

And I quote from the Master (literally) himself:

"HEADLIGHT RELAY KIT

Want to upgrade to a set of high powered headlights, but don't want to upgrade the rest ofyour wiring? Then this is the kit you need. (please note: our "power block" wiring harness kit is designed to handle headlights up to 110 watts each, so this kit isn't needed with our harness kit). This kit is designed to stand alone, so you may purchase and use this kit to add high powered lights to any car, whether or not you also have our power block harness system installed. The kit includes two relays, one for the high beams and one for the low beams, and four lengths of heavy gauge wire, all prewired and assembled. Each filament is wired and fused individually from the relays so there is no splicing or "daisy-chaining" required."
 
And Bill,

If I told you how we got the engine in and out with the tranny right there, I'd have to erase your memory like they did in "Men In Black".

Just look at the pretty red light.... that's it...just a little closer....

Actually, we got the secret while studying rock formations in Roswell, NM. There was this loud humming noise, a big flash and then the answer was so obvious. Funny, it seemed to be about 3 or 4 hours later than our watches showed.....
 
<div class="ubbcode-block"><div class="ubbcode-header">Quote:]If ya find a source for them "light up" fuses, buy a bunch and send me some.[/QUOTE]

Dale,

What "light up fuses"? Remember that I have no power to anything yet, so I know nothing of the workings of the Master's masterpiece. The battery is still in plastic and will be until the end of the week.

I did order an extra set of relays and fuses from Mike when I ordered the harness.

If they are available locally, I'll certainly send you whatever you want. Just give me the amperage and colors (to be sure) of what you want via email and I'll get them for you.

And I don't think that we need to go that far inside to tap into the wiring from the switches. I'll know more later in the week. Stupid job getting in the way of car progress again.
 
Stupid kid on the block question-

Are you sure all six blue wires run to the front
of the car? Like you have them laid out in your photo?

When I installed my Power Block harness, I ran one
blue/white and one blue/red thru the firewall to the
headlight switches. I ran the other four blues to the
headlights.

PS- Don't forget to install ground wires on each headlight.
Mine did not function until I installed grounding bars.

d


grounds.jpg
 
No, I'm not sure. Erik just mounted the fuse block in a convenient spot and we began to talk about the location of the Spal harness/relays for the radiator fan and I had to get back to my real job. These are just laid out for preliminary thought process and ideas about running neatly. Notice that the yellow (12V source) is heading to the front, when it will be going the opposite way when finally run?

I do know that if you unplug the wiring connectors in the harness at the front of the engine compartment, down near the bottom of the grille, there is a very easy way to tie these into the harness with the bullet connectors that come with the kit. More on that next week.

Any work on Lucas electrical systems requires verification of good grounds. I learned that one the hard way. Several times....
 
You could put a bus bar right where that ground on the front clip is. I did that and it's immensely comforting to see everything screwed and bolted in place...
 
Good point Alan. After we get the Spal harness laid out, we'll decide, but that sounds as good as any a spot. I want to get everything in there neatly and not all cluttered looking.
 
There is enough width on the ridge right where the ground tab is to put a mini bus bar in.

It looks very pretty, and you can run separate grounds to all the lights - if you undo the stock front harness, it's linguini central in there with the grounds tieing together.
 
Dale is right. Only four wires from the harness goto the lights, two for L/R low beams, two for L/R high beams.

Of course you need the ground, but I fashioned a ground terminal up for the front and ran all the ground wires to it... sort of like what Dale did only I used one bolt for everything.

The other wires, go into the firewall and connect to the existing light switch/dimmer switch. The existing wiring now only exists to supply the relays the tiny bit of voltage they need to turn on and off.
 
Thank you Shannon and Dale and Alan.

I need a break from my day job to have more time with my play job.
 
alana said:
There is enough width on the ridge right where the ground tab is to put a mini bus bar in.

It looks very pretty, and you can run separate grounds to all the lights - if you undo the stock front harness, it's linguini central in there with the grounds tieing together.

My version different location. I also have 1 at the front grounding location.

DSCF2099.jpg
 
Yo Paul-

Mike uses fuses that "light up" when they are burned out. Slick!

While it's true I know almost nothing about auto mechanics,
I DID sleep at a Holiday last week!

A piece of advice. Mike's wires are much better than the
originals. You should install Mike's new blue/white and
blue/red wires down to the headlamp dimmer switch in the
driver's footwell.

You should be able to find the existing bullet connector
for the existing blue/white wire that runs to your high beam
indicator light bulb in the dash gauge. Chop out that bullet
connector, use the existing blue/white and new bullet connect
with new blue/white. That will save you messing behind the dash.

You should be able to keep the existing column switch power
wire to dimmer switch. Again, that will save you from messing
behind the dash.

Hope this helps. Remember, measure twice, cut once and dry fit
all your wires before you install the bullets.

d
 
They're called "Smart Glow Fuses" and the Masters' power block is full of them. The idea being that when a circuit pops the fuse glows for easy identification. The downside is they cost about $2 apiece so Dan recommends putting regular old fuses in when you test your power block with power for the first time. Once everything checks out, put the smart glow fuses back in.

THe little bump on the top lights up if blown.
l_10-0003-outlined.jpg
 
when I put relays on my headlights I think I used the wires from the dip switch going to the head lights under the hood so I didnt have to go back throught the fire wall, I found the Hi beam wire and low beam wire ran to the relay as the signal wire and then ran heaver gauge wire to the head lights from the relay and a power wire to the battery and a ground, I made a diagram to help me get it straight but cannot find the diagram.
 
Hondo,

That would be pretty much what I suggested in my earlier post.

Dale, I will weigh those thoughts of yours and probably go in that direction.

Don, where did you get that nice grounding bar, with the plastic base?
 
Back
Top