• Hi Guest!
    You can help ensure that British Car Forum (BCF) continues to provide a great place to engage in the British car hobby! If you find BCF a beneficial community, please consider supporting our efforts with a subscription.

    There are some perks with a member upgrade!
    **Upgrade Now**
    (PS: Subscribers don't see this gawd-aweful banner
Tips
Tips

TR2/3/3A Mad Max seal

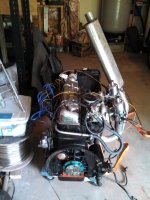
I installed the Alexander seal with complete success. I slipped the spring over the boss because I didn't want to take the spring apart. Nervous making but it didn't seem to stretch out. Otherwise followed the directions and then I used the flywheel bolts (gently hand tightened) to push the seal into place. Waited 2 days for the silicone (high temp red) to set up. Assembled with the lock tabs and ran the engine on the ground.
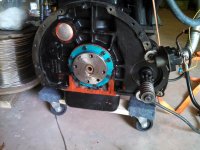
Homemade muffler to keep the wife happy. Removed the flywheel (Attached is a picture) to check for leaks which there were none.

Right now I am trying to decide what bolts to use on the flywheel/crank. The self locking (moss #320-770) are a bit shorter and designed to work without the lock tabs.
I micked up the clearance and the standard bolts without the lock tabs will definately scrape the seal. I am leaning towards using the self locking with the lock tabs and blue loctite but I haven't done it yet.
 

Attachments

  • IMG_20150708_132401_459.jpg
    IMG_20150708_132401_459.jpg
    46.2 KB · Views: 77
I'm still not clear on the theory of that Viton seal. It fits into the housing of the aluminum seal, and little sealant is recommended. But the crank is spinning through it. Won't it tend to spin the Viton seal with it, silicone or not? I'm in no mood to disassemble mine and start all over, but the High Temp Silicone Red coating I used on the two halves of the aluminum seal (sparing to avoid fouling the drain holes) hardly seems enough to hold the seal from spinning under load. Maybe after a few miles it seats itself better, but I just don't quite understand the theory.
 
OK. First, I bought the seal kit from Joe Alexander https://the-vintage-racer.com/index.php/categoryhome/engine-components/product/53-vsk-t34 which comes with the centering tool and an instruction sheet. With this kit, I didn't need to enlarge the drain hole as per page 2. Item 7 on page 3 deals with fitting the spring. I gently worked the spring over the crank boss first, then fitted the split seal aroung the crank ans then with a small thin hook pick I was able to slide the spring around the seal lip into place. On page 4 where it calls for pushing the seal into place in the aluminum ring, Joe's instructions call for sliding thin shims to force the seal into place, others have used wood wedges, I used the flywheel bolts gently tightening them by hand to push the seal in. I asked Joe about this trick and he seemed OK with it. I also glopped red silicone all around the seams between the bearing cap and the block and everywhere else I could think of. See my attached picture and good luck.
 

Attachments

  • IMG_20150708_132350_052.jpg
    IMG_20150708_132350_052.jpg
    71 KB · Views: 63
I'm still not clear on the theory of that Viton seal. It fits into the housing of the aluminum seal, and little sealant is recommended. But the crank is spinning through it. Won't it tend to spin the Viton seal with it, silicone or not? I'm in no mood to disassemble mine and start all over, but the High Temp Silicone Red coating I used on the two halves of the aluminum seal (sparing to avoid fouling the drain holes) hardly seems enough to hold the seal from spinning under load. Maybe after a few miles it seats itself better, but I just don't quite understand the theory.
The inside and outside diameters are chosen to give more friction on the outside than on the inside. Plus, the seal-to-crank joint gets lubricated, which greatly reduces friction there.

The silicone is just extra insurance, the seal should stay put even without it. But the lube is kind of important as otherwise the seal may overheat before engine oil works it way into the joint.

BTW, both Kas Kastner and Carroll Smith had unkind words to say about lock tabs. If necessary, you can trim the end of the stock early bolts to fit.

Also worth noting, perhaps, that Loctite comes in many dozens of formulations, and many of them are blue. Loctite 243 or 2422 would both be more appropriate here IMO than the 242 you'll get at some places if you ask for "blue Loctite".
 
Hi Randall
I think that I'll use the self-locking bolts and grind them down a bit just to make sure. Good tip on the loctite.
Thanks.
 
I ordered the new ARP place bolts for the flywheel that do not take a lock tab. The "look" awesome, but I measured them, and they are .05 too long. They'll just barely scrape the Viton seal. Can I add the little curved tab plates to take up the space? Maybe I'm supposed to use them anyway? You know, the ones that don't have a lip to bend up? Moss 837-560, but with rounded corners and no bend-up tabs? That's what I had on there originally.

BTW, Randall, are you saying, in other words, that as long as I got the seal in there correctly with a little silicone, the squeeze fit is good enough, and lapping it up with silicone is not required? Because I certainly only smeared a very thin coat. I did, however, grease the crank pretty good.
 
I am not sure what you are measuring. The ones I got from Moss #320-770 were shorter than the stock ones. Anyway what I just did was to put a dab of grease on the end of the bolts and then snug them down without the lock plate. After removal you will be able to see if they bump up against the seal or not. Check to make sure the seal is already in as far as it will go. In the end, I ground off one thread just to be safe. Randall: Is the blue permatex threadlocker as good as the loctite 243?
 
Actually, I'll probably grind one thread off, too. Even that lockplate I mentioned won't take up .05 inches.
 
I have no experience with the Permatex threadlocker; but it probably works OK. The data sheet they give is pretty vague, it just says things like "breakaway torque decreases as temperature increases, however the assembly remains effective" and "the product retains effective qualities in contact with automotive fluids". My impression is that it is equivalent to the Loctite 242.

Loctite 243 also says things like it will work without the use of primer on "passive" metals (Permatex suggests to always use a primer), and that it will work in the presence of minor oil contamination on the threads. And it's rated to work at a slightly higher temperature (180C vs 150C).

https://www.permatex.com/component/...rmat=raw&filename=24240.pdf&market=automotive
https://tds.us.henkel.com/NA/UT/HNAUTTDS.nsf/web/96FA02BC2AE06C5E85257E49004D92EA/$File/243-EN.pdf
 
Just out of curiosity and because I already had the flywheel bolts off, I measured the depth of the bolt holes to the seal. The minimum measurement was .915" the other ones were slightly more with the maximum being .920".
 
The fly wheel bolts are very worthy to check and shorten them 1 or 2 threads that they are flush with the crank surface.
I've read you force the spring over the crank mounting flange.
I wouldn't do this.
The spring can be opened like a screw. Just a turn an it is open, or closed.

Cheers
Chris
 
Hi Chris I put one of your seals on my engine and I opened the seal up by pulling it apart some to get the seal over the flange. Pulling the spring open made me feel a little uneasy, but everything work out fine. Perhaps you can post a picture of what you mean by opening up like a screw. Are you suggesting rolling the seal on by twisting the seal open then around and around like I would be threading the seal on like a nut on a bolt over the flang.
 
The seal lip is very sensitive to scratches. Sliding over the crank flange could damage the seal because there could be sharp edges or dirt evident.
The proper way is, to remove the spring, open the seal, push the seal on the crank at the bearing journal. Then open the spring, wrap the spring around the crank journal, close the spring, slide the spring into the lipseal notch. Then open the seal with the spring in place and put it to the rear end of the crank and take care that the lip never touches the scrolls.

attachment.php


There you can see the little thread of the spring.
 

Attachments

  • 20150915_171357.jpg
    20150915_171357.jpg
    13.3 KB · Views: 87
Back
Top