• Hi Guest!
    You can help ensure that British Car Forum (BCF) continues to provide a great place to engage in the British car hobby! If you find BCF a beneficial community, please consider supporting our efforts with a subscription.

    There are some perks with a member upgrade!
    **Upgrade Now**
    (PS: Subscribers don't see this gawd-aweful banner
Tips
Tips

TR2/3/3A Low Port Head Cracks

Well Keith, you called it on your first post. The stud hole with the coolant (in the picture) is cracked. On the TR3 I didn't pay close attention to the studs. I assumed they were all "wet", as in surrounded with coolant, like a big block Chevy. They are actually completely dry. The crack is from the cooling jacket to the stud. Coolant passed through the crack to the stud and then went up the stud hole in the head to the valve gallery.

Bummer.

I found the crack right where you and KK spoke of, so thanks for the tip. I still need to clean the rest of the block and look it over closely. If this is the only crack...I can fix it. If there are any more, I'm done with this project...
 
Take a good look at the front one also, they seem to be the ones that crack. Sorry that you found a crack and lets hope it's the only one. I would hate to see a TR2 project end. You may want to walk away for awhile and re-think what's next.
 
I hope this isn't the end of your project as well. Perhaps you could locate a cheap replacement block in Texas (there's a total stripped one near me for $5 for example).

Scott
 
Thanks Keith, Scott. Marv's head arrived today. I'll work on that a bit while I ponder the cracked block situation. I've got a couple questions specific to machining the old heads.

The "new" head will need a clean-up of the deck surface. I noticed the intake valves on the 83mm heads is back cut into the side of the combustion chamber. It appears this is necessary due the smaller bores in the 83 mm cylinders. So, as the head is decked, the material below this back cut intake will be made thinner...and at some point will open up the size of the combustion chamber. Is this a problem? At some point does this breach into the the head gasket sealing bead?
 
You don't want to shave to much off that it leaves a sharp edge in the undercut area. This can lead to a hot spot and cause run-on, or detonation. The edge will get red hot and ignite the fuel vapor after you shut the car off. Somebody that knows more about head rebuilding will have to answer your other questions.
 
That's what concerned me. Do you have any idea how much is too much? If it does turn sharp, can it be ground back to thicken it up, or is the gasket too close? I tossed the gasket that was on the car...I wasn't expecting this much of an issue. I read through the Roger Williams restoration book. He seemed only concerned about the compression ratio, and did not mention the intake fly cut at all.

I've searched through the archives, and there is little about decking the heads. One post talks about a "max .165"...but I don't know where the poster came up with that number. Plus, that sounds beyond extreme for a skim.

This is uncharted territory for me. I can't tell how much the heads have been decked, and cannot find any info on what's acceptable. The old math problem with too many variables to solve!?!
 
OK John, this was my experience with my original TR2 head. The correct thickness must be measured. Original thickness was 3.330 inches. My head had 3.215 left, showing that .115 had been skimmed. My understanding was that .115 is pretty much to take off. I rebuilt with 83 mm liners to keep it original, and used a thicker solid copper head gasket to keep my compression where it should be. I used a .084 inch thick gasket instead of the standard .040 inch size. Now everything is fine, but it was a journey.

Dan

P.S. please don't give up on your project!
 
Thanks, Dan. Using your numbers, neither head has ever been decked...and with what you were able to deck, I'm way good! That makes me much more confident. I also went through the Williams book even closer. Buried in one of the illustrations he mentions unshrouding the intake fly cut for better performance. So, that implies that when the ridge gets sharp during the decking procedure, I can remove the ridge.

Good news...thanks to all of you for the tips!

Just an update on the block situation. The TR2 block is cast with number 31140. It has no casting date that I can find anywhere, at least not still dirty. Marv's parts car has a block cast number of 31435, and does have a date cast. I can rebuild the TR2 using the newer block...but would prefer not to, as it becomes an obvious mismatch. I will try to save the original block.

I will have to grind out the crack, which is about 1 inch long, and into the metal up to the stud threads. Researching every welding technique there is...it'll have to be cold welded. There are to many precision bores that could be screwed up by heating the entire block above 500 degrees, like I am used to doing. The chance of warpage, even if the weld is successful , is not worth the risk. For any of you guys into the details, the welding will have to be done in very short bursts, DC, low current, high nickel rods...immediately peened and then allowing the bead to completely cool before running the next bead. The block cannot be allowed to heat above 120 degrees during the operation. Because of the location, I'll have to build above the level of the top deck of the block, so the whole top will have to be skimmed back down. The stud hole will also have to be re-tapped.

I think I can fix it, but it is far from a sure thing.

If any of you welders out there have any ideas...I am open to suggestions...
 
John

Here is some advice on welding blocks to address cracks. i will say that you should consider a new block. They are not too expensive, and with a low port head you will be spot on for the basic correct engine, but with the benefit of camshaft bearings. Here is the advice from an English mate:

Cast iron is what blocks are made from, it's very brittle and very difficult to repair because if you try to weld it, cracks will radiate from the weld. Almost always, the only safe course of action is to buy another, but if it's irreplaceable there are experts who can repair, but at a price, and they use two methods.


1. Cold stitching. This is a process of drilling and tapping along the line of the crack and screwing studs into it and also drilling at right angles as, every 1/4' pr so and pressing in a steel tie that pulls the crack edges together. It's highly skilled and used to save marine engines more than anything, because they won't usually come out of the ship they were built into. It's very strong and effective, but expensive and needs a highly skilled person to do it. Sometimes they even stitch in new metal.


2. Welding. This is a difficult and very risky operation because localised heat will cause distortion and may start off a chain of cracks. Therefore it is normal practice to put the whole block into a furnace and raise it to a dull cherry red over 24 hours or so and then gas weld the cracks. Once the repair has been made, cooling has to be carefully controlled and make take a day or two. Usually, if this is successful, some distortion will have occurred and line boring of the mains and camshaft bearings and surface grinding the top of the block will be necessary.


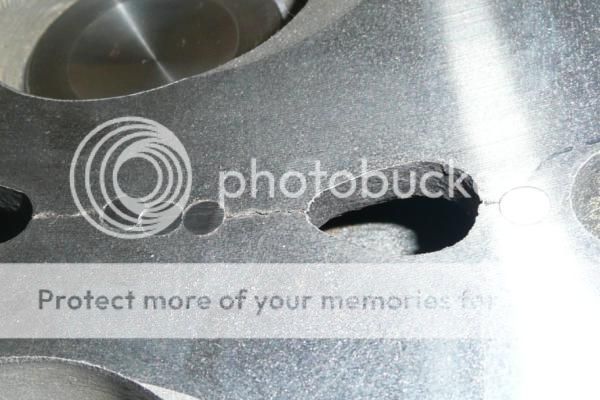
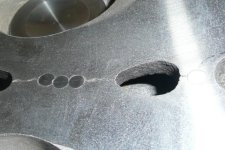
Warnings. Old blocks tend to fatigue, so if cracked in one place, may be about to go in others. At the time the TR engine was designed, blocks weren't rigid and if run at high revs for any time, the main bearing caps would move around on the joint face and sump bolts would loosen, so lots of stress. In the case of this one, old age and very large studs with 100 Lbs ft of tension on them, have caused the metal to give way, so it's probably scrap.
 
Thanks, 2Long. You hit it spot on!

I researched the stitching, and it is very interesting. I don't think it would be possible in this case, as the crack is on the inside of the water jacket. I see no way to get a drill in such a confined space to drill the stitches.

Your description of the heating process is also spot on. I've used that many times on heads, as afterwards all you have to do is skim it, give it a valve job and away you go. I don't think heating the entire block would be a good idea. It would likely warp the main bearings, cam bearings, sleeve holes, along with the front, top and bell housing mating surfaces.

Many years ago, when I was really into building engines, I found a local company that does ion-nitriding. I begged them to do my block, as in theory, the bores would never wear out after the nitriding. After pestering them for months, the manager finally gave me his reason. Apparently Rusty Wallace's NASCAR team had already had the same idea and got them to try it. They provided a half dozen high-dollar blocks to work with. Ion-nitriding elevates the temp of the block to about 500 degrees. All 6 blocks warped and were unusable. They were too hard to machine after the process, and the heat warped every one out of tolerance.

I will have to attempt the cold welding.
 
Holy cow...I just ordered the Nickel welding rod! I have not been this shocked since the last time I bought R22 for the house. The nickel is up to $90/lb! They must be pulling this stuff out of meteors!
 
Just an aside on the subject of stitching... this is what I found the first time I pulled the head off the TR4:

CrackofDoom_zps589d04b2.jpg


The machinist who was doing the head pronounced it to be excellent work and said it would be fine -- and it has been no trouble in the 10 years since. Can't prove it, but I have reason to believe that the repair (and the .040 over bore) were done before the car left Coventry.
 

Attachments

  • CrackofDoom_zps589d04b2.jpg
    CrackofDoom_zps589d04b2.jpg
    40.2 KB · Views: 82
Geo, your picture got me wondering, so I sent a picture of my crack to Lock n stitch. (I probably could have worded that better). They said it was marginal for stitching, but they have a sealed thread insert that works like a stitch. The threads on the outside of the insert are saw-tooth shaped, so as the insert bottoms it draws the bolt hole inwards...instead of forcing the iron out. The rest of the crack can remain as-is, similar to your head crack It's definitely not cheap...but I have a kit on the way.

What sold me on the stitching is that if I weld, then the metal will be hardened to much to try stitching later. But stitching doesn't rule out welding. If this goes well, I will try stitching the cracked head. Some of the examples of stitching I've seen are pretty amazing. More to follow...
 
OK...next question...

I recieved a head gasket from Moss that is labelled "TR4". I need one for the TR2 heads. Is there a difference between the 83mm liner head gaskets and the 86mm head gaskets?
 
I believe the 86mm gasket is supplied for and works fine for all bores up to 86mm.

I have certainly used the 86 on smaller bores.
 
Ditto
 
Back
Top