• Hi Guest!
    You can help ensure that British Car Forum (BCF) continues to provide a great place to engage in the British car hobby! If you find BCF a beneficial community, please consider supporting our efforts with a subscription.

    There are some perks with a member upgrade!
    **Upgrade Now**
    (PS: Subscribers don't see this gawd-aweful banner
Tips
Tips

TR2/3/3A Looking for helpful hints for door hinge screw removal

Joel Lester

Senior Member
Country flag
Offline
Hi guys!
Doing a frame off restoration on my '58 TR3. Got her all stripped down and getting ready for removing the body off the frame to get it sand blasted.
The one thing I'm stuck with (literally...) is those darn door hinge screws in the A post. I don't think they've ever been removed. I can't get them to budge.
I suppose I could use the old adage "if it ain't broke... don't fix it". They seem to work fine but it would be nice to have that added adjustability for perfect door gaps all around the door.

I certainly can't be the only guy to struggle with this problem. What did you guys do? Drill them out? Use heat? Or... just leave well enough alone?
Thanks in advance for any advice,

Joel
 
The big gun is a hammer driver:


If that finally strips the slots on the screw, then you have to drill the heads off. Once you remove the body, you can access the nut plates from the front side of the A pillars...or drill out the remainder of the screws once the doors are removed.

You will become very proficient in drilling out screws during a TR restoration! You will need a good set of taps to clean out the nut plates.
 
Excellent! Thanks so much. That brings up one more thing... when you mention the set of taps to clean out the treads. What size do I get? All those square nuts in their respective cages is what I really want to make sure are clean and smooth once I reassemble.

Joel
 
Those nuts are mostly, if not all, 1/4 x 28. I found it better to replace most of them. Just pry up one of the "flapped over" sides of the cage and insert a new nut.
Bob
 
+1 1/4-28 will cover at least 3/4 of the screws on the entire car. When you get into the body mounts, 3/8-16 and 24, 7/16, and 1/2 coarse and fine would be good to have. Normally the best value is in a tap and die set. They normally rip you off on onesies and twosies.

Most of the smaller threads switch to BA series.
 
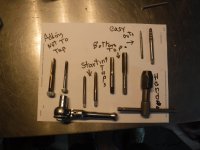
A small set of taps fine thread and a small set of what are called easy outs. A small set of drill bits The taps to chase the threads. Note there three types of taps STARTING RUNNING and BOTTOMING AS for the easy outs They look like a tap that has been twisted . You drill a under size hole in say broken bolt and twist the easy out into the hole CCW this will unscrew the broken bolt . In your case drill out the head of the hinge screw drill a small hole and insert easy out. See pic adding a nut to tap press on with a vice faster than tap handle. The cost of these few tool will help you in your project and pay for them many times over. And some WD 40 to start

Madflyer
 

Attachments

  • DSCF2481.JPG
    DSCF2481.JPG
    3.6 MB · Views: 176
My experience with easy outs is that they are not so easy. When the bolt is frozen, easy outs (particularly in the smaller sizes) will snap before overcoming the thread corrosion. I have had numerous instances of this, but the most memorable was on a wrung bolt holding the tappet door to the side of a 1940s Jeep flathead 4. Had to pull the engine and take it to a machine shop. Rigged it sideways on a drill press, ending up boring the block hole oversize, plugging it and drilling and tapping the plug. Like taps, easy outs are very hard and not machinable with ordinary tools.

To borrow a phrase from an old humor song "don't do it, mon".

Bob
 
If you have managed to get the doors off then you will have the front fenders removed and have access to the caged nuts on the A-pillars so you can go with all of the above. Heat the nuts use a good flat blade screwdriver give it a few good hits with a hammer, spray the hot nuts with CRC use multi grips on the handle, and go for it. If you have to drill them out don't drill into the countersunk screw holes in the hinge plates.

Graham
 
The set from HF is not worth getting. They may have better sets now but the one I got is mainly junk.

David
I got one from HF a few years ago.
Sixty pieces in NPT, Metric and SAE.
I found the important parts like the taps and dies are good.
The thread guide is impossible to live without.
Learned the importance of thread cutting oil before I got this set.
I even squirt the inside of the case occasionally to make sure nothing gets crusty.
The tool holders, handles, braces and such are total c..p.
I was able to customize some but some just broke so got tossed.
 
As far as loosening stuck fasteners, here is what I found:
There is never one universal solution.
I keep about five different types of penetrating fluid in my shop.
Most of them even work in a few minutes.
Heat can be useful but also dangerous and sometimes melts things in the neighborhood.
Sometimes tightening a fastener will un-stick it.
If a nut is stuck on a bolt or screw, just break it off and start with a new one.
EasyOuts can leave you with more problems than you started out with.
Drilling out the old fastener MUST be done accurately or you will surely screw the pooch.
If you can't hold the part in a vice on a drill press, think of another way.
Start with a small bit and only increase the diameter if you are still centered.

I got a tap & die set with Sixty pieces in NPT, Metric and SAE from HF a few years ago.
All the important parts, like the taps and dies are good, and even the 4-40 tap hasn't broken yet.
The thread guide is impossible to live without.
Learned the importance of thread cutting oil before I got this set.
I even squirt the inside of the case occasionally to make sure nothing gets crusty.
The tool holders, handles, braces and such are total c..p.
I was able to customize some, but some just broke so got tossed and replaced with domestic brands.
 
I use a hand held impact driver I think Craftsman. I heat the bold or screw red hot and then use the impact hammer. IMHO the best way to use the impact driver is in a tight hand grip; hold the impact driver still and firm and that way when you smack it with the 2lb or more hammer the cam of the impact drive spins that little bit this combined with the force of the blow of the hammer and the twist of cam has the best chance of grabbing the slot and giving it that little break free twist.

If you see the screw head move just a little put some more penetrating oil on it and leave it for a while. Composure and the proper angle with the hammer are important when removing the screws. Maybe the next day after soaking, I will try and loosen some more. Moreover it is important to turn the screw back tight that little bit to work lose the rust. Go back and forth with tightening and loosening by hand while adding the oil to work off the crud.

steve
 
not sure if this will help but I have used my mig and an old screw driver and wielded the two together the heat helps break it free.it has worked in the past with striped heads on screws
 
You can get a set of thread restorers for arountd$100 or less. It will contain what look like taps/dies for SAE fine, SAE course and metric along with thread files. Thread restorers or chases don't cut the threads like taps do but clean up deformed threads and remove debris from threads. I have just about worn the hinges off the case they come in. Some of the best tool money I've spent.
 
I reread my post and I was not clear. I let the screw cool off before I try and loosen it. Good luck you will probably have to do all the above also

steve
 
Back
Top