• Hi Guest!
    If you appreciate British Car Forum and our 25 years of supporting British car enthusiasts with technical and anicdotal information, collected from our thousands of great members, please support us with a low-cost subscription. You can become a supporting member for less than the dues of most car clubs.

    There are some perks with a member upgrade!
    **Upgrade Now**
    (PS: Subscribers don't see this gawd-aweful banner
Tips
Tips

Group statistics

Members:
18
Threads:
1725
Messages:
4214
Discussions:
3
Photos:
113

Latest posts

Group events

Photography

Light meter

waltesefalcon

Yoda
Platinum
Country flag
Offline
Howdy fellas, I've got a photography question for ya. I am thinking about picking up a cheap light meter. I don't have any experience with these, so I am wondering: is there a big difference between brands, are there any I should just avoid? Are they kinda like test lights, where they are all about the same and the $10 one from NAPA is about as good as the $100 Snap-On?
 
Following. I have never used an external light meter myself as all of my cameras have built in meters.
 
How are you thinking you are going to use it? There are two types. Incident and spot. Incident meters read how much light is hitting what you are shooting. So it you were taking a head-shot, you'd want to have the meter right by the person's face pointed at the main source of light to take a reading. Spot meters measure the amount of light that is reflected from the object of interest. These can be used close up or at distance.
Both types can read flash if you want to pay more.
I have both, but with digital cameras and instant viewing of what I shot, the meters haven't been out of the case for years.
 
Last edited:
Great question Greg. I believe that a spot meter is what I'm looking for, since virtually all of my photography is outdoors in natural light.
 
Great question Greg. I believe that a spot meter is what I'm looking for, since virtually all of my photography is outdoors in natural light.
What Camera do you have? Most newer cameras have built in light meters.
 
I have a Nikon D7500, it has a light meter built in. This is just so I can learn more about photography. I sometimes feel like I got into the hobby twenty or thirty years too late, because my camera can do everything itself. All I really have to do is point and shoot, I don't need to know the first thing about photography to get decent photos with this camera.
 
Greg defined it. We could likely match our collections of hand-held meters. Mine live in storage, too.

With your camera, the built-in meter is likely as, or even more accurate, than a hand-held external one for anything you will likely encounter. It is "calibrated" for the camera's sensor. You can set it to read anything from the entire frame, to spot-reading a small area of it.

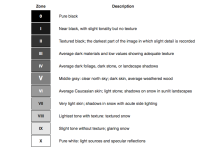
A better learning tool (and a LOT less dollars!) would be to get an 18% gray card and use that, in conjunction with the camera's meter to get a good reading. To get a fair understanding of what the different variables do, start with the camera in manual, card in the same lighting as the subject, aim the camera at the card (Doesn't even need to be in focus), dial the possible variables to get the "0" of the camera's meter in line, depending on whether you want DoF to be deep or shallow (by setting aperture first), and whether the subject is moving or not (using shutter to stop motion first). Better to set your ISO at something like 400 or 800 as a "constant" to start with and work inside that constraint... and even though your DSLR is capable of some really amazing things itself, there are still some limitations and compromises that revert back to basics.
 
Thanks Doc, this is what I needed. I run the shutter speed and aperture manually all the time, but have found that setting it to auto ISO yields better photos for me. I'd like to learn more about lighting to be able to set the ISO a little better on my own.
 
As it turns out, the D7500's meter can function as a spot meter. The focus point you use doubles up as the light meter when in spot meter mode. I always just use the center focus point.

In the film days, a box of film came with a set ISO. Depending on what you wanted to shoot, that type of film was loaded. Outdoor in the sun, ISO 25-100. Dim indoor events, ISO 3200 was about the fastest film you could get. So ISO was the first thing set on your camera. That gave you a range to shoot in by adjusting the shutter and aperture.

Then some guy named Ansel came along and gave the range, zones of exposure. Each zone was a stop. He also came up with a definition of what each zone looked like. Tone and or texture. By using his chart, you can look at an object and decide how far off what you metered the object should be exposed for.

Writing this, I'm thinking about buffaloes. Looking at the chart, I'd say a buffalo is somewhere between zone 2 and 3. Zone 3 would be two stops below what was metered on said buffalo. So I'd stop down 2 stops. The meter always gives zone 5.
 

Attachments

  • zones.png
    zones.png
    39 KB · Views: 2
Thanks Greg, this chart and the 18% grey card I just picked up will help me immensely. Not having started this hobby back during the days of film I often feel at a disadvantage knowledge wise. All I have to do is let my camera do the work and my photos look good.

I don't so much mind my camera doing some of the heavy lifting for me, but goal is to develop an understanding of photography that is deeper than just knowing how to set my camera up and then click. Often I will pretend that its the 90s and I have a roll of 200 film in my camera. I will go out and take no more than 24 exposures and not look at my photos until I am home and upload them to the computer. Then I can check and see the setting for a decent photo and try to figure out how all the legs on the triangle work. Learning with the tools that I have been given here will help a lot. Once my landscapes start looking good, maybe I'll move on to wildlife.
 
Good morning from snowy NJ ! Back in the days of film and manual cameras, lots of emphasis was placed on the Sunny 16 rule. That is F/16 and the reciprocal of the ASA(ISO) for bright sunny days. If you were using Kodak Tri-X black and white (ASA 400) the shutter speed would be 1/400 (ish) at F/16. Again manually you open up a stop to get more exposure, or give it a shutter speed a bit longer.
I have always said that one should start out with a manual film camera, a roll of film and think that you are shooting a weapon with a 20 round mag. Make every shot count.
 
I may have mentioned before, can't recall. But the palm of your hand will read at VERY close to 18% gray. In a pinch, if you need a reference setting, that works fine. And again, it need not be in focus to get a light reading.
 
Walter, I commend you limiting your shutter count. So many people today are trigger happy. Then they have to go through all those photos. I'm on a photo site where a guy was talking about what to keep and what to delete from his backups. He'd shoot 1000 shots a day with a 90% rejection rate on the 1st cull. So he wasted more than 900 shots, but he was storing all that on two backups.
 
Just a thought. While you're exploring exposure, you could set the camera up to bracket the shots. What this means is holding down the shutter, the camera will take several shots. The 1st exposure would be what you metered, 2nd underexposed, 3rd overexposed. There are several options in bracketing. You can choose aperture or shutter to change so you can learn the differences. Your camera can even bracket color temperature.
 
The "Spray-n-Pray" rapid fire "CH" setting seems to be a salvation for lots of folks.
Learning anticipation/timing is a holdover from the film days. When doing sports photos or covering an event, limited to twelve exposures and changing flashbulbs, you develop a sense of when to hit the shutter to get that "money shot".

I do admit to now using "CL" with the frame count limited to three, usually can limit to only one frame easily. A "learned behavior" from the F3/MD-4 days. Makes ya lazy! :ROFLMAO:
 
Back
Top