• Hi Guest!
    You can help ensure that British Car Forum (BCF) continues to provide a great place to engage in the British car hobby! If you find BCF a beneficial community, please consider supporting our efforts with a subscription.

    There are some perks with a member upgrade!
    **Upgrade Now**
    (PS: Subscribers don't see this gawd-aweful banner
Tips
Tips

Left my key on for 5 hours and wont start, UGG!!!!!!

Hi Doug, will try this now. Ill first try the way john mentioned above then do what your pointing out and post back in a min...


At the coil, remove the high-tension lead going to the distributor cap.
Remove the spark plug wire and plug for cylinder #1 from the engine and from the dizzy cap.
Plug that wire into the center terminal of the coil, seat the spark plug in the other end of the wire, then rest the plug on the cylinder head. (I prefer this to holding the wire next to the head as suggested above. I've been bitten too many times).

Now have someone crank the engine while you watch for a spark at the plug resting on the head.
If you do see the plug sparking, that says the coil and module are working. That means the problem is in either the rotor, cap, or main high-tension lead lead.
If you do not see a spark there are a few potential problems to check for...
Did you remember to fit the Pertronix magnet ring under the rotor?
With the wires removed does the coil still have about 3 Ohms across its low-tension terminals?
Is there a ground wire present between the breaker plate and the dizzy housing?

BTW, Steve G. and I have been told different values for the Pertronix overheat time. He was told 45 seconds, I was told 3 minutes, others I know have been told 5 minutes. Regardless, it's a known problem. Whenever I need to work on something that requires leaving the ignition on I unplug the Pertronix red wire first.
 
Notekkaa
If you have a Rotor which contains a rivet regardlss of its color , prior to use drill the rivet out and fill the small void left with JB Weld.

Rotors with rivets shorten the insulation path to ground and cause ignition failures.
 
Last edited:
At the coil, remove the high-tension lead going to the distributor cap.
Remove the spark plug wire and plug for cylinder #1 from the engine and from the dizzy cap.
Plug that wire into the center terminal of the coil, seat the spark plug in the other end of the wire, then rest the plug on the cylinder head. (I prefer this to holding the wire next to the head as suggested above. I've been bitten too many times).

Now have someone crank the engine while you watch for a spark at the plug resting on the head.
If you do see the plug sparking, that says the coil and module are working. That means the problem is in either the rotor, cap, or main high-tension lead lead.
If you do not see a spark there are a few potential problems to check for...
Did you remember to fit the Pertronix magnet ring under the rotor?
With the wires removed does the coil still have about 3 Ohms across its low-tension terminals?
Is there a ground wire present between the breaker plate and the dizzy housing?

BTW, Steve G. and I have been told different values for the Pertronix overheat time. He was told 45 seconds, I was told 3 minutes, others I know have been told 5 minutes. Regardless, it's a known problem. Whenever I need to work on something that requires leaving the ignition on I unplug the Pertronix red wire first.

Even Pertronix doesn't state a given amount of time to incapacitate their system with the ignition "ON" and not running. I do exactly what you said.... remove the red wire when I need to work with the ignition in the ON position.

Screen Shot 2019-07-02 at 5.33.52 PM.jpg
 
Thanks my friend, ill do that tomorrow for sure!!!

Notekkaa
If you have a Rotor which contains a rivet regardlss of its color , prior to use drill the rivet out and fill the small void left with JB Weld.

Rotors with rivets shorten the insulation path to ground and cause ignition failures.
 
Hi Doug, will try this now. Ill first try the way john mentioned above then do what your pointing out and post back in a min...

Hi Doug!

I removed number 1 wire from the cap. Plugged it directly into the coil and grounded the plug to the head and no luck. The magnetic ring is on, and its actually a spare, there is 3 oms across the coil terminals when nothing is connected (new coil) and the ground wire, braided, is connected to the plate. I also tried to take a jumper wire from the dizzy housing directly to the neg on the battery and no difference....

I did also notice that on the coil when the key is in the on position, all terminals register 12.09 volts, so both sides of the coil + and -. I think thats by design and as the rotor turns it cuts ground for spark?
 
Is there a trick to the little graphite piece in the cap that has the spring? Is it supposed to come in contact with the rotor?
 
I did also notice that on the coil when the key is in the on position, all terminals register 12.09 volts, so both sides of the coil + and -. I think thats by design and as the rotor turns it cuts ground for spark?


"...all terminals register 12.09 volts."
If the module is NOT conducting (equivalent to points open) then both terminals should be at battery voltage.
If the module IS conducting (equivalent to points closed) then coil (+) should be at battery voltage and coil (-) should be at ground potential (0 volts).

Either resting the spark plug or holding the plug wire just above ground should have allowed you to develop a spark if the Pertronix module was working.
Try the following which SHOULD at least confirm that the coil is working OK.
Set up the spark plug resting on the cylinder head again.
Remove the Pertronix black wire from coil (-).
Make a jumper wire about 6" long and connect one end of the jumper to coil (-).
Switch the ignition to the run position.
Hold the jumper wire by its insulation and tap its free end to the dizzy housing while watching the spark plug.
Each time you LIFT the jumper wire off the dizzy housing you should see a spark at the spark plug.

If you see a spark, the coil is working OK.
If you do not see a spark, there is something wrong with the coil or power to it.
 
Hi Doug, thank you and everyone else very much for all the tests!

Heres a link to a quick video of the test i did and if i did anything incorrectly, please let me know...

I removed the ground wire from the pertronix, made a jumper, connected one end to the coil - side. I put the plug in one of the wires, placed it on the head and when i touched the second end of the jumper to the dizzy housing, it sparked on the housing and no change with the plug. Im thinking that makes sense since i see 12v from the - side of the coil and if that hits something with ground it should happen?

Anyway, its not a victory but feel awesome to see some sparks even if they aren't the ones we want after two days of oil priming activity, ha!

https://youtu.be/esGwwRaOykA


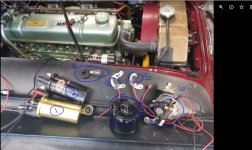
For parts i have, take a look at this pic... We have a couple healeys so always nice to have some extra stuff laying around. If i can test in anyway, let me know..


Capture.jpg

1. Coil that got smokin hot
2. Older used coil (the one in there now is out of a box)
3. New ring and rotor (the one in there now is the fancy red one)
4. Pertronix I think i cooked
5. Pertronix that is new but not the right base plate
6. New dizzy that wont fit

I did order a new pertronix ignition to replace number 4. Someone has to keep pertronix in business :>)

"...all terminals register 12.09 volts."
If the module is NOT conducting (equivalent to points open) then both terminals should be at battery voltage.
If the module IS conducting (equivalent to points closed) then coil (+) should be at battery voltage and coil (-) should be at ground potential (0 volts).

Either resting the spark plug or holding the plug wire just above ground should have allowed you to develop a spark if the Pertronix module was working.
Try the following which SHOULD at least confirm that the coil is working OK.
Set up the spark plug resting on the cylinder head again.
Remove the Pertronix black wire from coil (-).
Make a jumper wire about 6" long and connect one end of the jumper to coil (-).
Switch the ignition to the run position.
Hold the jumper wire by its insulation and tap its free end to the dizzy housing while watching the spark plug.
Each time you LIFT the jumper wire off the dizzy housing you should see a spark at the spark plug.

If you see a spark, the coil is working OK.
If you do not see a spark, there is something wrong with the coil or power to it.
 
Last edited:
I know I write too much. I'm sorry. However, I write as much as I do to hopefully give someone an understanding of what is supposed to happen and how things work. I'll try and be briefer in this post.

From the video it looks like you still have the high tension lead from the coil going to the distributor cap. What I suggested you do is to place a spark plug wire directly in the coil's high tension terminal, put a spark plug in the other end, and rest that on the cylinder head. Doing this eliminates the dizzy cap, rotor, and plug wires as possible sources of the problem.

Since you have the right-angle dizzy cap, try this as a simplification to what I said earlier.
Have ALL the spark plug wires connected and going where they would normally go.
Trace the high-tension lead from the coil to the dizzy cap.
Locate the screw securing that wire to the cap, loosen the screw, and remove that wire.
You now have the coil with a high-tension wire dangling and not connected to anything.

Disconnect both Pertronix wires.
Configure the low tension wires as before (black jumper on coil (-), wire from the ignition switch on coil (+))
Turn the key to the run position.
Hold the dangling high-tension lead with a clean, dry shop towel such that its loose end is 1/8 to 1/4 inch off the cylinder head.
Now tap the jumper wire against the dizzy housing.

Each time you lift the jumper off the dizzy housing you should see a spark jump between the free end of the dangling wire and the cylinder head. All this will do is confirm that your coil works. Let us know what you find.
 
Hi Guys!

Doug, did exactly as you said. (i think, ha)

1. Disconnected the dizzy and the two leads from the pertronix ignition. Left them dangling
2. Connected the car to the coil, so the solid white from the key to the + side of the coil and the white/black dash to the - side of the coil
3. I held the high tension lead from the coil, so the center wire about 1 inch above the valve cover bolt and went up/down till it touched and was again 1" away
4. Connected a jumper wire to the - side of the coil and tapped it to the side of the dizzy...

It would only crackle on the jumper side against the dizzy housing.


HOWEVER, when i took the jumper and touched it to the other valve cover bolt, the coil fired! It sparked.... What does that mean, the dizzy isnt grounded anymore?


Then, thinking it then has to be the wiring in the car getting to the coil, i pulled the solid white from the + side of the coil and connected to my jumper wire
on the other side of the jumper i connected it to my multi meter
i then disconnected the two white wires from the key
I did a continuity test on those and they BOTH respond...

I think this means i have fried the two power leads together, so the one that goes to the coil and the one that goes to the batter cutoff..

Is this right and can i then run a new + from the key to the coil?

Video here shows the test.... https://youtu.be/FxfTp867nZM

THANK YOU ALL!!!
 
Please do not be offended by the following questions.

With the Pertronix (even though it is disconnected) why do you have white/black wires on the coil? One white/black typically runs from coil (-) to the points. If a second one is fitted it goes to a Smiths RVC type (voltage pulse sensing) tachometer. If you have a Smiths RVC tach, disconnect it's white/black wire and anything else connected to the coil. All you want on the coil during this test is a white wire coming from the ignition switch to coil (+) and the jumper wire on coil (-). Nothing else should be on the coil's low-tension terminals.

In the 2nd video you said that you held the plug wire close to a head bolt. However, (and don't take offense) were you leaving that plug wire in proximity to the head bolt simultaneously with tapping the jumper wire against the dizzy housing? You have to do both at the same time. Do you also understand that no spark will be generated until you lift the jumper wire OFF the dizzy housing? (While the jumper is held to ground the coil charges, when you lift the jumper wire, the coil discharges and the spark is created).

Don't be looking for shorts or open wires at this time. In previous tests you said you measured 12V on coil (+). That says power from the ignition switch is going where it needs to go.

Rick, I don't disagree with you. Going back to points is a great idea. However, at this point he is not even getting the coil to fire without the Pertronix or points.
 
Success! Doug, you're awesome and I'm super grateful!

I wasn't doing it properly and after a new coffee, POP!

https://youtu.be/Pa1XcM4eMfU

I am able to make the coil spark when I touch the jumper to the dizzy vac diaphragm, and I also verified when I took the cap off I could also make the coil spark from the Pertronix base plate!

Everything else is back to where it was... Now what, hahahahah
 
Last edited by a moderator:
So it sounds like the pertronix, im guessing?

Great idea rick, i can look for them or....

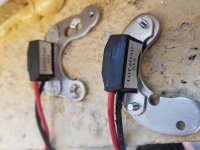
The perftonix in the car was a spare we had, and used for some mock-up work. I cannot say with 100% certainty its good. The ones in this pic, top one is the one left in the car, bottom new out of the box. Should I attempt to swap the base plates to try the bottom one? The numbers on the mag are different..

Capture.jpg
 
That was it, i fried officially everything!! LEAVE YOUR KEY ON = FRIED PERTRONIX IGNITION, COIL, and CAP!

I just swapped that module to the plate i needed, used a new cap, went to the coil with it and grounded 1 plug and spark!!!

The new cap broke my little screwdriver so off to the store and then when im back ill put it together and see how she does!

Fingers crossed
 
Pertronix told me the units are the same; base plates are different. I swapped one out and ran it for several years.

PS - hard to understand how it fried the cap, too. Did you see any evidence of burning inside the cap?

Addendum: When Jeff Schlemmer converted my DM6A to D25 internals, the old Pertronix was only attached by one of the phillips screws. Added a 6-32 on the right for security.

DistribDM6internal.jpg
 
Last edited:
Pertronix told me the units are the same; base plates are different. I swapped one out and ran it for several years.

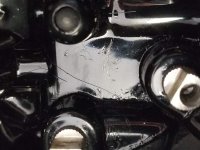
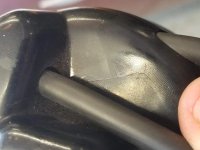
PS - hard to understand how it fried the cap, too. Did you see any evidence of burning inside the cap?

Great q! Here's a couple pics close up to the cap. You can see some hairline cracks and when i backed out the coil wire, a piece of the plastic housing broke off...BBQ

20190703_131258.jpg20190703_131500.jpg
 
Back
Top