• Hey Guest!
    British Car Forum has been supporting enthusiasts for over 25 years by providing a great place to share our love for British cars. You can support our efforts by upgrading your membership for less than the dues of most car clubs. There are some perks with a member upgrade!

    **Upgrade Now**
    (PS: Upgraded members don't see this banner, nor will you see the Google ads that appear on the site.)
Tips
Tips

TR2/3/3A Leaky Steering Box [TR3A]

TR3sharon

Member
Country flag
Offline
Hello all!
I'm new to the forum, so here's a quick background on my toy. She's a '59 TR3A with 41,000 miles, originally purchased by my grandparents in the '70s, barn kept and neglected after their divorce. My father then became the caretaker in the 90's, but because he was not a fan of foreign cars, not much care was taken then either. I have since inherited the car and I'm slowing working to making her nice again. She's now road worthy and I'm working on fixing some leaks.

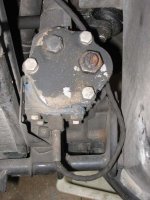
Now, the steering box. It's leaking all over and has some play at the pitman arm. I think I can adjust the box with the nut at the top to take that play out. I'm sure the lower seal and the upper gasket are relatively straight- forward to replace, but the turn signal wire at the base of the box has me stumped. Any advise?
 
Welcome to the forum Sharon.
I grew up in Portage Pa. and have almost enough parts to put together a 58 tr3.

What exactly is your concern with the wires that run through a small tube inside the steering shaft up to the trafficator? They work the horn and signals and rotate with the wheel. When I took mine apart, the shaft was a bit rusted and did not want to come out. There are one piece and two piece columns, but both have the same problems when it comes to play. If you tighten that nut too much, you will not be able to turn the wheel. There is a proper method to set the cam in the worm. But the leaking has nothing to do with the wires. What sort of documentaion are you looking at?


Jer
 
Try some Penrite Box Lubricant. Moss carries it and it's a semi heavy grease that works well in worm/peg boxes and does not leak out like 90wt. does. My box leaked prior to using the stuff.
If you are leaking from the box stator tube (wires) there is a nut and compression sleeve (olive) on the end that may need checking. The Nut (brass) often strips from overtightening and fluid will leak in this area. When this is loose the horn assembly will also rotate while turning the wheel. It's easy to replace the nut by disconnecting the wire bullet connectors and threading another on.
 
Thanks for the info on the box stator tube. I haven't noticed the horn turning with the steering wheel, but I'm sure I've got some oil leaking at the nut and olive.
 
If someone had overtightened the adjusting nut, the top cover may have become bowed and this can permit the oil to leak out the edges of the top cover. It's easy to remove and check it for flatness.
 

Attachments

  • 9608.jpg
    9608.jpg
    52.8 KB · Views: 391
If you can feel play in the Pitman arm, odds are very good that the bushing in the bottom of the box is worn, and no adjustment will compensate for that.

I also learned the hard way that overtightening the top adjustment (to try to compensate for wear) can easily damage the worm (which is rather expensive and difficult to replace), so I would not recommend it.

I fought with the box on my 59 TR3A for many years; then finally bit the bullet and replaced the peg, bushing and seal. The result was truly an eye-opener ! Should have done it years earlier ... before the 'rebuild' the car steered hard and everyone agreed "They're all like that because of the primitive cam and peg steering."

Well, after rebuilding the box, my TR3A steered just as easy as anyone could ask for ... I could literally change lanes on the freeway with one finger and park with one hand.

Anyway, I'll never try to adjust one on the car again.

Trying to replace that lower seal on the car is also risky, IMO. It takes a lot of force to remove the nut on the Pitman arm, and even more force to remove the arm itself. The book warns against transmitting any impact to the worm & peg and I believe they are serious.

More at
https://web.mac.com/sctoa/SCTOA/Help_Desk..._involved..html

BTW, I used Valvoline full synthetic gear oil after the rebuild, which I believe played a part in making the steering so nice and light. I also replaced the Silentbloc pivots with free-turning ones, similar to the ones at
https://www.zeni.net/trf/christmas07/32.php
 
The steering box on my TR3 was about as effective as a spagetti strainer on holding oil in, so I switched to Penrite. Steering is still a bit heavy but no more leaks.

Hopefully this will hold me over until I can address it.
 
my apron was off the last time I worked on the steering of my TR3A. I am wondering, does the apron have to come off in order to replace the steering box?

All this talk of improved steering has me thinking of rebuilding my spare steering box with these modern parts and swapping it into the car.
 
If you have a long shaft I believe you do have to remove the front apron. Short shaf no. I've heard of guys removing long shafts by taking the dash apart and other parts in the engine compartment to get clearance. sorry it's been to long to give you a detailed discription. I now I wouldn't want to remove my front apron if I could get away with another option.
 
Adrio said:
does the apron have to come off in order to replace the steering box?

I removed my apron to rebuild the steering box and would do it the same way again, Though, there are those here who have removed the steering box without removing the apron.

Welcome to the forum Sharon!

Randall...Thanks for the link to those silent block bushings!!! They look great! The SCTOA site was also interesting - makes me want to move west.
 
TR3ATR250 said:
I've heard of guys removing long shafts by taking the dash apart and other parts in the engine compartment to get clearance.
Wow, really ? Maybe I'll give it a try on the 56; I do purely hate removing the apron. I suspect you'd have to disassemble the brackets behind the dash, too.

Anyway, the split column on the 59 came out pretty easy with the apron still on. I took both motor mounts loose so I could jack it up for clearance, but I suspect only one actually has to come loose. Obviously the stator tube & wires have to come out first, but I was able to leave the upper part of the column (and steering wheel) in place. Think I had to remove the horn & one radiator brace tho.
 
The project has begun! I removed the apron, just for the ease of access to the steering box (and I just like to take things apart :wink: )
Hopefully sometime this weekend I can get the box out, but I'm still not clear on the stator tube. Can I pull the wires thru when taking the box down, or slide the box off the tube, or does the whole tube come out? Correct me if I'm wrong, in order to take the tube out, I must disassemble the control head. But what then? The instructions I have are really not very clear on this subject.
 
Aloha,

The wires extending out of the steering box should have connectors about eighteen inches from were they emerge from the tube. Disconnect them and them remove the compression nut on the end of the steering box and slide it over the wires. Slide the olive (compression sleeve) off the tube if you can.

Next step is at the other end at the control head. Around the hub of the steering wheel there are three grub screws (set screws in the US) that need to be backed out. The originals have a slotted screw head, but may have been replaced with allen head set screws. The set screws hold the base of the control head against the steering wheel. When loosened you should be able to pull back the control head and with draw the stator tube from the steering column as one piece. If the compression sleeve has not been removed or doesn't pop off when pulling on the control head, you may have to careful cut or file it off. you should then be able to remove the stator, however be careful as the wires reach the steering box, you may need a helper to feed the wires and connectors into the hole.

When working properly, the control head remains fixed in position and does not rotate with the steering wheel. The set screws hold a rotating base plate (disk) against the steering wheel (this is the only rotating part of the control head). The disk moves as you turn the steering wheel and operates the self canceling function of the turn signals.
 
Here's a picture of my head and stator tube (the tube is very long). There should be oil at one end, but there was a lot of rust the entire length of the tube, making it very hard to pull out. My wires cracked and broke just touching them, so I didn't worry about trying to feed then through.

I hope this helps.
Jer
 
I get it now! Thanks, you guys, for the help. I didn't realize the the stator tube and control unit were connected.
I'll try and get some pics of my progress.
 
Please don't cut the wires at the bottom end of the steering box.

If some DPO hasn't cut the wires at the bottom end of the steering column, it should be fairly easy. Unplug the 4 bayonet connectors. You will find that each one is slightly longer (or shorter) than all the other three. This enables you to straighten (dress) them one after the other so they won't bind. I usually use masking tape around the wires and all the male bayonets so they make as small a bundle as I can. Pulling them out is a snap. They should slide up the tube as you pull up on the steering wheel. If you feel it has snagged, stop pulling, re-dress the bundle and try again.

For easy reassembly, I use a long stiff wire like a coat-hanger wire, but longer, which I tape onto the taped end of the bundle of wires mentioned above. Then I slide the stiff wire down the tube and pull the 4 wires back down the tube with that wire. A helper would possibly make it a little easier.

You could also tape the stiff wire onto the end of the taped bundle before you pull up the wire assembly, in case you have to pull it back down a bit if you encounter a snag while trying to withdraw it all.
 
Not sure if it's clear from all the above : there is a slip joint between the control head and the stator tube. After removing the 3 grub/set screws from the steering wheel, you can pull the head and wires out while leaving the stator tube in place.

However, what I've found works easiest for me is to only pull the wires through the tube until the longest bullet is still hanging out of the tube, and then pull the tube out with the wires still inside it. Although Don's trick of taping a stiff wire to the harness also works, this works even easier IMO. Then when you are ready to reassemble, poke the tube back through the column and pull the wires back out.

The steering box can be serviced without disassembling the control head at all, beyond removing the 3 screws in the steering wheel. However, the wires and stator tube must be out of the way before you disconnect the two halves of the steering column, in preparation for removing the steering box from the car.

Oh yeah, the bayonet connectors that Don mentions are way up under the hood, near the horn mounts. When the wires come out of the steering box, still in a harness, they should go under a clip on the inner fender, then on up to the horn area where they go into 4 different connectors.

Although most people will warn you to mark the connectors carefully, I've found it easier over the years to just ignore the markings, and "buzz out" the connections when reassembling. An ohmmeter, DMM or powered test lamp will make short work of it; plus you'll probably wind up fiddling with it anyway after something doesn't work.
 
MGTF1250Dave said:
The wires extending out of the steering box should have connectors about eighteen inches from were they emerge from the tube.
Possibly it varies by car, but mine were more like 36".
 
If you are pulling the wires out of the tube, tie a string to the end of the wires. Leave the string in the tube, and you will be able to pull the wires easily when you reassemble.
 
Back
Top