• Hi Guest!
    You can help ensure that British Car Forum (BCF) continues to provide a great place to engage in the British car hobby! If you find BCF a beneficial community, please consider supporting our efforts with a subscription.

    There are some perks with a member upgrade!
    **Upgrade Now**
    (PS: Subscribers don't see this gawd-aweful banner
Tips
Tips

It's time to replace a muffler!

jaybird

Yoda
Country flag
Offline
The B sounds like a 747 taking off. Has gotten much worse the past 2 weeks. Hole is right under the driver's floorboard I think, because the floor gets darned HOT under the heel of my foot.

Anyway, I want a Peco. Not sure I can convince dahubby of that though. So...need suggestions on a moderately priced muffler and pipes that are going to sound 'good!'

Thanks!
 
Howabout a Peco pipe on the stock header? That's what I and a few others have and it works wonderfully. Sounds really good, too! Standard is cheaper than stainless.

On my GT I have a Falcon system. Sounds nice, is quiet and fits right up.

If it's just the box that has rusted out you can also have one made at a local trusted muffler shop. Should only cost $40 or so from what I've heard.
 
You can always just replace the center muffler with a strait pipe to the rear muffler. Should give a deeper sound and not cost much.
I went with the moss big bore stainless which sounds great around town and at idle but you cant hear it at high speeds.
 
Stopped by a local shop, fired her up, guy looked under the bonnet. He said it's a donut or flange gasket, showed me a gap. Didn't hoist her up to check the exhaust system yet, but I suppose we start with the gasket?
 
So I start with $5 worth of gaskets, right? For $65 an hour, I think I'm going to let him do the work, will have to pull a couple bits to get to it anyway. BUT, first I'm calling the MG Doc - in our car club. I'd rather him get the money and I trust him with my baby!
 
If it's just the 3 dollar donut gasket between the manifold and the pipe get your hubby off his butt and have him change it. Remove the air cleaner housing and you should have good access to the 3 nuts holding it together. Or if you have some long socket extensions put the car on jack stands and you can reach them from below the car. Then Pull the exhaust pipe apart remove the old one and put the new one in and reassemble. Shouldn't take to long to change.
 
Go from underneath - it's way easier. If you don't have 2-3 socket extensions, a trip to Sears is in order. You'll still pay less than the labor charges for the shop to do it.
 
I don't see anything that resembles a gasket. (dahubby's out there with me, chuckling, but I'll show him) Here's a pic, looks to me like the flange is broken off, or rusted off. I can't see (and neither can he) where it was ever welded onto that flat piece though. (and I ruined a perfectly good, brand new French manicure, by the way) How is the flange attached to that flat piece? ((can you see the 'gap' in the picture?))

thingy002.jpg
 
The end of the pipe should be larger than the hole in the flange. The end of the pipe should look like the bell on a trumpet. The donut gasket and pipe should be pinched between the cast iron header and the steel clamp when you tighten the three nuts. If the exhaust pipe was able to move in relation to the engine than the bell may have straightened itself out. The pipe will need to be re-flanged. I have done this with a hammer before. It is easier with the pipe removed from the car. Good luck.
 
As has been pointed out the doughnut bolts coming lose is a common problem.

I started having this problem soon after I installed a new exhaust system. Every 5 or 6 weeks it would start loosening up. Part of the problem was that the guy who installed it for me ran the down pipe right next to the lip of the oil pan. This caused it to bang up against the lip and the vibration would eventually loosen the doughnut bolts. After the second return visit to his shop he told me he wouldn't fix the problem unless I paid him to do it. /ubbthreads/images/graemlins/eek.gif

Needless to say that was my last visit to that fellas shop. /ubbthreads/images/graemlins/nonod.gif

Newly motivated (money'll have that effect on a Scotsmen /ubbthreads/images/graemlins/wink.gif) to fix the problem myself - I loosened all the exhaust mounting hardware from the front to the rear and shook it around a little until it rested naturally without touching the engine. Then I retightened the all the hardware again. This seemed to work fine for a while. But after some time it would start leaking again when the hardware started working it’s way lose every few mouths – usually towards the end of a log drive. After a couple times of that nonsense – I got totally fed up & double nutted the hardware and haven’t had a problem in almost a year now. I have even gone under to inspect it and it still holding up just fine.

If you decide you might like to try this too simply purchase and extra 3 nuts and after you tightened down the three nuts & bolts - add an extra nut behind the others. Kind of like one of those teflon self-locking nuts. Much better than the split lock washers.
 
Hay Jaybird,

The picture of the exhaust dosn't look like what I'd expect to see - but then it could be me. Isn't yours a 1974 model year?

Anyway here is a picture of the Exhaust for a 68-74 off of the Moss Motors site.

MGB-033.gif


Also here is the exhaust for a 75 MGB the only thing different between it and the later exhausts is that the down pipe is a bit shorter to make room for the cat.

MGB-034.gif


Item #24 of #42 depending is the gasket we are talking about. Note you'll need two of these for the earler setup. It isn't really a gasket but a metal doughnut (thus the name) that makes a compression tight fit as you tighten the bolts.

Is either one of these systems what you have or do you think you might have something aftermarket?
 
'74 1/2 Bret, titled as a '75.
 
[ QUOTE ]
'74 1/2 Bret, titled as a '75.

[/ QUOTE ]

So no Cat! Thats a good thing. /ubbthreads/images/graemlins/grin.gif 74 1/2 has the single carb dosn't it? If so - it should look like the second drawing with the single down pipe.
 
In this pic, it's #61, that gasket that hooks to the manifold, then there's the gap where it's loose/broken (no cat) and the down pipe, #42 seems to be MIA.
MGB-035.gif


I'm getting confused.
 
There's no cat. And if there were, I'd have had it off first thing.

One carb, single downpipe.
 
[ QUOTE ]
In this pic, it's #61, that gasket that hooks to the manifold, then there's the gap where it's loose/broken (no cat) and the down pipe, #42 seems to be MIA.
MGB-035.gif


I'm getting confused.

[/ QUOTE ]

No worries we got ya covered. /ubbthreads/images/graemlins/grin.gif

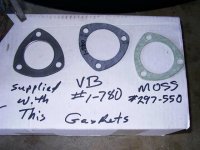
The gasket (#61) pictured has a long and sorted history in the Duff Garage – is really a pain in the rear for us folks that have to run a cat for emissions. If you ain’t careful and your car runs too rich (cheery red cat) for too long in addition to blowing out the cat - it’ll fry that gasket too. Often its too late to do anything but replace the gasket by the time most folks find out they have a leak there. So count your blessings you don’t have to have a cat on your car.

Not that that is a concern to you because you don’t have the cat in your car – but not that long ago Moss & VB where selling some cruddy replacement gaskets and they would fry up the first time they got too hot (rich running condition) or your car for whatever reason develops a leak as I suspect your car did. The hot gases escaping through the leak just decimate those gaskets in a heart beat. Believe me I know of what I speak – because I’ve fried a number of these little guys.

Moss finally wised up and currently sells a much better quality gasket today that incorporates a metal heat flange/ring around the inside of the gasket (see attached pick - new style gasket on the left). While they are more robust than the old cheapies ones, you can still fry one up pretty easily if you get a leak at this same joint.

The best option IMHO is to take it to a muffler shop and have them install or make you a “handmade” (cut to fit) gasket made out of a similar material to that commonly used for the head to manifold gaskets.

I did this using one of the old cheap gaskets as a timplate the last time around and haven’t had a worry ever since. In fact I developed a slight leak and all I had to do was re-tighten the bolts and everything was fine.

Good luck!
/ubbthreads/images/graemlins/cheers.gif
 

Attachments

  • 121542-Gaskets01.jpg
    121542-Gaskets01.jpg
    39.2 KB · Views: 57
If it hasn't been mentioned yet, use a set of brass nuts rather than steel. They won't rust in place and snap the studs when you try to remove them. As Bret said, back up the nuts with a second set of nuts to prevent loosening.

One last thing, try to tighten evenly so the gasket has uniform pressure all the way around. If there is less pressure on one side of the gasket than another side, you run the risk of the looser side burning up and disintegrating.

This job really is easy if you have the proper socket extensions and if the nuts aren't seized up.
 
[ QUOTE ]
If it hasn't been mentioned yet, use a set of brass nuts rather than steel.

[/ QUOTE ]

Hmmm? Cool idea Steve, /ubbthreads/images/graemlins/thumbsup.gif I am making a mental note as I type.
 
I had to go to a funeral today. Came home, dahubby is under the car. I found a leak in the radiator too yesterday, so he's going to pull that and have it repaired while I'm waiting on parts. I guess I'm ordering an exhaust system from Moss. Thinking Peco. Possibly the performance free-flow. I don't need stainless, the driving conditions here don't warrant it.

HELP! I'm really confused on what to order. I know Chuck doesn't want to bend and shape any pipes himself. IF that's the case, he'll probably have it installed by our resident club MG DOC, John Mangles.
 
Back
Top