• Hey Guest!
    British Car Forum has been supporting enthusiasts for over 25 years by providing a great place to share our love for British cars. You can support our efforts by upgrading your membership for less than the dues of most car clubs. There are some perks with a member upgrade!

    **Upgrade Now**
    (PS: Upgraded members don't see this banner, nor will you see the Google ads that appear on the site.)
Tips
Tips

TR2/3/3A ISO ; One of these

RJCOX

Jedi Hopeful
Country flag
Offline
Many small parts are getting organized and cleaned as I move further along in my journey. I am now halving my time between the two TR3s helping my dad with welding or sandblasting parts and getting ready to head to Armagh PA for TRF's rally, swapmeet and picnic.

I've found many TR4 parts mixed with my parts so off to swap them for stuff we need.

My extra bumper looks to be from a TR4 and has all its mounts (freshly wirebrushed and coated with rust restore).

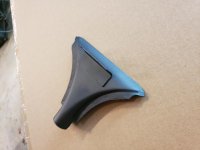
What seemed to be absent was one of these demister things. Between the two cars we have 3 and are searching for a fourth one.

I posted in the classifieds but I'll ask here if anyone knows a source. Rimmers is out, and so is TRF and Moss.
 

Attachments

  • 20190502_145003.jpg
    20190502_145003.jpg
    40.1 KB · Views: 130
Thanks Geo, have those on my list.

Since we only need one, the pairs aren't on my short list. With only one choice on ebay, I thought I'd see if anyone had one they'd be willing to part with, or had another direction to search in...
 
Ron, would you mind adding a couple more photos of the vent from different angles. I don't have these parts with my car although I have the rest of the heater system. It would help me make them if I have some more photos.
Lionel
 
Lionel,

I'll try to get some better pics for you.

The links in the second post show some pretty decent detail though. They pretty much look like a vacuum cleaner nozzle. Since they are out of sight, I'm fairly sure that the shape and depth would be less important than the input and output and mounting, if you just wanted them to work. They are thin metal (approx. 20ga.) almost tinny, if you know what I mean.

If a person had zero skill in fabrication, they could probably make one with an Aluminum can, tin snips and duct tape.
 
Ya beat me to it! Thanks David. I'm sure Lionel will appreciate it!
 
Wonderful guys. Thanks for the response. Will save the photos and have a go at making some in the future. Looks like a good exercise.
 
Does the vent have an overall curve to it or is it basically flat with only the section that feeds up to the vent opening in the dash curved up to the dash opening?
Lionel
 
My interpretation of a vent. Dimensions are best estimates from David's images and comparison with where it attaches to the car. Thanks for including the ruler in your photos David.

I started be making a wooden former from some jarrah hardwood. Cut it out with a jig saw and and rounded it off with a rasp and hand sander. The former was then mounted on a board which could be clamped to a bench to hold it firmly while hammering on it.
IMG_1976.jpgIMG_1977.jpg

The two bolts are to clamp a block down on the sheet to hold it firmly. I cut the sheet large enough to allow for the depth of the shape plus the outer flange.
IMG_1953.jpgIMG_1954.jpg

I worked the outer edges down with a wooden mallet to get the first impression in the metal, then started defining the shape with a wooden drift I made from the handle of an old wire brush. Seems they make them from some good wood.
IMG_1955.jpgIMG_1971.jpgIMG_1972.jpg

I then used a couple of drifts I previously made from a couple of old bolts to tighten the shape against the former. Below is a shot as I finished the work and was removing the sheet from the former. Next to it are the tools used to get to this stage, used in order from left to right. You can see I went to a lot of expense to do this job.
IMG_1956.jpgIMG_1975.jpg

From there I rolled the vent end of the two panels over some pipe a steel bar. Held the two together and offered it up to the dash to determine the location of the bracket. Spot welded the bracket on and then welded the two halves together.
IMG_1973.jpgIMG_1974.jpg
Couldn't get a photo of it in situ but it does fit nicely. The only issue I have with it is the round tubular section ended up a couple of mm larger diameter than it appears in David's photos.
 
DANG!!!

That looks wicked cool Lionel, and you busted that out in less than a day from photos no less.

I am in awe once again
 
Back
Top