• Hey Guest!
    British Car Forum has been supporting enthusiasts for over 25 years by providing a great place to share our love for British cars. You can support our efforts by upgrading your membership for less than the dues of most car clubs. There are some perks with a member upgrade!

    **Upgrade Now**
    (PS: Upgraded members don't see this banner, nor will you see the Google ads that appear on the site.)
Tips
Tips

Instrument Cluster Assembled, YEA !

Tinkerman

Darth Vader
Offline
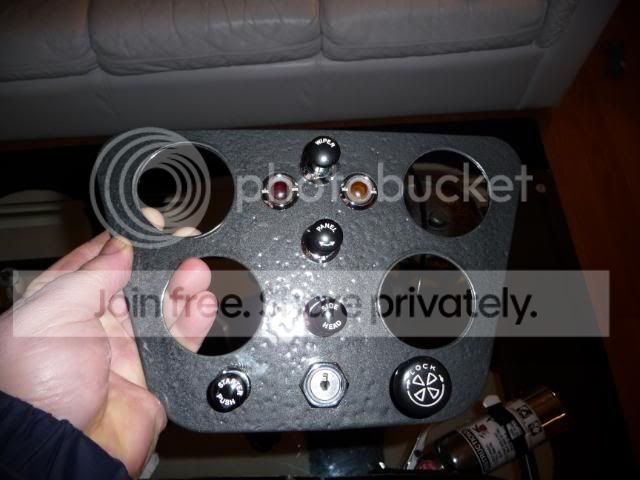
I am truly excited to report that the instrument cluster for my TR3A is assembled! To me it's the most gorgeous thing in the world and not because I did it, but is just a thing of beauty. It represents one of the reasons that I like to restore things.
Anyhow enjoy with me.

Now if anyone has a picture of the back of the cluster wired up and would like to share it, it sure would help me on my next step, which is to wire it up.

Cheers, Tinkerman
 

Attachments

  • 20518.jpg
    20518.jpg
    149 KB · Views: 234
Looks good where did you get your wrinkle paint. I am about to remove my dash and recover it next.
 
WOW
Looks nothing short of gorgeous! The cluster is a milestone on the TR3 and get you immediate satisfaction when installed. All the little details you have attended to will make it sparkle even more.
Do not have a photo, but the connections are fairly straightforward. I found it easiest to hook up the oil pressure gauge LAST. The solid metal line (if that's what you are using) is not very flexible or forgiving. Don't forget the leather washer and pre bend it around the heater. I also left the temp gauge till the end so I didn't injure the capillary line accidentally. Be sure to leave the glove box out and tape off the bottom of the dash while working on wiring the cluster so the dash covering doesn't get scarred.
Congratulations on completing an important milestone!
Gordon
 
The temp and oil gauges on my car are switched from the way you have them in there. Did different years have a different arrangement??

Looks great Tink...nice job. :yesnod:

Edit: The wiring is pretty straight forward. Just follow the wiring diagram and you should be OK. The fuel gauge should have markings on the back indicating which stud goes to the tank sender and which one is power. I think they are marked "B" and "T". The wiring on the ammeter will depend on whether you're running positive or negative ground. You can just switch them if need be. Also, there's a post with a screw for the grounds. I added another wire to that post to get a good ground elsewhere rather then relying on the grounding of the gauge cluster to the dash. I ran that wire to the dash support brackets.
 
Well done! The wrinkle looks to be perfect!

Art's "extra" ground lead is a prudent thing to do, just a couple lugs and a run of black wire. Guaranteed earth. :wink:
 
Eric, my wrinkle paint came from the local auto parts store. The one I used happens to be VHT or very high temp paint. The basic thing I found out about that kind of paint is not to try to do it in a cold shop. and watch the time lines. That is to say follow the instructions to the letter. Took me three try's cause I don't always read the instructions all the way through first. Shame, Shame. Good luck with your project.

Tinkerman
 
Art is right, the temp & oil gauges are reversed. I'll also agree with Gordon, IMO it's better to NOT install the temp gauge until after the panel is wired and secured in the dash. That capillary tube is just too fragile, you don't want it flopping around while you're trying to deal with everything else.

Only the fuel gauge needs to be grounded, but I agree the extra ground wire is a good idea. Mine is just wired to the ground lug on the back of the panel, though (which should be grounded through the harness to the voltage regulator and body).
 
Wow that looks great! I think the oil is a little crooked, but that could be the picture.

TR3driver said:
Art is right, the temp & oil gauges are reversed. I'll also agree with Gordon, IMO it's better to NOT install the temp gauge until after the panel is wired and secured in the dash. That capillary tube is just too fragile, you don't want it flopping around while you're trying to deal with everything else.

AGREED! Secure that mechanical temp puppy last. Install it so that it has plenty of slack to move if you have to pull the cluster out again, but where it pretty much has to move very very minimally or you could ruin the tube. I wound mine up like a 3 inch diameter spring so it almost doesn't move it all when I pull my center cluster. Also, when I installed mine, it seemed like the point where it enters the gauge is the most fragile, so try to keep that in mind.
 
martx-5 said:
The temp and oil gauges on my car are switched from the way you have them in there.

Mine, too.

OIL FUEL

TEMP AMPS
 
Dick,

Really nice looking!

Scott
 
Here I go again but this comes a a great time for me as I am going to start this same project very soon. And I think that this info could be great for a lot of people. I haven't searched the archives so I hope that I am not covering something already explained.
What's the best way to dis-mantle the dash and do's and don'ts? What are your techniques on wrinkle paint? Is there a readily available source for bezel/gauge o-rings? I have a thread on covering the dash with vinyl. Any help and ideas are appreciated and this will be the guide to doing this.
Sorry Tinkerman I don't like jumping on your thread but I get the impression that you are in the process of refurbing your dash and your and others advice could be very useful.
 
I started by removing the temp gauge & choke cable entirely. Then undo the oil gauge union, using a second wrench on the flats on the gauge, if the nut is very tight. Then undo the 4 wing nuts that hold the instrument panel to the dash and pull it forward so you can start undoing all the wires. The 4 lamp holders just pull out of their sockets and get left behind once the wires for the turn and ignition lamps get disconnected from the panel.

Even though mine is supposed to be vinyl covered, I had Fred Thomas do a PC crinkle that looks great, IMO. I've done my own in rattle-can in the past, but it always seemed kind of fragile; the PC is much sturdier.

I used just ordinary round O-rings, from MMC. Cost me maybe $8 for a multiple lifetime supply ... maybe someday I'll remember to give some away at a club meeting.
 
That looks great. I always loved the TR3 dash and gauges. My first ride in a Triumph was in 1962 in a white TR3 with a red interior. I loved that car.
 
eric
You can get a set of the o rings that go inside the gauges from Nisonger Instruments in Long Island. The exterior o rings are available from the big 3. Re krinkle paint.....I got this tip from Frank Conklin in CA that does an outstanding job on rebuilds:
1. Send Mama away for a few hours
2. Preheat an oven to 225 degrees
3. Four light coats of paint rather than 3 heavy, 10 min intervals
4. Immediately bake for at least 30 min; an hour is better
5. Remove and hide in the garage
6. Leave the oven door open and air out the kitchen b-4 Mama returns
7. Let it dry for a week.

Works great....I missed step 6 and caught ****.
Gordon
 
Yep you all are right I have the temp and oil pressure mixed up. Sheech and I had a diagram to fly by. I'll fix that when I install it or put the wires on the back.
The capillary tube, and choke cable are all secured so they don't flop around. the whole unit is now securely stowed until I am ready to install it.
I was so very excited about getting it done that I just had to share my excitement!
Eric most of the TR parts supply folks have the O rings available. I got mine years ago and one of the big rings had expanded so I had to buy another. If you are in or near a large town/city you may have an industrial supply house that can supply you with the ones you need. Just bring in the samples. I live in a small Tennessee town so my supply options are limited. I sent you some info on the wrinkle paint. It is really very simple to apply. If you redo your heater you would need it for that also.
By the way that was a very nice presentation on the capping cover! That one is real close down the line for me so I stuck it in my BCF Tips file. I'm working on the door capping now. I really have about 4 projects going. I want to get this baby done and on the road!

Still would like a picture of the wiring!

Cheers, Tinkerman
 
Good info guys keep it coming I was really looking to get as much as possible locally. After all the O-ring is just rubber and I shouldn't have to pay much shipping etc. I will search around and see what's out there. I have all the original glass with the exception of one of the 2 ones that I remember my dad replacing with a flashlight lens, just thought that was funny and worth passing on.
 
Howdy Folks,

I just finished my cluster as well.

"Crinkle/Wrinkle Paint": I bought VHT High Temp from an Auto Parts Supplier (Approx. $10.00). Stripped bare the cluster & primed. Its suggested a "Low" temp range of 60deg to apply the Wrinkle paint & best results is done in "Sunlight". I used 3 light coats: (1st). coat sprayed "Horizontally" (let sit for about 5min). (2nd) coat sprayed "Vertically" (Let sit for about 5min). (3rd) coat sprayed "Diagonally" & Let sit overnight. I did both sides of my cluster & It came out "Great"!

Yes; The Oil & Temp are reversed.

I have a pic of the "Back Side" of a restored cluster that I`m going to try to post here. Check out the "Quick Dis-Connects"! That sure does make life easier in Installation & Removal.

Here we go,

Russ

Dang; The pic I have, (Front & Rear), I got from an ebay listing and can`t shrink it to post here. If you`d like; Send me your email address & I`ll email both pics to yourselves. You`ll like what you see!! My address is: toysrrus@att.net
 
Tink,

Awesome Job, looks great.

I went a little different and went with the hammered look for my cluster. I am not too concerned as my car is fairly far from stock anyway. As long as it looks better that it did when it came out of the car, I am ok with it.

P1060987.jpg


Cheers,
M. Pied Lourd
 
Back
Top