• Hi Guest!
    You can help ensure that British Car Forum (BCF) continues to provide a great place to engage in the British car hobby! If you find BCF a beneficial community, please consider supporting our efforts with a subscription.

    There are some perks with a member upgrade!
    **Upgrade Now**
    (PS: Subscribers don't see this gawd-aweful banner
Tips
Tips

I need some midget pictures

I never thought about that. Since I welded the 11 gauge metal in there I could take some type of pliers and bend each edge out a bit to close to right and then fill in the middle. Door seals? What are those?
 
Door seals... the rubber bits that keep the rain and wind out. They actually affect the fitment of the door on these little tin cars.
 
You mean that u channel type stuff that goes on the outside if where the door fits? God, that is all packed up in a bag somwhere. Maybe that will be the first thing. I hope those hinge holes line up good, Oh and I also go to find the hinges, so now I have 3 first things to do.
 
Maybe I go over board, but I've been "burned" by not having things fit before the final blocking. When I do my bugeye I'm going to mount the motor, seats, etc. temporarily before finishing the body work. And it will be sitting on its wheels. It is a lot more time consuming and aggravating, but with a unibody it is worth the effort.
 
Here is another shot of a bad one under repair.
 

Attachments

  • 4925-APost.jpg
    4925-APost.jpg
    89.3 KB · Views: 81
Decided to post here though the info is relevant to the sill replacement thread also.

Got a newsletter/ catalogue from an outfit in Ontario here called Obsolete Automotive. I've never used them so usual disclaimer blah blah.

https://www.absoleteauto.com

Anyway, they have a lower A post repair piece that seems useful to me. They don't have pics on the website so I scanned the ad FWIW. They also have a full sized A-Post

BTW the newsletter is helpful as it has lots of tech tips.

They also have a yard sale this saturday. If anyone is going, please PM me as I don't think I'm going to make the drive.

They are at Point Edward (Sarnia/ Port Huron)
 
Not that I'm trying to give you something more to do, but how are you going to handle the flash/surface rust?
 
Trevor, Most of the car has been bare metal for a while and is kind of weathered with only a tiny amount of surface rust in the last couple years. I used a whole lot of stripper and a Brass scraping knife to strip the whole car. If you notice there are some spots with the original leyland primer on it. That stuff was tough as nails and hard to scrape off. If I got to a place where I was down to primer and it was being difficult I just left it. The car was never actually sanded and the metal kept up well. What I intend to do is, after I finish all the bondo work and get it really close and ready for etch primer, I will go over the whole car with the DA sander with some medium grit and remove all the old primer spots and go over all the metal avoiding the bodywork spots to get all the metal nice and clean sanded. Then I will coat the whole car with etch primer and then a coat of fill 2k primer. Then go over the car looking for anything that needs spot putty and do those and hit those places again good with the 2k primer. Thats the plan for now anyways.
 
Think etch primer is not required under 2K primer.
 
I bought it and thought I would use it /bcforum/images/%%GRAEMLIN_URL%%/smile.gif I only got a quart of the 2k and with activator its about 40 ounces. I'm going broke on this stuff. I figure I'll spray the whole car good with etch and then one good coat of 2k then more 2k on the nasty spots. I now have the fenders back on and everything done on both sides. I almost have the front valence all done and hopefully the back will be nearly done in one more day. Then comes the hard part. I have to grind down the welds that I put on when installing the new metal strip around the top where the roof snaps mount, then I will have to put a bit of bondo on that and sand it smooth. I'm hoping to get all this done before next Wednesday when I go back to the doc. I think he might be ready to do the shoulder ASAP since I can walk around now with the help of a cane in my left hand. If he does that then I will be unable to do much for a while. Maybe then I will study and piddle with Jack's fuel gauge /bcforum/images/%%GRAEMLIN_URL%%/wink.gif
 
I need to see two things, also. If anyone has thier grill surround off the car take a few pics of what it looks like. I still haven't found mine. Also, I need a picture to see how far the ends of that strip of metal that the top snaps to comes out on each side. I left it long on both sides because mine was rusted off at those corners.
 
Looks like I am going to have to drop the tank, seems there is a direct ground on the sender unit wire. If I move that wire by pushing it where it exits over the top of the tank the gauge will then work fine till I run the car.

I know I sodered that connection as I had to extend the wire that came with it but I bet old electrictions tape has unwraped and is allowing contact.
 
Jack, I learned how to make a super splice for wires that is weatherproof from working on my sailboat. Do your connection, then put a small amount of rtv silicone on it and then slide a piece of heat shrink over that and shrink it down. When it shrinks, the silicone will ooze out making a water tight seal when it all dries. Don't use the heat shrink gun around the gas though.
 
As mentioned earlier it is critical to have the doors mounted or the body braced and supported to be sure there is no sag to the body when you are piecing the panels back togeather. Minimal body filler should be required if you take your time and fiddle with the fit. I posted some restoration pictures on my home page that may be of some help. https://home.comcast.net/~r67cat/wsb/html/view.cgi-home.html-.html Good Luck,Rick
 
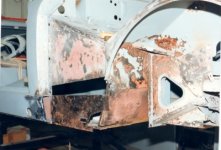
Kim, the inner and outer rockers create most of the longitudinal strength on the Midget. As you remove the rotten metal which always includes the rockers the body will have a tendency to sag in the middle. If the door opening is not maintained with braces across the opening and you fit and weld in your rockers and A piller patches you may find the door gaps front, back and at the rockers are impossible to get right. In my restoration I had to replace inner and outer rockers, inner and outer rear fenders, A piller bottoms and hindges, both door skins, passenger front fender, drivers floor and rear valance. One side done at a time to maintain as much ridigity as I could. Fitted all the metal work to insure good gaps before any welding. Removed any metal that was not structurally intack. Used my floor jack to fine tune the gaps by raising or lowering the frame jacking strut. Rick
 
Kim, if you did not have to remove the rockers you should be OK. A trick that I picked up at one of the Jaguar sights I visit is to adjust the door gap by MIG welding additional metal on the edge of the door skin (If the gap needs to be closed by less that 1/8") Or the use of body lead to build up the door opening (Rocker, A or B pillar). I used mostly body lead to correct minor inperfections in the pannels with just a light skim coat of body filler to block down to get the body dead straight. I was able to fuss with my gaps in reskinning the doors. The door skin has some ability to be slid fore and aft as well as up and down before you secure the bent edges tight. Rick
 
Back
Top