Hi Guest!

 Hey - did you know if you click on the title of a thread it will take you to the first unread post since you last visited that thread?
 but were afraid to ask:
  STOP!! Never post your email address in open forums. Bots can "harvest" your email! If you must share your email use a Private Message or use the
  smilie in place of the real @
 Pretty Please - add it to our Events forum(s) and add to the calendar! >>
AUSMHLY
Yoda
Offline
Hi all.
I thought I'd post how I got a good seal around the side windows of my BJ8.
First your top should fit as good as you or your top installer can get it. And that is a feat in and of itself, so good luck!
You've adjusted your side window glass to follow as close as possible (gap and uniformity) to the out line of the top area. Now it's up to the rubber to seal that gap.
First I'll address the bulb rubber that is used along the side window.
I found the original rubber seal from the 60's still on a top frame I bought. The original bulb is about twice the size of what's available now from our suppliers. The ones Moss sells has a stiffer rubber than the Bristleflex brand MacGregors provides. I choose the Bristleflex for the softer rubber, however, his bulb is smaller than Moss's. There may be other brands available, but being I don't know who else has them, I could not compare theirs.
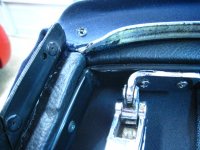
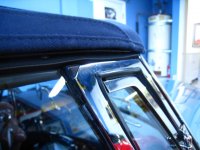
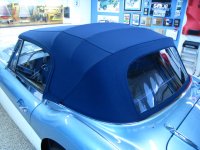
1. I found water leaks in at the top front corner, where the top meets the windscreen post.
If you look close at that corner when the side window is up, you may be able to see light through that area. Some tops don't have a problem there, but no matter how many times I repositioned both the header rail retainer and the side cantrail, I could not get the rubber bulb to seal the triangle area where the top meets the pillar post, vent window and side cantrail. The rubber seal should be one long piece, that starts at the end of the side wood that is over the side windows, then curves at the windscreen piller area onto the header rail. It continues to the other side, curves again at the pillar and continues to the end off the other end of the side wood. What I ended up doing to eliminate that gap at the pillar post was to move the side cantrail out closer to the edge of the top side wood. Because of that, the header rail and the side cantrail did not line up enough to use one piece of continuous rubber. I cut the rubber into three sections. One for over each window and one for the header rail. Now the side rubber bulb would run right up to the windscreen post and make seal.
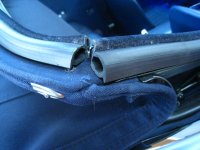
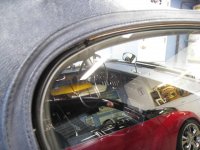
2. Second water leak was at the top of the vent window, around the rubber tip.
Because of the thickness of the edge of that rubber tip, it created a small gap between the thickness of the door glass and the edge of the vent window where the rubber tip is. To close that gap, I moved the side cantrail out further, which put more pressure against the rubber bulb where the rubber tip is.
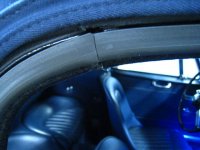
3. Third area was at the rear curve of the side window where the two rubber bulbs meet.
I found that a) the rubber end caps don't follow the same outline of the rubber bulbs and b) once glued on, they did not compress a easy as the rubber bulb. It would be at that place that water would find a gap. What I did was to install one long piece of rubber bulb, and make a straight cut at that hinged area. I held each end in place by putting some dum-dum behind them. Now when then the two rubber bulbs meet, it's like it's still one piece of rubber bulb. Both pieces compress with the same pressure and there's no raised rubber or harder rubber to compress like the end caps introduced.
This page will show photos of where the top meets the windscreen post.
Second page will show photos of the vent window rubber tip and where the two rubber bulbs meet at the curve.
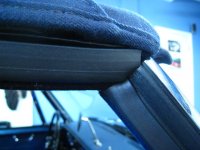
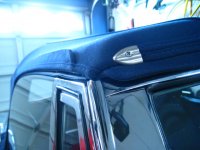
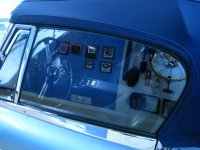
Now for the purists out here, you bet it's not correct and you don't see any end caps. However when the top is in the down position, one does not see any of the end caps because the top has the stowage cover on.
For the non purists, it has a much cleaner look and my car is actually water tight. I don't drive in the rain, but I may get caught in it. However I do wash her all the time, and that's when I found the water would leak in. I may have one of the very rare Healey's that stay dry inside when it's rained on, by my garden hose. I know what you're thinking, now that's just not British.
Cheers!
I thought I'd post how I got a good seal around the side windows of my BJ8.
First your top should fit as good as you or your top installer can get it. And that is a feat in and of itself, so good luck!
You've adjusted your side window glass to follow as close as possible (gap and uniformity) to the out line of the top area. Now it's up to the rubber to seal that gap.
First I'll address the bulb rubber that is used along the side window.
I found the original rubber seal from the 60's still on a top frame I bought. The original bulb is about twice the size of what's available now from our suppliers. The ones Moss sells has a stiffer rubber than the Bristleflex brand MacGregors provides. I choose the Bristleflex for the softer rubber, however, his bulb is smaller than Moss's. There may be other brands available, but being I don't know who else has them, I could not compare theirs.
1. I found water leaks in at the top front corner, where the top meets the windscreen post.
If you look close at that corner when the side window is up, you may be able to see light through that area. Some tops don't have a problem there, but no matter how many times I repositioned both the header rail retainer and the side cantrail, I could not get the rubber bulb to seal the triangle area where the top meets the pillar post, vent window and side cantrail. The rubber seal should be one long piece, that starts at the end of the side wood that is over the side windows, then curves at the windscreen piller area onto the header rail. It continues to the other side, curves again at the pillar and continues to the end off the other end of the side wood. What I ended up doing to eliminate that gap at the pillar post was to move the side cantrail out closer to the edge of the top side wood. Because of that, the header rail and the side cantrail did not line up enough to use one piece of continuous rubber. I cut the rubber into three sections. One for over each window and one for the header rail. Now the side rubber bulb would run right up to the windscreen post and make seal.
2. Second water leak was at the top of the vent window, around the rubber tip.
Because of the thickness of the edge of that rubber tip, it created a small gap between the thickness of the door glass and the edge of the vent window where the rubber tip is. To close that gap, I moved the side cantrail out further, which put more pressure against the rubber bulb where the rubber tip is.
3. Third area was at the rear curve of the side window where the two rubber bulbs meet.
I found that a) the rubber end caps don't follow the same outline of the rubber bulbs and b) once glued on, they did not compress a easy as the rubber bulb. It would be at that place that water would find a gap. What I did was to install one long piece of rubber bulb, and make a straight cut at that hinged area. I held each end in place by putting some dum-dum behind them. Now when then the two rubber bulbs meet, it's like it's still one piece of rubber bulb. Both pieces compress with the same pressure and there's no raised rubber or harder rubber to compress like the end caps introduced.
This page will show photos of where the top meets the windscreen post.
Second page will show photos of the vent window rubber tip and where the two rubber bulbs meet at the curve.
Now for the purists out here, you bet it's not correct and you don't see any end caps. However when the top is in the down position, one does not see any of the end caps because the top has the stowage cover on.
For the non purists, it has a much cleaner look and my car is actually water tight. I don't drive in the rain, but I may get caught in it. However I do wash her all the time, and that's when I found the water would leak in. I may have one of the very rare Healey's that stay dry inside when it's rained on, by my garden hose. I know what you're thinking, now that's just not British.
Cheers!