• Hi Guest!
    If you appreciate British Car Forum and our 25 years of supporting British car enthusiasts with technical and anicdotal information, collected from our thousands of great members, please support us with a low-cost subscription. You can become a supporting member for less than the dues of most car clubs.

    There are some perks with a member upgrade!
    **Upgrade Now**
    (PS: Subscribers don't see this gawd-aweful banner
Tips
Tips

How not to start a freshly rebuilt 100/6 engine

5

57_BN4

Guest
Guest
Offline
This is a workshop that appears to have rebuilt a paying customer's engine. I hope he got oil pressure up before this little episode.

Fast forward to 3:00 where the cranking begins.


In my opinion, I don't think oil pressure is a problem here. The assembly lube on the bearing journals and camshaft lobes are more than enough protection in the time that the engine takes to build oil pressure. I know this must sound like blasphemy, but cranking the engine over and over in order to build oil pressure has the consequence of scraping off a lot of the assembly lube that is more beneficial than any oil.
As I see it, the real problem with this scenario, IF this is a fresh engine, is that the engine RPMs are not high enough to get the lifters (tappets) spinning in their bores in order to properly break-in the cam. Proper break-in procedure would be to immediately get the engine to AT LEAST 1500 RPM and holding it there for 20 minutes or more. If this is the extent of these clowns breading-in this engine....that cam and lifters are toast. I suspect the situation will manifest itself after a week or two of driving the car.
 
Yes. What got me was just how sloppy the whole operation is and how dumb somebody is to put this on YT under the name of the machine shop. If he is prepared to start an engine by stamping two wires together rather than take a few minutes to wire a solenoid in then it doesn't say much about the quality of what has gone into the engine assembly.
 
Never mind the cooling ;-)
At least they got a spare block ....
 
How long? No idea how many minutes but ...
There is no cooling liquid (tubes are open at the end). There is no airstream (no fan). The sump is surrounded by the support.
Normaly with some coolingfluid in, but without motion, it will start to boil somewhere in the head
Without any fluid at all, things will go much faster. In the wrong direction that is
 
Well, you get what you pay for right? We all have our particular budgets to work with when restoring our cars. Personally, I would chose a shop that tests newly rebuilt engines on a dyno, such as the SF-902 dyno the Healey Werks uses, check out there web site. Someday if needed, that's where I plan to have my motor done and upgraded. With my bad back my motor pulling days are over!
 
Yep its true , you get what you pay for and it certainly looks like a pair of rednecks at "redneck rebuilds" . I would'nt want to be the customer of that engine .
 
If that engine has a new cam & lifters...whoops, they surely won't last long. The guys at APT said if you do this the cam may only be good for 1,000 miles or so. No warranty on the cam if it is not broke in correctly. When I started my newly rebuilt MGA 1600 engine it was a little scary, but I brought her right up to 2600 RPM and ran her 25 minutes per instructions for the Cam mfg. Kept an eye on oil pressure and temp...which were fine all the time. Then let cool a little, changed the oil & filter, put in VR-1 20w-50 and so far so good. I would not have known to do this break in if I had not have asked. Have about 1200 miles on it now. Oil change coming up this week., Lee
 
I see also part of the 12 Videos of this mechanic, with others type of engines, all was started with this method, and same support
 
Last edited:
Just gone over the 500 mile mark on my rebuilt engine. It has been bored out to the max and all parts balanced, I rebuilt the engine myself using graphogen rebuild compound on all moving parts. The crank was turned by hand as each bearing and piston etc. was put in place to ensure that there was no binding.

All start up work was carried out with the engine in the car, coolant in and plugs out and fuel pump electrics disconnected, the engine was turned over on the starter for around 60 seconds to build up the pressure in the system and get the oil flowing around. Then I connected up the pump, installed the plugs and slackened the dizzy clamp, turned over the engine again rotating the dizzy until she started and tuned her up from there. First oil change will happen in the next few days, I will also be adding in the antifreeze at the same time.

All looking good and we have not yet gone over 2500 revs. though I have been told I can now open it up a bit by a Healey specialist - the main point is not to stress the engine.

:cheers:

Bob
 
the main point is not to stress the engine.

Hi Bob,

I guess we have different philosophies on running in a newly rebuilt engine, here is a pic of my Longbridge lump about an hour after first startup. Since then I have had the sump off to change the cam out and found just a small amount of black fuzz on the sump plug magnet so I think she is in pretty good health despite this treatment. Andy.

first startup BN4.jpg
 
So Bob,

You told us how you rebuilt your engine but........What did you do to break in the cam and lifters in your fresh engine? I ask since that was the point of my first post criticizing those clowns for starting a "freshly rebuilt engine".
 
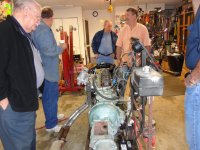
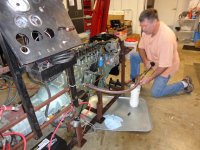
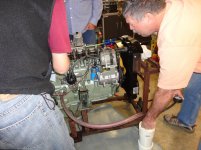
I remember as a kid I would watch my neighbor build gas dragsters from the frame up using 4130 moly tubing and building all his racing motors as well, in fact Don Garlits and Don Prudomme "the snake" where his racing buddies before they became famous in the NHRA drag racing world. Anyway, one of the things that was common among theses guys was using STP on all the internal motor components when assembling there motors. I used to watch my friend open up a can of STP and spread it on all the rod bearings, cams,lifters, cylinder walls....everything! In fact we built my 427/435HP Tri power corvette motor the same way. After careful checking of clearances, torquing and resembling of the motor we would slowly turn the motor by hand. Then install the motor for our run in. Which consisted of a short period of running listening to the internals with a stethoscope. Then it was road tested at slower speeds at 50mph for about 20 minutes, allowed to cool and repeat the run in process for the first 500 miles. Change the oil make tappet adjustments,head bolt torque settings and go! At least that was the proceedure for street motors. Really basic stuff! Some people I knew would run there motors at full tilt and did not believe in a gradual break in period Which always made me shudder!
 
Somewhat off topic, but aircraft piston engines absolutely must be broken-in at full power, full rich, at low (as possible) altitudes and for extended times (an hour or more). This is so you get max BMEP and the rings will seat; if you don't do it this way you're all but guaranteed to have low compression (and will likely void the rebuilder's warranty). Some resort to putting Bon Ami in the cylinder in an attempt to break the glaze. If you have CHTs (cylinder head temperature gauges) you will see the temps rise to scary levels for a few minutes, then come down quickly as the rings seat. They're run full rich to purposely wash oil off the cylinder walls to assist "final machining."

This is a religious topic, but my dad who was an auto shop instructor and factory rep for Ford says "break them in how you're going to drive them." Others say "break them in slow, get a slow engine." One thing that does make sense to me is if you baby an engine for too long you'll get a ridge at the top of ring travel, then when you finally punch it the rings may hit the ridge and possibly be damaged. Modern engines are so precisely machined that usually no specific break-in is required.
 
So Bob,

You told us how you rebuilt your engine but........What did you do to break in the cam and lifters in your fresh engine? I ask since that was the point of my first post criticizing those clowns for starting a "freshly rebuilt engine".

The cam was a Racer Brown and was in the engine when I bought the car. I discussed the state of it with my local Healey man and it was decided that it did not need replacing. The valves were in good order and just needed lapping in as the head had been modified to unleaded a couple of years back and rebuilt with new rockers and shaft, so all these parts were put back in using the graphogen.

:cheers:

Bob
 
Hi Bob,

I guess we have different philosophies on running in a newly rebuilt engine, here is a pic of my Longbridge lump about an hour after first startup. Since then I have had the sump off to change the cam out and found just a small amount of black fuzz on the sump plug magnet so I think she is in pretty good health despite this treatment. Andy.

View attachment 30040
Here are pics of our clubs Engine Test Stand that our local club members can borrow to use to break-in their engine before it goes into the car. We have a dummy transmission to support the engine and exhaust pipes w/ mufflers. The engines owner must use their radiator, battery, etc. Also a pic of the "Engine Oil Primer" that a club member made to get oil through the engine before spinning and starting it up. It uses a home made oil tank and is hooked up to a small air-compressor and the engine is primed until oil is coming out of the rocker shaft and going down to the lifters. After starting the engine we run it up to a little over 2k rpm and adjust the timing, carbs, etc.
 

Attachments

  • DSC01309.jpg
    DSC01309.jpg
    194 KB · Views: 167
  • DSC01307.jpg
    DSC01307.jpg
    195.1 KB · Views: 154
  • DSC01306.jpg
    DSC01306.jpg
    198 KB · Views: 157
Hi Patrick,

I'm making a similar rig this week with the addition of a water brake dyno on the back for load testing. The pic above is when I was using my old chassis for an engine stand but due to lack of space it got cut up and scrapped. This one looks a bit neater than the rusty old chassis. Andy.

dyno assembly.jpg
 
Back
Top