• Hi Guest!
    You can help ensure that British Car Forum (BCF) continues to provide a great place to engage in the British car hobby! If you find BCF a beneficial community, please consider supporting our efforts with a subscription.

    There are some perks with a member upgrade!
    **Upgrade Now**
    (PS: Subscribers don't see this gawd-aweful banner
Tips
Tips

How do the outer sills [rockers] drain water?

Csarneson

Jedi Hopeful
Country flag
Offline
I primed and painted my chassis without the rockers (lower sills on). It's my understanding that it's smart to load the chassis before welding them on. I'm now ready to weld them on and have my door gaps lined up. How on earth are these things supposed to drain the water that will inevitably get into them? This seems like an absurd design. Am I supposed to seal them up with chassis sealant and hope that they don't ever get water in them? Am I supposed to have a drain hole in them and if so where? I'm terrified about leaving any bare metal exposed in there. Help! It's no wonder these cars rusted like crazy...

Chris
 
Well your right, it's no wonder these cars rusted like crazy. The early Morgans weren't even painted until after they were assembled. They got a lick and spit and anything the spray gun couldn't reach stayed bare. I remember more than one MGB i cut apart to restore, I always got a chuckle out of the bragadocia of the use of Waxol during the factory build. When I cut the 'B's apart I found plenty of Waxol, all of it up around the mid section of the panel or high on the side of Sills. None of it was ever found down around the seams.
So anyway, on some more concerning car constructions you will find "weep slots" along the bottom edges of the Sills. This is usually achieved by creating a "pucker" in the bottom flange where it is mated to the inner sill. In my case to achieve this during construction, I just spot welded the lower seam instead of doing a complete weld bead. That way the water can run out. i also fabricated a wand about 12 to 14 inches long to fasten to a suction gun. At the end of the wand I pounded it flatly closed then drilled a few small holes in the tubing so that it would spray. When I was done welding in the Sill I drilled a hole in the rear end of the sill box at the rear wheel openning. About 5/8" size just big enough to incert the head of the wand. I then sprayed regular Enamel paint into the inside of the sill until it dripped from the lower seam openings. Use any colour you want. Put paper on the floor.
 
I found a pic that shows where I drilled the hole. You can see it just inside the left rear wheel opening at the rear of the sill box. When I was finished spraying and I felt it had enough time to dry I plugged that whole with a regular black rubber hole plug. just popped in.
 

Attachments

  • DSCF1314.jpg
    DSCF1314.jpg
    52 KB · Views: 188
Thank you! That makes a lot of sense. I like the idea of dealing with the bottom seam. I think I may try to integrate some drainage there as well. I've been very concerned with getting paint in there too!

My parts came from moss and I feel like I have a ginormous gap in the front where it hits the door pillar. It's not so big that I couldn't fill it with chassis sealer though. Is that what you did?
 
My parts came from moss and I feel like I have a ginormous gap in the front where it hits the door pillar. It's not so big that I couldn't fill it with chassis sealer though. Is that what you did?


It's been 8 or 10 years since I did mine but yes I think I remember that the Sills didn't fit very well. Mine came from Moss also. The biggest thing I remember is that if the bottom flange of the new sill was pulled tight to the bottom of the inner sill, as you would to weld the bottom edge, then that action pulled the sill to much inward where it didn't match the profile of the front or rear fender. In other words it appeared that the bent edge of the lower flange was bent prematurely and the bend line would not reach the inner sill. Also it was exasperated by the fact that the bend line was on an angle to the line of the lower sill where by the gap was wider at the front than the back. It was pretty bad. Bad enough that, at the front, I could fit my fingers between the flange of the new sill and the surface of the inner sill. So I straightened the flange on the New Sill and rebent it. But it became tedious because the gap at the front was so wide that there was not enough metal to reach and reform the new flange. So I had to create a new flange with new metal.
It was also harder because the gap necessitated a pie cut so stribing and measuring the new piece was difficult. And a lot of metal finishing to smooth out the new weld line. Seems to me I had to do something at both ends as well but i don't remember what that was. Ya know if ya got a welder ya build what you need. None of these metal parts are ever going to fit out of the box.
 
Corrosion control wasn't a 'feature' of older vehicles. One strategy that I found works very well is getting oil into those cavities. I've had several International Scouts and rockers always rusted out. I found one in really good condition and drilled holes in the forward area of the rockers, sprayed oil into the various cavities and years later they were still like new. Oil flows well, coating everything. Go to any metal shop and the steel stock is coated in ..... oil. A engine that leaks oil is a rust prevention system!
 
I have 1/2" holes in the bottom of sills, a couple of inches from the rear. I also sprayed Waxoil inside through that hole.
 
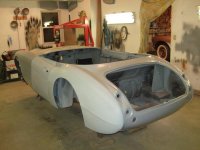
As per Mark, yes the oil flows well and fills the cavities, but of coarse you want to make sure all your paint work is done before you let any oil get near the car. My final decision to use good old fashion enamel paint is because it also flows well and sticks to about anything. As an example is if you have ever dropped a tablespoon full of enamel paint on the garage floor or on some surface, unless the surface was really dirty, then later after it dried came back to clean it up you must then get ready for some mighty good scraping with a paint scraper or such as well as some judicious use of lacquer thinner or other such chemical loosening agent. It just doesn't want to come off. That's the way it will stick and coat the inside of your panels if you spray it in there. One good example is more than 20 years ago I restored an MG Midget for a fellow in Massachusetts. It was a '74 I think with the rounded rear wheel arches. I had to fabricate those wheel arches because no commercial patch pieces available.
After I finished the fabrication and welding and even finished the paint job I then sprayed spray bomb can enamel into the back side of the fender panels from the trunck area. I coated the panels and the wheel wells heavily with the enamel till it ran down the inside of the trunk and into the seams and dripped on the floor. This past summer I was up visiting him and he still owns the Midget. The body is without blemish the rear fenders look as good as the day I finished painting them. And over the last 20 years his 3 sons have grown up thrashing that car every chance they could.
One caveat to this method is that even tho I am sold on using enamel for this purpose, Enamel and base colour of a base coat/clear coat system don't like each other. Base Colour will lift enamel. Clearcoat does not have a negative effect on enamel but the base colour does. That is why I spray the inside enamel coating after I finish my painting with base/clear. You just have to take precautions as to where the over spray might land and cover up any surface you don't want overspray on. If you spray enamel paint into your inner panels and voids before you do you basecoat/clearcoat painting and the enamel drips out the seams, and the enamel is visible or you might say reachable with the base coat, the basecoat will craze the edge of your panels. Of coarse a big NO, NO. So you can't let the basecoat get on top of the enamel, but you can let the enamel get on top of the basecoat. Sorry to belabor this but it is a fine point that is very important.
 
Back
Top