Hello fellow TR3ers I have the horn control head and stator tube on the workbench. Before reinstalling it I would like to pry off the button and clean things up in there as last summer the horn button was sticking on much to the dismay of drivers in front of me. My question is what is the best way to remove the button? Looks like the chrome/plastic? ring is what holds the button down. Do I gently pry off the ring with a thin blade knife and free up the button. I don't want to break anything. How is the ring secured?
-
 Hi Guest!
You can help ensure that British Car Forum (BCF) continues to provide a great place to engage in the British car hobby! If you find BCF a beneficial community, please consider supporting our efforts with a subscription.
There are some perks with a member upgrade!**Upgrade Now**
(PS: Subscribers don't see this gawd-aweful banner

Tips
- We have a special forum called "Member Articles" where you can submit actual articles for consideration for publication. Learn More
- Don't have an Avatar? If not, your avatar will default to the 1st character in your username. Go into "Account Details" to change your Avatar.
- Some basic forum navigation info: click
Hey - did you know if you click on the title of a thread it will take you to the first unread post since you last visited that thread?
- Hey Guest - Is your British Car Club in our Clubs database? If not, send me a PM - Basil

- Looking for a local club? Click the "Clubs" tab above and browse hundreds of clubs world-wide.
- Add Android or iPhone APP: click
- Did you know - any picture or video you add in your posts in any marque-specific forum will also get added to the Media Gallery automatically.
- A few more tips about posting and replying: click
- Hey there Guest - be sure to keep your profile page up to date with interesting info about yourself: learn more
- More tips and tricks on Posting and Replying: click
 STOP!! Never post your email address in open forums. Bots can "harvest" your email! If you must share your email use a Private Message or use the
  smilie in place of the real @
- Want to mention another member in a post & get their attention? WATCH THIS

- So, you created a "Group" here at BCF and would like to invite other members to join? Watch this!
- Hey Guest - A post a day keeps Basil from visiting you in the small hours and putting a bat up your nightdress!
- Hey Guest - do you know of an upcoming British car event?
 Pretty Please - add it to our Events forum(s) and add to the calendar! >> Here's How <<
- Hey Guest - you be stylin'
Change the look and feel of the forum to fit your taste. Check it out
- If you run across an inappropriate post, for example a post that breaks our rules or looks like it might be spam, you can report the post to the moderators: Learn More
- If you would like to try some different "looks" or styles for the site, scroll to the very bottom, on the left and click the Style Selector.
You are using an out of date browser. It may not display this or other websites correctly.
You should upgrade or use an alternative browser.
You should upgrade or use an alternative browser.
TR2/3/3A Horn Button Removal
- Thread starter karls59tr
- Start date
There is an old saying--If it isn't broke don't fix it.
But it is broke. Once you press the button down it wont release???
TR3driver
Great Pumpkin - R.I.P
Offline
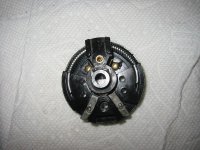
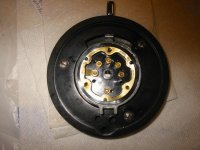
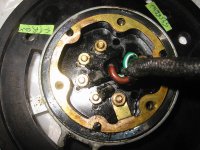
I did not take a lot of pictures when I repaired my control head. Once I got going it was not that difficult to take apart and put back together. Randall has several articles on his google site that also detail the rebuild process. Hopefully these pictures will help. Some are when I first took it apart (note the twisted wires) and some are when I was putting it back together. I found that the best thing to clean the bakelite parts is dishwashing liquid and warm water. I used white lithium grease to lubricate it.
Bob
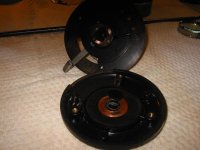
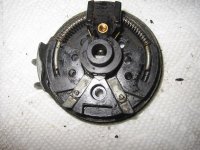
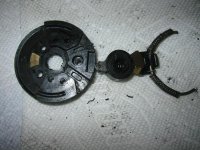
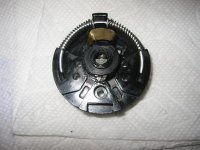
Bob


alexbobalex
Freshman Member
Offline
Once you've taken out the three screws, take the cover off. You will likely find that the copper ring has come unglued. Take a bit of fine grit sand paper to clean it up. Find some good metal/plastic glue. You can use a suitable epoxy but I found the metal/plastic Krazy Glue worked just as well. Good luck!
Once I take the three screws out and take the cover off to glue down the copper ring will all the various other assorted bits and pieces stay in place? I really don't want to any farther in the disassembly:fatigue:Once you've taken out the three screws, take the cover off. You will likely find that the copper ring has come unglued. Take a bit of fine grit sand paper to clean it up. Find some good metal/plastic glue. You can use a suitable epoxy but I found the metal/plastic Krazy Glue worked just as well. Good luck!
Yes take the 3 screw lose on the plastic and only the plastic will come apart with the button. Hopefully from there you can see the problem. Might be dirty and IIRC there is a screw for the horn right there that could be lose. There are 3 screws on the metal that you can see through a window hole leave those alone if you just want the button.
Got it apart and that was the problem . The copper ring had come unglued and was riding in one of the spring loops. Did you clean up the bakelight area with fine sandpaper before re glueing or just the copper ring?Once you've taken out the three screws, take the cover off. You will likely find that the copper ring has come unglued. Take a bit of fine grit sand paper to clean it up. Find some good metal/plastic glue. You can use a suitable epoxy but I found the metal/plastic Krazy Glue worked just as well. Good luck!

alexbobalex
Freshman Member
Offline
Depends much on the situation, but just make sure both are nice and clean. The sandpaper is mostly to create a little texture on the copper ring to give the glue something to hang on to. Don't worry too much. As long as the copper disc sticks nicely in place, you are good to go. Good luck! /Alex
PS Never open up the inside of the control head where all the bits and pieces of the trafficator reside unless you have unlimited patience and a swear jar near by.
PS Never open up the inside of the control head where all the bits and pieces of the trafficator reside unless you have unlimited patience and a swear jar near by.
