• Hi Guest!
    You can help ensure that British Car Forum (BCF) continues to provide a great place to engage in the British car hobby! If you find BCF a beneficial community, please consider supporting our efforts with a subscription.

    There are some perks with a member upgrade!
    **Upgrade Now**
    (PS: Subscribers don't see this gawd-aweful banner
Tips
Tips

Hood drain channel

chicken

Jedi Trainee
Country flag
Offline
Hi I did have a post running elsewhere but dont know how to revive it back where its seen.
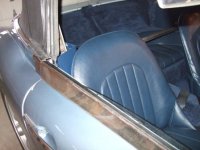
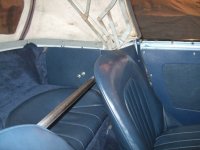
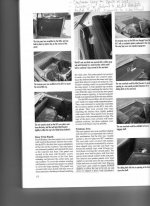
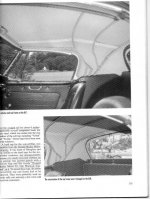
So here we go, i am getting ready to have a trimmer fit a new hood and i need to fit the hood drain channel, i have found out that the channel should have been fitted prior to the shroud going on but that didnt happen so i am going to retrofit. I gather the drain channel lips behind the rear of the shroud but is it then riveted from the front or does the chrome covering strip go on first and then all 3 are riveted together?

Is the drain channel just painted black or should it be body colour ?

There is also another curved strip i have which im guessing fits over the front of the drain channel and holdas the hood in place ? Is this also riveted onto the drain channel ?

I need to get the bits in place soon ready for the trimmer in January so any pointers would be most welcome.

Thanks
Rob
 
Hey Rob, what year car are you talking about. I'm sure my BJ7 Convertible top (hood) is fitted differently than the earlier roadsters.
 
Rob, I just went hunting for some pics but I don't have much from when I fitted the hood. Here are two that show my inside fitment of my BJ7 convertible top. There were some things on my car that I did not bother to restore if they were in good order and the top was one of them. Also I made no attempt to make my interior panels exact copies of originals. I actually don't remember the exact pieces or sequence of fitment except that I remember that it was not as complicated as I suspected. I'm pretty sure that the outside chrome piece went on first because it is secured with small screws horizontally from the inside edge. Then the gray curved piece that is seen on the inside is what holds the top tight to the edge of the drain channel i think. But my memory is foggy here. Hope this helps. Dave.
 

Attachments

  • Copy of DSCF2757.JPG
    Copy of DSCF2757.JPG
    45.7 KB · Views: 188
  • Copy of DSCF2758.JPG
    Copy of DSCF2758.JPG
    44.4 KB · Views: 202
Dave

Thanks for the pics, yes forgot to mention my car is a BJ7.
Do you see the drain channel ? if not then i guess i can just paint it black.

The grey curved piece, is that grey for a reason ? mine is black, as it's seen from inside the car did it ought to be painted body colour or the colour to match the hood, is yours a grey hood ?

Do you remember was the drain just riveted on ?

Thanks
Rob
 
If you want to make your Healey as close to original as possible then you should buy the book "Austin-Healey 100/100-6/3000 Restoration Guide by Anderson and Moment. In my opinion no other book will do. I have attached a page from the book but If I shrink it I don't think it will be ledgeable. In the one pic you can just barely see the left rear corner of the top frame. I believe that all the top frames were gray and the metal hooped piece we spoke of I believe is to be gray as well. My pieces are unrestored and they are grey. But of course they could have been changed before I got the car but I don't think so. I think I will try to attach another pic of the inside of an erected top in a next post. I believe Anderson & Moment are the best for this type of book. Dave.
 

Attachments

  • img237.jpg
    img237.jpg
    52.6 KB · Views: 170
Inside Pic.
 

Attachments

  • img238.jpg
    img238.jpg
    49.3 KB · Views: 160
FWIW, on my--'original' when I bought it 32 years ago--BJ8 all the hood, drain, etc. pieces are painted in a light, bluish gray.
 
FWIW, on my--'original' when I bought it 32 years ago--BJ8 all the hood, drain, etc. pieces are painted in a light, bluish gray.
Bob, thanks, i think i have found the colour now. I spoke with AH spares who said it is a Cumulus grey ? and have managed to find some paint.

I now just need to repair the drain channel it is full of holes !
 
FWIW, on my--'original' when I bought it 32 years ago--BJ8 all the hood, drain, etc. pieces are painted in a light, bluish gray.
There's a Rustoleum color in a spray can that's an excellent match for the original color.
 
The original channel was hand painted grey, kinda sloppily too on the outside, when the convertible top mounting channel is screwed on you only see the lower part of the channel anyway, but you still see the end sections .
 
Here's a link to some drain channel pictures that Patrick sent me several years ago when I was putting on a BJ8 top. In the first couple, it looks like the chrome piece is still attached to the channel, as if to indicate they were removed together; so if I understand the question correctly, perhaps they should go back in that way too?

I didn't have to disturb the drain channel, thankfully, beyond verifying it was doing its job, so I cannot comment on its removal or replacement.

https://spcarsplus.com/gallery3/index.php/reMKIII/top_work/drain-channel_by-others if you click on any opened picture, you'll see the high resolution image (and it too can be made original size with an additional click) for the greatest detail.

DSCF5801.jpg
 
Chicken

If you are going to retro fit the channel, you may have to release the shroud to gain some clearance to get the channel over the inner wheel arches and into position. It is a good thing that you are using the old channel as new ones invariably need altering to fit.

I have yet to do mine on the BJ7 but I will be removing the wings and shroud to do so.

Best of luck

:cheers:

Bob
 
Bob
I think I can just squeeze it into poistion, do you wknow is it just riveted in place ? I counted 13 holes, I think then the chrome trim surround is screwed on.
How is the metal piece that the rear of the hood is fixed to held in place, rivet or screws ?
Rob
 
Bob
I think I can just squeeze it into poistion, do you wknow is it just riveted in place ? I counted 13 holes, I think then the chrome trim surround is screwed on.
How is the metal piece that the rear of the hood is fixed to held in place, rivet or screws ?
Rob
Your right about the above Bob. Good luck on squeezing a drain channel in after the shroud has been installed. You have a 50/50 chance of getting it in without lifting the shroud off. My painter left off the drain channel and was able to squeeze it in but it took about 3 people to do it(my car was just painted). Always check the Factory Parts Book for the types of screws you need when reinstalling parts.
 
I am not there yet chicken but I think that it is pop riveted in place. Yes the chrome strip is the last to go on.

I screwed the metal piece into the side of the drain channel when I refitted my hood - ( on 2 separate occasions owing to the way I am working - rolling restoration ) because that was how it was when I bought the car, I do think that screws are the way to go from talking to the upholsterer at Rawles Motor Sport. This is also confirmed by looking at the SC Parts catalogue - they say 10 screws. The main trick is to get those clips around the rear moulding in the right place before screwing it to the drain channel.

:cheers:

Bob
Don't forget to apply some silicone under the chrome trim piece when installing it. Originally the material used was the same stuff that was used on the chrome strips for the doors(window area).
 
Back
Top