• Hi Guest!
    If you appreciate British Car Forum and our 25 years of supporting British car enthusiasts with technical and anicdotal information, collected from our thousands of great members, please support us with a low-cost subscription. You can become a supporting member for less than the dues of most car clubs.

    There are some perks with a member upgrade!
    **Upgrade Now**
    (PS: Subscribers don't see this gawd-aweful banner
Tips
Tips

Home Made Rotisserie - I'm sooooo Happy

JPSmit

Moderator
Staff member
Silver
Country flag
Offline
Well friends, look how I spent my afternoon.

Total cost about $55.00 CDN

Without Castors about $15.00 CDN and I bet I could have scrounged the wood if the snow was melted.

I am insanely happy with the results.

Thanks for sharing my joy
 

Attachments

  • 4491-Ispincar1.jpg
    4491-Ispincar1.jpg
    50.9 KB · Views: 314
  • 4492-Ispincar2.jpg
    4492-Ispincar2.jpg
    53.8 KB · Views: 293
  • 4493-myrotisserie.jpg
    4493-myrotisserie.jpg
    60 KB · Views: 291
Yep we share your joy.

Now the fun begins, hope you take lots of pics.
 
nice job!
 
Excellent job! I'd be interested in a set of plans also.
 
Freakin' awesome! My favorite part of this hobby is building new tools/parts.
 
Nice work, JP. I, too, would love to see plans. Maybe a nice addition to the knowledge base. Someday I'll take Tunebug down to that point...
 
I've asked to be allowed to add to the knowledge base. In the meantime, here are some plans. Please advise (seriously) if any of it doesn't make sense, then I can change it. Did I mention I love this community!

thanks
 
Thanks for the plans. What did you use for mounting points?
 
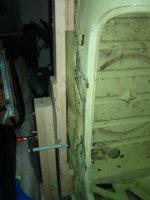
I just used the holes where the bumpers would ordinarily be bolted. They're easy with a rubber bumpr but shouldn't be too difficult to find something with a bugeye
 
Here is the joint - I hope it makes sense - I don't seem to be too clear - it's been a long day I guess
 
drooartz said:
Thanks for the plans. What did you use for mounting points?

I've included a couple of pics. It's really hard to get a frame of reference for these to make sense. I took the pics with the shell on its side (as per the first photo in this string.) So, what you are looking at is the edge of the trunk vertically (dents and all) and the 2x4 attached to the bumper brackets. The other photo is the front - same deal. I sure hope this makes sense. Post if it doesn't and I'll take some more pics.
 

Attachments

  • 4511-frontmountingpoint.jpg
    4511-frontmountingpoint.jpg
    65.1 KB · Views: 217
  • 4512-trunkmountingpoint.jpg
    4512-trunkmountingpoint.jpg
    56.2 KB · Views: 205
very nice ... thanks for the pdf's ... i could have used this about 12 months ago.
 
Back
Top