• Hey Guest!
    British Car Forum has been supporting enthusiasts for over 25 years by providing a great place to share our love for British cars. You can support our efforts by upgrading your membership for less than the dues of most car clubs. There are some perks with a member upgrade!

    **Upgrade Now**
    (PS: Upgraded members don't see this banner, nor will you see the Google ads that appear on the site.)
Tips
Tips

Help anyone with HVDA

gubba

Senior Member
Offline
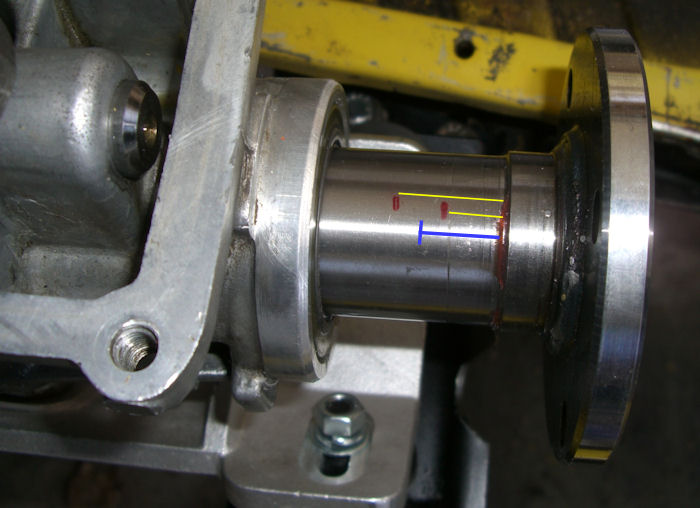
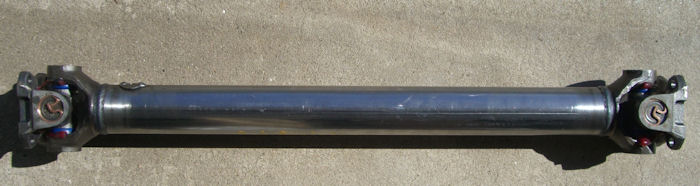
Hi gang just got back from ATDI in Cle Elum Washington..it was a blast..We were half way out on our 8 hr cross country tour and my rear transmission seal went again lost almost all of my tranny fluid 1/2 pint left..I had just replaced it in May... Luckaley I had an extra in the glove box..getting it installed on a Sat. when every thing is closed in the small town I was in..That was another story..A big thankyou to Hills Auto..the only place open with a hoist. Anyway I have the HVDA five speed conversion. Have any of you folks had a problem with the seal..do you have any idea why the seal keeps failing? There does not seem to be any play on the input shaft. There is a bit of play in the Universal and the drive shaft has the locking collar on it. Even after replaceing the part on the 4.5 hr trip home it is driping a regular amount again. TIA
 
Maybe I found a soloution

LEAKING FRONT OR REAR OIL SEALS: This can be an frustrating issue even after replacement seals are fitted, therefore due to a slight pressure buildup. Toyota boxes don't have a dedicated breather, so hopefully the solution to your problem.


This is the considered breather position I chose
Extra safe - Groove for sealant to form ring is formed with Dremmel tool.
Before hand the plate was sanded flat using emery paper on a sheet of glass.


https://people.physics.anu.edu.au/~amh110/Supra/supra_in_volvo_240.htm

Link for the pictures :banana:
 
I had the same problem with my HVDA setup.You need to have a solid drive shaft made. There can be only one slip joint. The yoke at the tail of the trans stays. The locking collor does not work, it lets the drive shaft expand The only solution is a new drive shaft made to fit. About $250. I did this after replacing a fried trans...
 
There can be only one slip joint. The yoke at the tail of the trans stays. Tinman58 can you elaborate on this statment for me. Did this fix your problem for good? Did you try the breather hole method?
 
I use the HVDA locking collar on mine. It locks the slide joint so that the propshaft does not compress. This is important because without it, the shaft could slide/compress together and at the same time, and slide of the tailpiece adapter on the W58, making it too short in length and potentially short enough to fall out. Not only could you lose some parts but a proshaft comes off at the front, it could pole vault your car.

A solid (custom made) propshaft is the best since it eliminates this potential, in the event that the locking collar fails. The one slip joint Tinman refers to is the one at the tranny tailpiece.

The locking collar is something that should be checked and tightened each season if you are using an original TR propshaft with locking collar.

When I get the spare $250, I'll probably have a custom sized propshaft made. But until then, the locking collar is working and has worked for years just fine. Herman now recommends a new shaft but it is not a requirement AFAIK.
 
When I did my HDVA conversion 5 years ago Herman strongly recommended a solid drive shaft as you never want two slips in one drive line. The stock drive shaft is a slip (it can move in and out) and the rear Toyota tranny flange is a slip too. What happens is the drive shaft moves out and pushes the rear flange into the rear seal causing the leak.

The locking collar he provides ONLY prevents the drive shaft from collapsing. The "other" collar on the drive shaft is nothing more then a dust cap. When I brought the stock drive shaft to Fleet Pride (national HD truck repair place) he agreed about the two slip issue and then tightened up the dust collar and proceeded to easily pull the drive shaft apart. I ended up with a solid drive shaft.

You also have to set the flange min/max per the HVDA directions to determine the new drive shaft length. Here's what mine looked like......

FlangeSetting.jpg


NewDriveshaft.jpg
 
Back
Top