• Hi Guest!
    If you appreciate British Car Forum and our 25 years of supporting British car enthusiasts with technical and anicdotal information, collected from our thousands of great members, please support us with a low-cost subscription. You can become a supporting member for less than the dues of most car clubs.

    There are some perks with a member upgrade!
    **Upgrade Now**
    (PS: Subscribers don't see this gawd-aweful banner
Tips
Tips

Healey rotisserie

thall66

Freshman Member
Offline
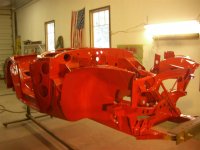
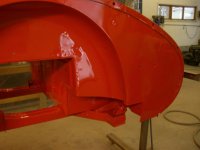
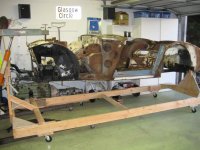
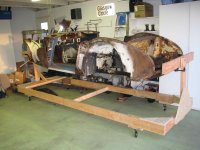
In the process of trying to do a "rolling restoration" on a BJ7, I kept asking myself, why not just go the extra step? Then again, and again, until I got down to the bare shell.

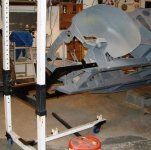
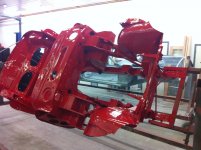
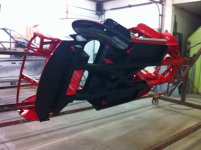
Once I decided to sandblast the whole thing, it only made sense to flip it. Looking around, I found 2 unused engine stands, some scrap steel, and some casters. A couple hours later and here's what I came up with.

photo 1.jpgphoto 2.jpg

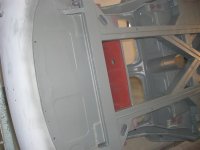
The car is too nice not to do it right. It still has original paint on the floor boards and trunk floor.
 
Hi Excellent timing. I've recently acquired a second engine stand with just this in mind. I note your mods, do you have any detailed plans of what you did. I've got numerous lengths of angle iron etc. and am puzzling how best to put it all together. I see you extended the rear legs of the stands and also reinforced the the uprights. How did you work the attachments and angles to the bumper bolt holes? I was going to try old spare bumper irons to get the angles but the plates of the stands themselves are also angled. ?Wedges.
 
All it takes is some thinking and ingenuity . Good job , smart thinking .
 
Thanks. I will take some closeup photos. a few things to note. The upright was lengthened. There was no need to strengthen it. The extra length allows the vehicle to spin without hitting the floor.

I made no compensation for the angle. The reason is that when an engine is on the stand, the weight levels it. I assumed that the car would also level it. It seems to do just that. No binding.

The base extensions were to add the swivel casters. Without them, you couldn't turn, as the original wheels were fixed, so without adding them to each end would only allow for 1 axis of travel. I just extended enough to allow the wheels to do a complete rotation without cutting off the old mounts. Figured it would also add some stability.

I'll get some more detailed photos and a few measurements, but I just basically winged it.
 
If you don't have a welder and old engine stands, here is an example of what I did with some 2X6's and casters from a moving dollie. Works great. Came in handy today when I had it sandblasted. Absolute joy to be able to spin the frame around when working.
 

Attachments

  • IMG_4646.jpg
    IMG_4646.jpg
    194.2 KB · Views: 224
  • IMG_4647.jpg
    IMG_4647.jpg
    170.7 KB · Views: 213
  • IMG_4648.jpg
    IMG_4648.jpg
    171.3 KB · Views: 216
I built the same type of "engine stand " type system. I used bumper brackets and their mounting points front and rear without a problem.
 
Love the bumper bracket idea. Wish I had thought of it. Would have saved time.

Thanks guys. Lots of cool ideas here. What a great community.

Just to add another idea, this is a setup we made for a Jag 5 years ago. Essentially it's just two bent pieces of pipe.

Notice how the bracket that attaches to the car is sleeved with a bolt for tightening. The thought was that different brackets could be made for different cars, re-using the same pipes.

Well, the guy we built this for left them behind his shed when he moved from his old house. That's how I wound up with the engine stands. I have better clearance this way and I don't think it took any more time to fabricate.

RollTubes.jpgRollTubes2.jpg
 
It's getting increasingly difficult these days to find a project Healey with floors and chassis as solid as that. Congrats.

Agreed .. theres no way my 62 Tri Carb could support its own weight on a rotisserie , total rust bucket ....not now though tks to Marty the Frameman .
 
61 BT7 001.jpg61 BT7 038.jpgThere is no better way to paint a Healey
 

Attachments

  • 61 BT7 043.jpg
    61 BT7 043.jpg
    77.9 KB · Views: 188
  • 61 BT7 052.jpg
    61 BT7 052.jpg
    58.6 KB · Views: 188
  • 61 BT7 028.jpg
    61 BT7 028.jpg
    65.3 KB · Views: 190
I made mine from an old free weight lifting rack. Adjustable height. Welded a homemade angle iron fork to a pipe and slid the pipe into a larger pipe. Welded a nut in the large pipe to restict rotation. Worked great. I do have to admit that the car was a little top heavy but I could handle rotating easy enough (with help that wasn't my wife:highly_amused:smile:.
 

Attachments

  • Weight rack rotisserie.jpg
    Weight rack rotisserie.jpg
    33.5 KB · Views: 184

Attachments

  • Front top painted .jpg
    Front top painted .jpg
    191.8 KB · Views: 181
  • Gravel Guard .JPG  1.jpg
    Gravel Guard .JPG 1.jpg
    199 KB · Views: 183
Back
Top