
-
 Hey Guest!
British Car Forum has been supporting enthusiasts for over 25 years by providing a great place to share our love for British cars. You can support our efforts by upgrading your membership for less than the dues of most car clubs. There are some perks with a member upgrade!**Upgrade Now**
(PS: Upgraded members don't see this banner, nor will you see the Google ads that appear on the site.)
You are using an out of date browser. It may not display this or other websites correctly.
You should upgrade or use an alternative browser.
You should upgrade or use an alternative browser.
Hardtop Restoration 101
- Thread starter tony barnhill
- Start date

OP
tony barnhill
Great Pumpkin - R.I.P
Offline
Re: Hardtop Restoration 101 - Interim Step
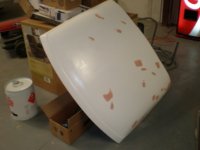
When the white epoxy primer dried & was sanded, a few spots showed up that can't be solved with buildable primer. So, we've touched them up with body filler. When they're sanded and the top is smooth, we'll start the final coat of primer.
When the white epoxy primer dried & was sanded, a few spots showed up that can't be solved with buildable primer. So, we've touched them up with body filler. When they're sanded and the top is smooth, we'll start the final coat of primer.
Attachments
OP
tony barnhill
Great Pumpkin - R.I.P
Offline
Re: Hardtop Restoration 101 - Interim Step
Yep, most of it goes on the floor....we're trying not to add any weight to the old top...got the fiberglass as smooth as was possible with repairs & a new layer of glass....
But, you know him, Jack, perfection!
Yep, most of it goes on the floor....we're trying not to add any weight to the old top...got the fiberglass as smooth as was possible with repairs & a new layer of glass....
But, you know him, Jack, perfection!
Offline
Re: Hardtop Restoration 101 - Interim Step
They're kinda thin to start with, tend to change shape over time. I was "semi-picky" with the one here. Got all the ugly parts mended and sealed it with epoxy primer then topcoat. Perfection is too elusive. :wink:
They're kinda thin to start with, tend to change shape over time. I was "semi-picky" with the one here. Got all the ugly parts mended and sealed it with epoxy primer then topcoat. Perfection is too elusive. :wink:
OP
tony barnhill
Great Pumpkin - R.I.P
Offline
Re: Hardtop Restoration 101 - Interim Step
& this one's gonna be put on a top stand & covered until I come up with a project to put it on!DrEntropy said:They're kinda thin to start with, tend to change shape over time. I was "semi-picky" with the one here. Got all the ugly parts mended and sealed it with epoxy primer then topcoat. Perfection is too elusive. :wink:
OP
tony barnhill
Great Pumpkin - R.I.P
Offline
Re: Hardtop Restoration 101 - Interim Step
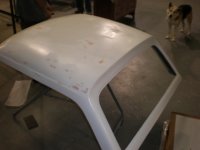
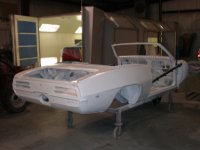
Holidays slowed things a little; but, here's a photo of the final sanding before tan buildable primer is applied. You can scroll up to my last photo to compare it to this one to see how much body filler hit the floor when they did this last sanding.
Next they'll clean the underside & spray the entire top - outside & inside with the tan buildable primer. Then, they'll spray the final color on the inside, tape it off & finish the outside.
Attachments
OP
tony barnhill
Great Pumpkin - R.I.P
Offline
Re: Hardtop Restoration 101 - Interim Step
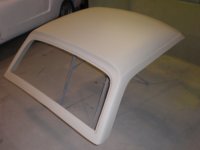
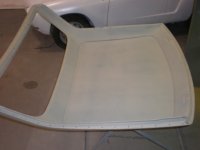
So, the we're reaching the final stage...in the 1st 2 photos below, the buildable primer has been sprayed on the top - both outside & inside.....next, we'll make any repairs to the inside & retexture it for paint.
At the same time, we'll be sanding the outside to see if it's perfectly smooth...if any low or high spots show up, we'll work them out with another coat of buildable primer.
And, just for the heck of it, the last 2 photos show the other cars in the bodyshop (besides mine)....both have been sandblasted and are primed with white epoxy primer.
Attachments

OP
tony barnhill
Great Pumpkin - R.I.P
Offline
Re: Hardtop Restoration 101 - Interim Step
GTO
GTO
Re: Hardtop Restoration 101 - Interim Step
Hello all! Im new to the forum and have purchased a factory hardtop. It is in need of repairs! The major focus is where the header rail retainer attaches to the top has separated. Inner from outer. Looks like the PO had busted the rivots out destorting the holes. Can anyone advise how these fit back together? I also have to duplicate the area from the drivers latch due to the passenger side being completly broken out. Thanks in advance for all help.
Hello all! Im new to the forum and have purchased a factory hardtop. It is in need of repairs! The major focus is where the header rail retainer attaches to the top has separated. Inner from outer. Looks like the PO had busted the rivots out destorting the holes. Can anyone advise how these fit back together? I also have to duplicate the area from the drivers latch due to the passenger side being completly broken out. Thanks in advance for all help.

Offline
Re: Hardtop Restoration 101 - Interim Step
Hoo-boy!
First off, welcome to the party!
You've dug up an old thread that will no doubt trigger some memories here. The instigator of this thread was our own Tony, who died a few years ago.
If you'll post a picture or two of the area of concern, I'm sure you'll get some responses.

Mickey
Hoo-boy!
First off, welcome to the party!
You've dug up an old thread that will no doubt trigger some memories here. The instigator of this thread was our own Tony, who died a few years ago.
If you'll post a picture or two of the area of concern, I'm sure you'll get some responses.
Mickey


Offline
Hmmm.... Looks like a lot of "creative engineering" is called for there. Besides cleaning up the rust and reinforcing the metal bar and clamp fixings, plenty of fiberglassing to do as well.
Any thoughts of finding another top?
Any thoughts of finding another top?
Offline
Yikes!
GIANT rats?!?!
That's gonna need some TLC. I will suggest looking into Marson tools for threaded inserts to 'fix' the anchor points. As to the missing 'glas pieces, I'd fab the anchor points first then use some vis-queen or other heavy plastic and mold releasing agent to approximate the missing sections with fibreglas rather than trying to bond it to the main liner immediately. That way you can cut/shape/fit the replacement bits to more closely mimic the correct shapes and drill the holes THEN bond it all together.
https://www.grainger.com/Grainger/MARSON-Plier-Style-Setting-Tool-5JK71?Pid=search
