• Hi Guest!
    You can help ensure that British Car Forum (BCF) continues to provide a great place to engage in the British car hobby! If you find BCF a beneficial community, please consider supporting our efforts with a subscription.

    There are some perks with a member upgrade!
    **Upgrade Now**
    (PS: Subscribers don't see this gawd-aweful banner
Tips
Tips

HALLALUJIAH!!! FINALLY....

Re: Hallelujiah...I Shouldn't, but...

"Slowly and steadily, we will surely reach our destination"
 
Re: Hallelujiah...I Shouldn't, but...

Very nice. Now that wasn't too difficult was it. The rear is a peice of cake.
 
Re: Hallelujiah...I Shouldn't, but...

Yep - plumbing pulled to the rear already so now its assembling & installing the rear end...I'll start with installing the radius arm brackets & shocks after I get off jury duty tomorrow.
 
Wiring Harness Addendum

So, it appears the factory has 'homolgated' the wiring harnesses for the MkI pull starter cars & MkII starter solenoid cars...after running lots of continuity checks, here's what I've learned:

++ I'll have to cut the white/red wire out of the harness where the brown wire goes to the negative post of the battery - after changing the end of the brown wire so it can be bolted onto the screw of the battery post cable - & also cut the white/red wire where it comes out at the ignition switch.

++ I'll have to cut the 3rd white wire that runs from the coil to the ignition switch so that it will loop through the U-shaped iron core connector on the back of the tach...that original looped connector has bullet connectors on either end so I'll have to install bullet connectors on the cut wire so I can plug it into the original connector on the back of my tach. And it's long enough to then become the 3rd white wire on the ignition switch.

Plus, who knows what else I'll run into! But, at least I don't have to wait weeks to get another harness.

I'l tell you one thing though: Blaine at Moss tech support is absolutely fabulous & can walk a person through any problem solution with utmost patience. And he said as I'm buttoning things up and get ready to actually make the cuts to call him & he'll walk me through each modification. Its a new one on him also!

I just wish the factory put a note in the bag with the harness explaining their 'homolgations' (I don't know any other word for it!

WHEW!!
 
Re: Wiring Harness Addendum

im startin to think u just might get
that thing finished in time!! :wink: ....z
 
Re: Wiring Harness Addendum

zimmy said:
im startin to think u just might get
that thing finished in time!! :wink: ....z
Might - but its fighting me step-by-step.

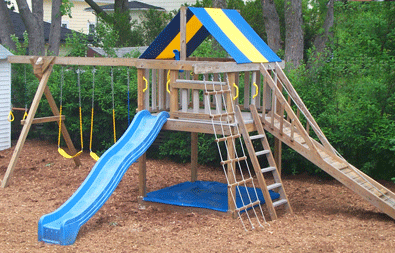
This afternoon I started cutting & drilling the wood for the jungle fort I'm building for my grandson next Wed, Thurs, Fri (his 2nd birthday is the 23rd & we're having a family celebration Sunday)....so, I'll spend a few hours each day on it....here's a picture of what it'll be when finished:

jf1ssphoto.gif
 
Re: Wiring Harness Addendum

This sort of makes up my mind. I'm just going to knock out a homemade harness for the new MkIII. Basic respect for the color code, measured outline on a 4x8 sheet of ply with nails at the nodes and turns. Modern nylon pull/shrink/mesh for the outside. Should kill two days at most and accomodate negative ground, alternator, relays for the headlights and horn, Left hand drive, extra brakelight, proper warning flashers, two speed wipers, modern radio and speakers, hidden ignition security switch, etc.

At a certain point, with all the mods that I want to do, the changes outnumber the unchanged wires.

The PO did this for my bugeye and I've had no wiring problems with it. He didn't respect the color code, but he used simple logic to group like things into like colors. For cars this simple, it's an option.

Glen
 
Re: Wiring Harness Addendum

Well, Glen...I can tell you I spent 2 hours doing continuity checks & redoing them this morning, talking with Blaine at Moss & the folks at British Wiring (both use the same factory) trying to figure out how to make this harness work....& I'm still not gonna cut anything until I get ready to check each circuit....so, you won't be spending a lot more in effort.
 
Re: Wiring Harness Addendum

Glenn, I just made mine for the Ugly Bug. It was easy and it makes for a neater installation. I used the nylon flex-braid cover and it looks great (too good for the Ugly Bug). I used new and old wire and stayed true to the Lucas colors.
 
Re: Wiring Harness Addendum

On behalf of your grandson... GRAMPA TONY, YOU'RE THE BESTEST!!! :laugh:
 
Re: Wiring Harness Addendum

On behalf of your grandson... GRAMPA TONY, YOU'RE THE BESTEST!!! :laugh:
 
Re: Wiring Harness Addendum

Silverghost said:
On behalf of your grandson... GRAMPA TONY, YOU'RE THE BESTEST!!! :laugh:
Thanks, Peter...I'm spending about 2 hours each afternoon before dinner cutting wood - finally finished all the 2x4 stock first time through..lots more to go before next Wednesday when I start assembly.

Oh, the little Midget is moving along...everyday something's going together....I'm actually getting ahead of it a little!
 
Re: Wiring Harness Addendum

WHEW!! All the lumber for the "fort" has been cut - for the 1st time...now I've gotta go back & do some 2nd cuts & then drill all the holes.

& the little Midget is slowly moving along.
 
Re: Wiring Harness Addendum

If could piggy back off this thread....same topic really.
My harness for my '63 has lots of extra wires, most notably 4 extra greens behind the dash end, near the rest of the switch wires, don't even see them in later years but I didn't look through all of them. I was going to just "cap" them off. I doesn't have a feed to the heater motor either that I can find. GY I believe, I know it was optional, can run my own of course.
Anyway, okay to pretty much ignore all the extras? There's more extra's too, by where the rear harness hooks in, GP, GW, GR,R rear lights and all, but there's more of them, maybe for side lights something my '63 doesn't have? Is a GW a GW? Use anyone and cap the other? I hope. I'm sick of tracing wires!!
 
Re: Wiring Harness Addendum

Tony,

The 8-10 hours of promised assembly time by two adults turned into more like 40 hours by the time we got the playset assembled for the grandkids this summer. Very similiar to what you've got. Wait until you get to the tubular slide. 165 bolts to be fit and fastened and none of the holes want to line up. GFL keeping this project and the Spridget project going simultaneously.
 
Wow Tony. Very, very nice. Im wishen I was you right now. I have a 78 and I always like seeing the front end grill design on the car you have versus mine. I start wondering if I did some cutting and fabrication if I could change it over? Probably not a good idea and would just create some major problems in the process.
Im looking forward to seeing that thing done.
 
Tony, you suck! I'm soooo wanting to be doing the things that you're up to! But, oh no, got to work, take care of the kid, plow the stupid snow, plow the stupid snow, plow the stupid snow..... This is one long winter! Your car is going to look fantastic!


Forcast:
Tonight: Snow showers. Low around 12. Wind chill values as low as -5. Calm wind becoming north between 12 and 15 mph. Winds could gust as high as 26 mph. Chance of precipitation is 100%. Total nighttime snow accumulation of 3 to 5 inches possible.
More of the stupid snow!!!!
 
Little Midget is under a car cover until the upstairs gameroom/apartment is finished....too much dust & traffic in garage.

All it lacks is a few nit-noid engine compartments items hooked up, exhaust installed, grille reinstalled after radiator installation, fluids, etc.
 
tony barnhill said:
Little Midget is under a car cover until the upstairs gameroom/apartment is finished....too much dust & traffic in garage.

All it lacks is a few nit-noid engine compartments items hooked up, exhaust installed, grille reinstalled after radiator installation, fluids, etc.

Remember Tony, Jack and myself still have the leg breakers on
stand by :smile:
 
Back
Top