but were afraid to ask:
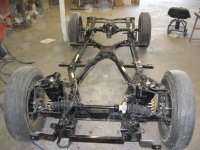
 I’m installing Goodparts Trail arm kits on my frame. Somewhere in the instruction or I read on a post that to set the toe shims are needed between the mounts and frame. It was so long ago since disassembly I have no idea how many shims were there originally. Is this something I shouldn’t worry about now since it’ll be awhile before the suspension is fully loaded. Or should I put a couple in to fit up the TA’s Thanks
-
 Hey Guest!
British Car Forum has been supporting enthusiasts for over 25 years by providing a great place to share our love for British cars. You can support our efforts by upgrading your membership for less than the dues of most car clubs. There are some perks with a member upgrade!**Upgrade Now**
(PS: Upgraded members don't see this banner, nor will you see the Google ads that appear on the site.)

Tips
- We have a special forum called "Member Articles" where you can submit actual articles for consideration for publication. Learn More
- Don't have an Avatar? If not, your avatar will default to the 1st character in your username. Go into "Account Details" to change your Avatar.
- Some basic forum navigation info: click
 Hey - did you know if you click on the title of a thread it will take you to the first unread post since you last visited that thread?
- Hey Guest - Is your British Car Club in our Clubs database? If not, send me a PM - Basil

- Looking for a local club? Click the "Clubs" tab above and browse hundreds of clubs world-wide.
- Add Android or iPhone APP: click
- Did you know - any picture or video you add in your posts in any marque-specific forum will also get added to the Media Gallery automatically.
- A few more tips about posting and replying: click
- Hey there Guest - be sure to keep your profile page up to date with interesting info about yourself: learn more
- More tips and tricks on Posting and Replying: click
 STOP!! Never post your email address in open forums. Bots can "harvest" your email! If you must share your email use a Private Message or use the
  smilie in place of the real @
- Want to mention another member in a post & get their attention? WATCH THIS

- So, you created a "Group" here at BCF and would like to invite other members to join? Watch this!
- Hey Guest - A post a day keeps Basil from visiting you in the small hours and putting a bat up your nightdress!
- Hey Guest - do you know of an upcoming British car event?
 Pretty Please - add it to our Events forum(s) and add to the calendar! >> Here's How <<
- Hey Guest - you be stylin' Change the look and feel of the forum to fit your taste. Check it out
- If you run across an inappropriate post, for example a post that breaks our rules or looks like it might be spam, you can report the post to the moderators: Learn More
- If you would like to try some different "looks" or styles for the site, scroll to the very bottom, on the left and click the Style Selector.
You are using an out of date browser. It may not display this or other websites correctly.
You should upgrade or use an alternative browser.
You should upgrade or use an alternative browser.
TR6 Goodparts Trail arm kits mounting just to the frame( no body) and shims?
- Thread starter Kingcat
- Start date
Tybalt
Jedi Warrior
Offline
As poolboy says, you still need to shim to even out wheelbase and adjust rear toe. The significance of the adjustable bracket is that they let you adjust camber without all the exercises of figuring your baseline then juggling one, two or three notch brackets and whether or not they should be notches up or notches down to adjust rear camber. After that little exercise, you get to recheck rear camber and if it is not where it should, you get to disassemble, rejuggle everything and reassemble then recheck repeating as necessary until you get it where you want it. I talked a friend into getting a set for his TR250 before he took it in for an alignment. The folks at GT East knew what rear camber adjustment was like on these cars and went into it expecting the usual task ahead. Then they saw the adjustable trailing arm brackets and he said they just smiled and then asked why he didn't tell them he had those on the car. Everyone was happy.
The only thing I didn't like about that kit, and it seems the vast majority of kits out there regardless of source is the hardware. Richard uses SAE hardware which has somewhat restricted bolt grip length choices available and longer threaded sections. I replaced the supplied hardware with AN stuff so I could make sure that the threads would not be loaded in shear (bad juju there). The primary pivot bolts are an AN7 but I don't recall specifically which grip length dash number I used. I think it was -42 which is a 3 11/16" grip length but take a measurement on the movable block outer to outer face to confirm the grip length you need. The callout for the bolt you need if -42 is the correct grip length would be AN7-42A for an undrilled head and undrilled shank 7/16" bolt. Another thing is that you will probably need slightly longer bracket to frame bolts unless Richard is kitting them with longer bolts now to allow shim fitment compared to when I bought them many years ago. Those would be an AN6-xxA but I have no idea off hand what grip dash number other than it was in the -5x or low -6x range. It's been many years now and the memory has gotten a bit foggy on that level of detail.
And remember, you can always "adjust" grip lengths by going the next dash longer and stacking washers on the nut side (or on the bracket to frame bolts more so on the bolt head side) if need be to keep the threads from seeing shear loads. Good sources for AN hardware are Aircraft Spruce and Pegasus Racing.I find that I can buy AN stuff from Spruce and often from Pegasus for less than what I would pay at local hardware stores or local fastener houses. Once or twice a year I take a look at what I have on hand and place what amount to a stock order with Spruce as a result. Pegasus has a nice little explainer on AN fastener callouts here:
 www.pegasusautoracing.com
The only thing I didn't like about that kit, and it seems the vast majority of kits out there regardless of source is the hardware. Richard uses SAE hardware which has somewhat restricted bolt grip length choices available and longer threaded sections. I replaced the supplied hardware with AN stuff so I could make sure that the threads would not be loaded in shear (bad juju there). The primary pivot bolts are an AN7 but I don't recall specifically which grip length dash number I used. I think it was -42 which is a 3 11/16" grip length but take a measurement on the movable block outer to outer face to confirm the grip length you need. The callout for the bolt you need if -42 is the correct grip length would be AN7-42A for an undrilled head and undrilled shank 7/16" bolt. Another thing is that you will probably need slightly longer bracket to frame bolts unless Richard is kitting them with longer bolts now to allow shim fitment compared to when I bought them many years ago. Those would be an AN6-xxA but I have no idea off hand what grip dash number other than it was in the -5x or low -6x range. It's been many years now and the memory has gotten a bit foggy on that level of detail.
And remember, you can always "adjust" grip lengths by going the next dash longer and stacking washers on the nut side (or on the bracket to frame bolts more so on the bolt head side) if need be to keep the threads from seeing shear loads. Good sources for AN hardware are Aircraft Spruce and Pegasus Racing.I find that I can buy AN stuff from Spruce and often from Pegasus for less than what I would pay at local hardware stores or local fastener houses. Once or twice a year I take a look at what I have on hand and place what amount to a stock order with Spruce as a result. Pegasus has a nice little explainer on AN fastener callouts here:
Identifying AN Bolts: Sizes and Nomenclature - Pegasus Auto Racing Supplies
Ordering AN bolts can be confusing because the sizing is so different from SAE graded bolts. AN bolts are identified by grip length (not shank length), and the threads are shorter than on SAE bolts.
Last edited:
Thanks for the great info on the bolts. Not sure if my kit came with the longer bolts. Since the suspension won't be put under load for a good while should I put acouple of shims in just for mounting the TA's now. Thanks again. One of those long restoration stories 40 yrs in the making. Lot's of questions. ThanksAs poolboy says, you still need to shim to even out wheelbase and adjust rear toe. The significance of the adjustable bracket is that they let you adjust camber without all the exercises of figuring your baseline then juggling one, two or three notch brackets and whether or not they should be notches up or notches down to adjust rear camber. After that little exercise, you get to recheck rear camber and if it is not where it should, you get to disassemble, rejuggle everything and reassemble then recheck repeating as necessary until you get it where you want it. I talked a friend into getting a set for his TR250 before he took it in for an alignment. The folks at GT East knew what rear camber adjustment was like on these cars and went into it expecting the usual task ahead. Then they saw the adjustable trailing arm brackets and he said they just smiled and then asked why he didn't tell them he had those on the car. Everyone was happy.
The only thing I didn't like about that kit, and it seems the vast majority of kits out there regardless of source is the hardware. Richard uses SAE hardware which has somewhat restricted bolt grip length choices available and longer threaded sections. I replaced the supplied hardware with AN stuff so I could make sure that the threads would not be loaded in shear (bad juju there). The primary pivot bolts are an AN7 but I don't recall specifically which grip length dash number I used. I think it was -42 which is a 3 11/16" grip length but take a measurement on the movable block outer to outer face to confirm the grip length you need. The callout for the bolt you need if -42 is the correct grip length would be AN7-42A for an undrilled head and undrilled shank 7/16" bolt. Another thing is that you will probably need slightly longer bracket to frame bolts unless Richard is kitting them with longer bolts now to allow shim fitment compared to when I bought them many years ago. Those would be an AN6-xxA but I have no idea off hand what grip dash number other than it was in the -5x or low -6x range. It's been many years now and the memory has gotten a bit foggy on that level of detail.
And remember, you can always "adjust" grip lengths by going the next dash longer and stacking washers on the nut side (or on the bracket to frame bolts more so on the bolt head side) if need be to keep the threads from seeing shear loads. Good sources for AN hardware are Aircraft Spruce and Pegasus Racing.I find that I can buy AN stuff from Spruce and often from Pegasus for less than what I would pay at local hardware stores or local fastener houses. Once or twice a year I take a look at what I have on hand and place what amount to a stock order with Spruce as a result. Pegasus has a nice little explainer on AN fastener callouts here:
Identifying AN Bolts: Sizes and Nomenclature - Pegasus Auto Racing Supplies
Ordering AN bolts can be confusing because the sizing is so different from SAE graded bolts. AN bolts are identified by grip length (not shank length), and the threads are shorter than on SAE bolts.
Tybalt
Jedi Warrior
Offline
Probably not a bad idea to get things semi-dialed in if the suspension and hub are in place and the car is already up in the air but not really required at this point. You can at least get the wheelbase adjustment pretty close and depending on what kind of precision measuring instruments or if have them, toe plates, you can do a little in that area too. Just bear in mind anything you do now regarding rear toe will probably have to be readjusted somewhat once you start adjusting camber. They are interrelated to some degree so an adjustment to one means that you need to at least check the other. And make sure that you allow the suspension to "settle" by rolling the car back and forth a few times unless you are using some hubstands on a really nice smooth level surface that allow the suspension to settle as you lower the car.

Offline
Get some string. The roughing out of the rear suspension is a lot of fun. Find the center line of the frame, use it for a reference
for installing the shims. Bear in mind you are setting the THRUST alignment also . The wheel base and the tow need to be reasonably close
to drive it to the alignment shop .Just get in the ballpark ,Buy the beer when you get there!!
Mad dog
for installing the shims. Bear in mind you are setting the THRUST alignment also . The wheel base and the tow need to be reasonably close
to drive it to the alignment shop .Just get in the ballpark ,Buy the beer when you get there!!
Mad dog
Thanks for the great advice. I'll keep the info in mind as I set things up.Probably not a bad idea to get things semi-dialed in if the suspension and hub are in place and the car is already up in the air but not really required at this point. You can at least get the wheelbase adjustment pretty close and depending on what kind of precision measuring instruments or if have them, toe plates, you can do a little in that area too. Just bear in mind anything you do now regarding rear toe will probably have to be readjusted somewhat once you start adjusting camber. They are interrelated to some degree so an adjustment to one means that you need to at least check the other. And make sure that you allow the suspension to "settle" by rolling the car back and forth a few times unless you are using some hubstands on a really nice smooth level surface that allow the suspension to settle as you lower the car.
Driving to the alignment will call for a celebration.Get some string. The roughing out of the rear suspension is a lot of fun. Find the center line of the frame, use it for a reference
for installing the shims. Bear in mind you are setting the THRUST alignment also . The wheel base and the tow need to be reasonably close
to drive it to the alignment shop .Just get in the ballpark ,Buy the beer when you get there!!
Mad dog
Offline