• Hey Guest!
    British Car Forum has been supporting enthusiasts for over 25 years by providing a great place to share our love for British cars. You can support our efforts by upgrading your membership for less than the dues of most car clubs. There are some perks with a member upgrade!

    **Upgrade Now**
    (PS: Upgraded members don't see this banner, nor will you see the Google ads that appear on the site.)
Tips
Tips

glueing leather

ekamm

Jedi Warrior
Offline
I'm about ready to recover the leather portion of my cappings. I have read here that stretching of leather is best done wet or damp. But, with my dissatisfaction of the contact cement(that I have gotten better at) I wonder how will the wet leather adhere to the capping?
 
ekamm said:
I'm about ready to recover the leather portion of my cappings. I have read here that stretching of leather is best done wet or damp. But, with my dissatisfaction of the contact cement(that I have gotten better at) I wonder how will the wet leather adhere to the capping?

Eric: I can understand your trepidation, but it does work out very well. This is what I did. First I made sure that the cappings were rust free. Then I powder-coated them (paint is fine). Be sure that the paint is properly dry. Also be certain that the surface is perfectly smooth before laying down the leather. If you're not certain, give the surface a once over with 220 wet/dry paper. Trim your leather pieces so that you have plenty of overlap. Fill a small bucket with hot tap water (boiling water is not necessary). Soak the leather in the hot water until it cools. Now take out the strips and cover the cappings, gently pulling and stretching the leather as you do this. You will notice a definite grain in the leather and be sure you dont over-stretch the leather. Dont be afraid to wipe off the extra water by rubbing a soft dry cloth against the leather. When you have the leather stretched to where the grain looks even overall hold it in place on the capping with small clamps or clothes pins. I put a piece of cardboard between the clip jaws and the leather so it wouldn't leave a mark. What you need to do now is let the leather dry. The leather covering will dry and in this state will not shrink back to its original form. When dry you are going to glue the leather in place. I used WeldWood original contact cement. Now you are going to uncover each capping, but only one half at a time - length wise. When you have the first uncovered, apply the contact cement to BOTH the capping and the underside of the leather. DONT LET THEM TOUCH Then, after waiting for the cement to dry thoroughly, recover the capping, smoothing it with a damp cloth from the top to the bottom. This should never move, but you can use a few clips. Now, your ready to cement the other half of the capping. Be sure not to trim any excess leather untill you are ready to attach the capping to the doors or tonneau surround. This should work OK. it did for me.
DSC04227-r1s.jpg
 
Talk to an upholsterer and find out what they are using. I had a small project performed by an upholsterer a few weeks ago that required glue. He used a product with the consistancy of Elmer's White Glue, but was a very fast setting rubber based, leather specific adhesive. It's not a product sold through retail.
 
I also covered my cappings in leather. The doglegs were the only time I soaked the leather before stretching, as that concave curve is hard to get without wrinkles. Actually, that was the only section of the leather I soaked. I also used a heat gun, but on low setting. I used 3M #77 in the spray can. I sprayed it on both the leather (while still wet, but not dripping) and the dogleg piece. I put the dogleg in a jig (courtesy of a design by Geo Hahn) and stretched it all on while the glue still had some give. I had to use a little heat also. After the glue dried on the upper dogleg section, I trimmed and folded it over and glued in place with brushable contact cement. The other cappings did not require any wetting or heat.
 

Attachments

  • 20178.jpg
    20178.jpg
    29.8 KB · Views: 359
Art after the upper part dried I assume you meant to say that you continued on down to the lower part. Did you do the entire exposed (top) portion and then trim and fold under the edge?
 
Worth mentioning that once the cappings are mounted to the body the leather is really well-clamped by the tight fit of the capping over the body so I don't think you need a whole lot of glue to keep it all together.

I just used a light coat of spray adhesive. As I recall I used it while the leather was still wet. Here's a shot of the stretching part way thru:

dogleg3.JPG
 
Geo looks like you did this all at one time or am I wrong?
 
ekamm said:
... Did you do the entire exposed (top) portion and then trim and fold under the edge?

Yes, that's what I did. Sorry I wasn't more clear in in the earlier post. I did it all at one time on the top section, meaning the outer part of the dogleg.
 
BTW, here's a picture of Geo Hahn's jig without the dogleg on it. I made mine from a piece of 3/4" wood.

It really holds the dogleg in place and you can really apply the necessary forces to get a nice clean result.
 

Attachments

  • 20179.jpg
    20179.jpg
    24.2 KB · Views: 334
So the door cap recovering is going well. My issue right now is how do you get the button on the end to stay in tight? I made a small hole to push in the "retaining spring" but no matter how hard you push it ca only go so far. Any jarring is likely to make it floppy.
cappings065.jpg
[/img]

cappings070.jpg
[/img]
 
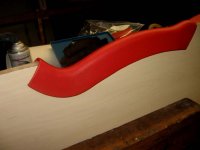
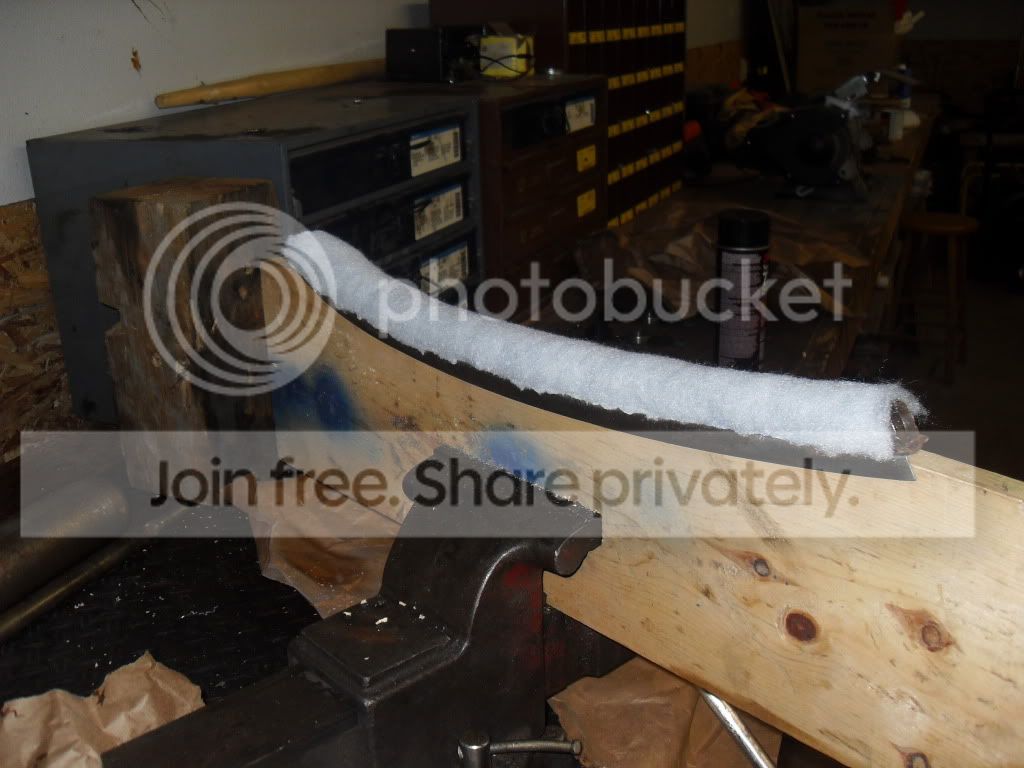
I did my doglegs in leather, built a jig contained in an vice, and used standard contact cement as the bonding agent. I did mine dry, and produced some very slight stretching marks towards the bottom of the curve, but 1000% better looking than some of these messes I see at car shows. It was my first try at something like this.

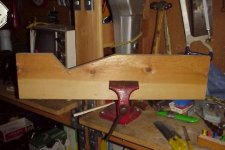
First, I'd suggest doing the dash rail before the doglesgs, so you get a feel for how the leather stretches, how to fold it around the edges, and how the cement reacts to the materials.

For my dog legs, I started at the top, and worked my way down to the complex curve. I had to do the bottom curve in two stages: the first was to stretch and manipulate the leather around the leading edge, let it dry, then continue to stretch it around the trailing edge of the capping, until I was able to flip the leather around the sides, at which point the leather seemed to pull in on itself. In retropect a heat gun probably would have helped stretch the leather and saved my fingers some soreness. I spent around 2 hours on each capping, pulling streching and smoothing the leather as I went.
 
P.S. I developed a disdain for the contact cement I was using too, cursing it as I went along. THEN I decided to actually read the instructions and learned that one must allow the cement to dry (before trying to adhere the pieces) to the point it gets sticky and tacky on both the leather and the capping. This will help allow the pieces to grab and adhere to each other, as opposed to using wet cement whcih won't get you very far, very fast. Who was the genius that thought up those crazy things we call instructions anyway?
 
I built a jig to do the door cappings (ala Geo Hahn) It helped to get the leather tight. I didn't pull it to tight, I didn't want to pull the grain out.I really want to see the leather grain.
cappings052.jpg
[/img]

cappings054.jpg
[/img]
 
Back
Top