• Hi Guest!
    You can help ensure that British Car Forum (BCF) continues to provide a great place to engage in the British car hobby! If you find BCF a beneficial community, please consider supporting our efforts with a subscription.

    There are some perks with a member upgrade!
    **Upgrade Now**
    (PS: Subscribers don't see this gawd-aweful banner
Tips
Tips

Generator to Alternator Swap

AUSMHLY

Yoda
Country flag
Online
Hello,

I'm replacing the Lucas C42 generator with a WOSP LMDC42 alternator, Dynator.

The pulley on the WOSP has a smaller diameter than the Lucas.

1) Does the diameter make a difference? Should I swap or ok to leave the smaller WOSP?
2) If I should swap, how do I remove remove the nuts.

The Lucas has one nut.
The WOSP seems to have 2 nuts. A smaller one in the center of the larger one. Not sure if the small center nut needs to be removed or why it's there. How do I remove one or both to get the pulley off?

Thank you in advance.

A2CB35C3-E11F-4578-9600-33201E8590A7.jpeg
F5BEC9CD-3FAF-4144-B2A5-2514D1D0B61C.jpeg
 
Last edited:
I'd check with the supplier before messing with the pulley. I would be surprised if WOSP sent an alternator with the wrong pulley.

Most alternators run quite a bit faster than generators so usually have smaller diameter pulleys and, from your second picture, it looks like the armature shaft is bigger diameter than the old generator armature shaft so the pulleys probably won't interchange anyway.

The alternator doesn't look like it has two nuts - looks like a hex has been cut into the end of the armature as a way to hold it from turning when tightening or loosening the nut. On the generator, there are two holes in the pully for a spanner wrench to keep it from turning.

Dave
 
1) Does the diameter make a difference? :
Yes it will speed up the WOSP unit.

Should I swap or ok to leave the smaller WOSP?

Well TH all I Can tell U is the smaller pulley may be
a performance requirement for the WOSP device.
 
Hello,

I'm replacing the Lucas C42 generator with a WOSP LMDC42 alternator, Dynator.

The pulley on the WOSP has a smaller diameter than the Lucas.

1) Does the diameter make a difference? Should I swap or ok to leave the smaller WOSP?
2) If I should swap, how do I remove remove the nuts.

The Lucas has one nut.
The WOSP seems to have 2 nuts. A smaller one in the center of the larger one. Not sure if the small center nut needs to be removed or why it's there. How do I remove one or both to get the pulley off?

Thank you in advance.

View attachment 71944View attachment 71947
 
Looks to me as if the axle has a (fixed) hexagon to hold when removing the bigger nut
 
Since I am not a slave to originality when I went looking for an alternator about 15 years ago I did not consider the units that resemble generators.

The alternator I selected is a 75 amp Leece-Neville/Prestolite "Universal" unit and it had to features I found most attractive:

1. It came with a two-piece pulley and washers to shim the pulley sections apart me which allowed me to retain the original 3/4" wide belt so I did not have to address replacing the WP pulley, and

2. It has an external regulator that simply plugs into the housing via a couple of blades. Although I have never had to replace the regulator in 15 years of service if I should ever need to it is only a matter of plugging in the replacement I carry in the boot. Failed regulators are not uncommon and since most alternators have interrnal regulators this entails an R & R and a trip to the alternator shop--one less thing about which I must worry!
 
After dicking around with a cobbled-together melange of slotted arms and wedging big screwdrivers against fragile British castings while trying to get my big mitts into tight places I decided to install this universal Balmar tensioner:


Life is now good--no bruised arms, etc.
 
Michael that's pretty cool that someone in the aftermarket has put together a kit for that adjuster.
Toyota has used that arrangement on many engines over the past 20-25 years and I always thought it would be a great product for the aftermarket.
 
Craig--

The initial installation takes a little time setting up distances, pivot points, etc. but once installed tightening/loosening the belt is simply a matter of backing off a lock nut and turning a wrench. It comes in blue anodized but if that bothered you it could of course be painted Healey Engine Green or the color of your choosing.
 
Michael,
That adjuster has a nice clean look. Lots of hot rods I see use turnbuckles for adjusters and your setup looks much better.

I trust with 75 amps on tap, you've got a heavier primary wire, such as AWG 8 or 10 and not the stock Healey yellow wire.
 
Michael,
That adjuster has a nice clean look. Lots of hot rods I see use turnbuckles for adjusters and your setup looks much better.

I trust with 75 amps on tap, you've got a heavier primary wire, such as AWG 8 or 10 and not the stock Healey yellow wire.
Steve--

Many aftermarket tensioner setups use a turnbuckle on the left side of the engine as a "puller". This avoids having to fabricate a new mounting point in an already crowded engine compartment.

You're right on the wiring gauge--8AWG--and resistance from undersized wiring is definitely something to avoid.
 
I put together a One Wire alternator kit using a Nippondenso alternator (35 AMPs) with Triumph alternator brackets, all thread and sleeves for clean look. The alternator is small and looks correct. The kit also included a bracket to mount the Coil. Since the alternator has an internal regulator you would need to gut or replace with a "Dummy Regulator" available from Moss. This is just another option.
 

Attachments

  • BJ8 NEGIVE GROUND ALTERNATOR INSTALLATION.pdf
    135.5 KB · Views: 215
This is the Triumph bracket mentioned above. With a couple of these and some 5/16" all-thread, one can build an inexpensive alternative kit to fit a GM configured alternator, such as the 35 amp Denso. Also available in SS for 3x the price.

screenshot.2959.jpg
 
Mike, do you have a photo of the alternator with the adjusting bracket in place in your car? Thanks, Lin
 
Lin--

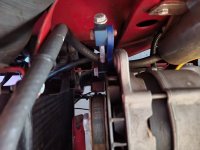
It's hard to get a shot that shows much without major disassembly but attached is a pic taken from directly above the alternator. The anodized blue piece is the bracket and the nut is the adjuster. As said, the initial mounting of the adjuster and the alternator is a knuckle skinner but once it's in making an adjustment on belt tension is a piece of cake.
 

Attachments

  • alternatortensioner.jpeg
    alternatortensioner.jpeg
    1.5 MB · Views: 167
I have a 1960 BT7, I am planning on switching to negative ground so any reason why I can’t use this unit?
 
I have a 1960 BT7, I am planning on switching to negative ground so any reason why I can’t use this unit?
What unit? You did not post either a picture or a description of whatever it is you are referring to.
 
Back
Top