
 Hey Guest!

 Hey - did you know if you click on the title of a thread it will take you to the first unread post since you last visited that thread?
 but were afraid to ask:
  STOP!! Never post your email address in open forums. Bots can "harvest" your email! If you must share your email use a Private Message or use the
  smilie in place of the real @
 Pretty Please - add it to our Events forum(s) and add to the calendar! >>
Tinkerman
Darth Vader
Offline
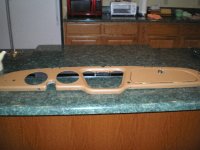
Well, the dash is covered. A tedious time consuming job. I have a bunch of pictures to share if any one is interested.
THINGS I LEARNED:
1. Weldwood brush on contact worked very well. Spray contact was not fun to work with, would not suggest it.
2. The interior corners of the cubby box opening were by far the toughest.
3. Do not pre-cut any holes in the vinyl before gluing. At the suggestion of a friend who had worked with vinyl I did. Caused me considerable grief as I got into the project.
4. I used primer on the back of the dash and the solvents in the glue caused it to get soft. Had to let the glue dry a minimum of 30 min. for it not to create a problem.
5. I used a heat gun to soften the vinyl for the stretch around corners. Heat the back of the vinyl NOT the front. Doesn't take much heat, experiment on scrap pieces.
6. On the tight corners I let the cement dry at least 24 hours before removal of the clamps.
TOOLS FOR THE JOB
As you can see from the picture I used a variety of cutting, clamping, markers and glue applicators to get the job done. I used the heat gun on a low setting briefly to get the right stretch in the vinyl.
I forgot to mention 2 important tools. At the suggestion of Texas Knucklhead I cut out a plywood plug for the instrument cluster and used a large socket and clamp for the steering column section. Those really helped.
Good luck to those of you out there that are planning to do the same job and feel free to contact me for questions or pictures.
Cheers, Tinkerman

 Nice job Dick.
