• Hi Guest!
    If you appreciate British Car Forum and our 25 years of supporting British car enthusiasts with technical and anicdotal information, collected from our thousands of great members, please support us with a low-cost subscription. You can become a supporting member for less than the dues of most car clubs.

    There are some perks with a member upgrade!
    **Upgrade Now**
    (PS: Subscribers don't see this gawd-aweful banner
Tips
Tips

Front tilt bonnet done

David_Doan

Jedi Warrior
Country flag
Offline
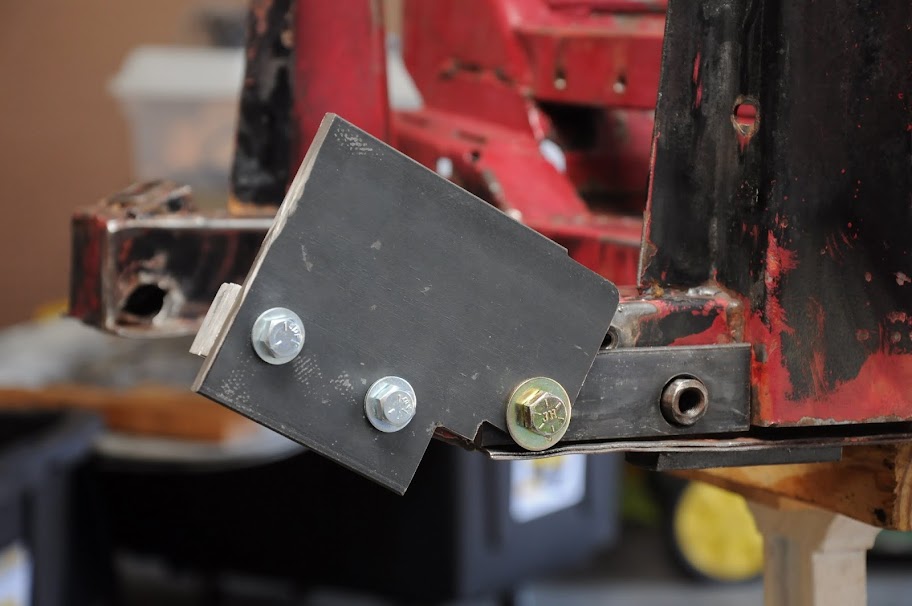
I made my front tilt kit this weekend, more pics in my blog for those who are interested. I still have to work out what I’m going to do for stops for the hinge. I’d like to use gas struts if possible. I really want to come up with some kind of power opener, maybe using a power-antenna motor.

UPDATE: Added gas struts as stops, details HERE

DSC_0436.JPG
 
Last edited:
I’d like to use gas struts if possible. I really want to come up with some kind of power opener, maybe using a power-antenna motor.

Old power top system, yes; power antenna, can't see it happening. Most ones I've seen have a plastic belt drive and not near strong enough. UNless you are building a framework for the opener/strut load point I wouldn't do it. I'd be too concerned about bending the front end depending where you tie in at.
 
David,

Looking good. You've got most of the work done. Look at the hinge plans for this at Gerard's Web page. The plans there have the built in stop. Bolt through the side of the radiator support strut that connects to a slide and teflon bushings. All of the needed bushings available at local Tue Value or Ace. A really simple plan and just a little bit more and you are complete. Teflon bushings will make it much easer to go up and down and with the built in stops no cable to get in the way. I built everything from scratch using drill press, angle grinder, files, etc. Just a little patience required.

RE latches, not sure if you worked that out yet but I used SS Adjustable Draw Latches w Lock from McMaster Carr Catalog. 2 small screws in the body and 2 in bonnet hold everything in place. Go for the ones rated as 400 lbs. load. About $10-15 each as I remember but after breaking 2 sets of other latches from another supplier out of Cleveland these work and look good as well. The adjustable part id important as bonnet will change shape as it's mounting point has changed.

One of Frank C' tips for forward tilt bonnets was welding a piece of 1/4" SS rebar on the inside lip of the bonnet in the curve right at the top orf the arch. This is a weak spot on BE Bonnets and they have a tendency to crack there.
 
One other thought, Front Harness. I used a 6 way trailer connection as a quick disconnect for the front harness. I combined all of the grounds for the turn signals, flashers, lights into a single connection and ended up with 6 wires to be disconnected - High Beam, Low Beam, Left TS, Right TS, Flashers, Ground. No flashers of a BE but needed for a '68 like Bugsy. A plastic Tie Wrap kept everything secure and together. With a Block and tackle I made out of some old sailing hardware, sure everyone has Harken Ball Bearing pulleys and mainsheet cleats in the back of their garage of course, I used 2 lines that attach to small S-Hooks, that attached to 2 eye bolts that go through mirror mount holes on the fenders. Disconnect the wiring harness, attach the hoist ropes, cover the battery with something just in case, disconnect the front hinge bolts, pull up on hoist rope and you can lift bonnet off of the car by yourself keeping some pressure on the front of the bonnet. Lift up, manuver and rotate sideways and lower bonnet to floor so it stands on end. 5-8 minutes start to finish after some practice.
 
David,

Looking good. You've got most of the work done. Look at the hinge plans for this at Gerard's Web page. The plans there have the built in stop. Bolt through the side of the radiator support strut that connects to a slide and teflon bushings. All of the needed bushings available at local Tue Value or Ace. A really simple plan and just a little bit more and you are complete. Teflon bushings will make it much easer to go up and down and with the built in stops no cable to get in the way. I built everything from scratch using drill press, angle grinder, files, etc. Just a little patience required.

RE latches, not sure if you worked that out yet but I used SS Adjustable Draw Latches w Lock from McMaster Carr Catalog. 2 small screws in the body and 2 in bonnet hold everything in place. Go for the ones rated as 400 lbs. load. About $10-15 each as I remember but after breaking 2 sets of other latches from another supplier out of Cleveland these work and look good as well. The adjustable part id important as bonnet will change shape as it's mounting point has changed.

One of Frank C' tips for forward tilt bonnets was welding a piece of 1/4" SS rebar on the inside lip of the bonnet in the curve right at the top orf the arch. This is a weak spot on BE Bonnets and they have a tendency to crack there.


I'm going to work on the stops after the car is put back together, at this point I can't tell how far it can open before hitting the ground. I really want to explore gas struts to make it easier to open.

And yes, both of my wheel arches have small cracks, I'm going to do the rebar thing too.
 
"...easier to open" LOL

Dude- with a front-tilt, it can't be any easier to open, all the weight is at the front opposite a mighty long lever. Not worth the effort. At least that's how I remember it from my old car every time I hoist my current traditional bonnet. I have all these memories of popping the bonnet with my finger tips...never bashing my head or feeling my lower back give out... ahhhh happy times.
 
David,

If you add the slides per Kit on Gerard's website it's already done. You'll end up with 3-4" of clearance.
 
Front tilt bonnet was the best mod I've made on my BE. I used the plans from Gerard but made them out of 1/4" aluminum which can be worked with woodworking tools as long as you don't get too aggressive with feed rates. Then installed leather straps & buckles for hold down for a nice "period look".

Griz
 
Back
Top