• Hi Guest!
    If you appreciate British Car Forum and our 25 years of supporting British car enthusiasts with technical and anicdotal information, collected from our thousands of great members, please support us with a low-cost subscription. You can become a supporting member for less than the dues of most car clubs.

    There are some perks with a member upgrade!
    **Upgrade Now**
    (PS: Subscribers don't see this gawd-aweful banner
Tips
Tips

Front Suspension rebuild

Bill Redd

Jedi Hopeful
Offline
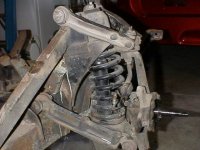
Maybe I'm not searching correctly, but I recall someone posting some geat pictures of their newly rebuilt front suspension.

I'm unsure of the way I putting some of the pieces back on, and wanted to confirm with that picture. Specifically, the top arms of the left side seem like they would place the vertical riser in towards the front of the car. Is that correct?

Thanks so much!

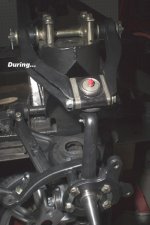
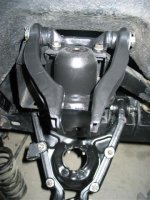
Just installed the first parts, after months and months of waiting to start the rebuilding process!
 
Hi Bill,

I don't have any good pictures at hand illustrating this, hopefully can describe it adequately...

Without the upper control arms installed, the vertical link should "lean" toward the *rear* of the car about 3 degrees off of vertical. (If leaning toward the front of the car, you've got the right and left vertical links incorrectly reversed.)

Then the top control arms/ball joints should match up with the vertical link. In other words, the longer/more curved arm always goes on the upper fulcrum pin toward the front of the car, while the shorter/straighter control arm goes on the rear pin.

The control arm sets are the same right and left, though, but can be positioned either side up to accomodate the 3 degrees of camber in the suspension.

Note: TR3 and very early TR4 used a 0 degree camber setup, with different upper control arms and ball joints, along with vertical links that don't lean either forward of backward. TR4 from approx #6000 onward through TR6 use 3 degrees of camber, as described above.

Cheers!

Alan
 
Bill,

Alan does a great job describing it; here is a picture I took of my passenger side front suspension while I was dismantling the car. it shows the more curved upper control arm towards the front of the car. Hope this helps.

Mark
1970 TR-6
 

Attachments

  • 110583-oldfrontsuspdetail.JPG
    110583-oldfrontsuspdetail.JPG
    95.4 KB · Views: 169
Alan, Mark:

So, I guess the wishbone arm with the "R" and "L" stamped on it is important.

I assume the "L" should be "up" when correctly mounted on the left?

Geez.... Just noticed the "L" stamped on the other side!!!

Thanks guys...
 
No worries Bill. Best of luck with the rebuild. I just finished mine, down to the last detail, so if you need any more pictures or help, drop me an email. I've probablly been there, done that with most of the stuff you're working with!!!

Mark
 
Re: Frt Suspension rebuild - picture & correction

Hi again,

I just found a picture that might help. It's of a lefthand (driver's) side, partially assembled. I also need to correct my previous response... where I referred to 3 degrees of "camber"... that should be 3 degrees of <u>"castor"</u> instead. I was typing faster than I was thinking.

I've got three sets of front suspensions in the garage right now, none of which are marked L or R as yours are... perhaps that was done on later cars, or a previous owner or shop making a repair marked them.

Note: The upper fulcrum is a special camber-adjustable type, different from the originals I assume you are using. And there are shim spacers on either side of the ball joint (to fine tune castor), plus the ends of the control arms have been re-shaped a little to give clearance for wider wheels along with the negative camber that's been set up on this particular car.

Hope this helps...

Alan
 

Attachments

  • 110603-TR4front_susp2_2004_2923.jpg
    110603-TR4front_susp2_2004_2923.jpg
    70 KB · Views: 177
Re: Frt Suspension rebuild - picture & correction

Okay,

Attached is a picture of the way I've got the left side set up. Appears to "tilt" toward the back slightly, and that upper wishbone has an "L" on top!
 

Attachments

  • 110611-125_2529_r1(2).jpg
    110611-125_2529_r1(2).jpg
    44.1 KB · Views: 174
Re: Frt Suspension rebuild - picture & correction

Bill,

I'd agree, you've got that correct! Good luck...

Mark
 
Back
Top