-
 Hi Guest!
If you appreciate British Car Forum and our 25 years of supporting British car enthusiasts with technical and anicdotal information, collected from our thousands of great members, please support us with a low-cost subscription. You can become a supporting member for less than the dues of most car clubs.
There are some perks with a member upgrade!**Upgrade Now**
(PS: Subscribers don't see this gawd-aweful banner

Tips
- We have a special forum called "Member Articles" where you can submit actual articles for consideration for publication. Learn More
- Don't have an Avatar? If not, your avatar will default to the 1st character in your username. Go into "Account Details" to change your Avatar.
- Some basic forum navigation info: click
 Hey - did you know if you click on the title of a thread it will take you to the first unread post since you last visited that thread?
- Hey Guest - Is your British Car Club in our Clubs database? If not, send me a PM - Basil

- Looking for a local club? Click the "Clubs" tab above and browse hundreds of clubs world-wide.
- Add Android or iPhone APP: click
- Did you know - any picture or video you add in your posts in any marque-specific forum will also get added to the Media Gallery automatically.
- A few more tips about posting and replying: click
- Hey there Guest - be sure to keep your profile page up to date with interesting info about yourself: learn more
- More tips and tricks on Posting and Replying: click
 but were afraid to ask:
  STOP!! Never post your email address in open forums. Bots can "harvest" your email! If you must share your email use a Private Message or use the
  smilie in place of the real @
- Want to mention another member in a post & get their attention? WATCH THIS

- So, you created a "Group" here at BCF and would like to invite other members to join? Watch this!
- Hey Guest - A post a day keeps Basil from visiting you in the small hours and putting a bat up your nightdress!
- Hey Guest - do you know of an upcoming British car event?
 Pretty Please - add it to our Events forum(s) and add to the calendar! >> Here's How <<
- Hey Guest - you be stylin' Change the look and feel of the forum to fit your taste. Check it out
- If you run across an inappropriate post, for example a post that breaks our rules or looks like it might be spam, you can report the post to the moderators: Learn More
- If you would like to try some different "looks" or styles for the site, scroll to the very bottom, on the left and click the Style Selector.
You are using an out of date browser. It may not display this or other websites correctly.
You should upgrade or use an alternative browser.
You should upgrade or use an alternative browser.
front hub removal
- Thread starter Hoghead
- Start date
pkmh
Jedi Warrior
Offline
FWIW, I took apart my front wheel bearings, cleaned, repacked and reinstalled.
I remember people here suggesting using special testing equipment for inspecting end float, etc. Is there more to know, but from my notes, I can offer the following...
No special hub removal tool was needed for me. There is a dust/grease cap found within the outer hub and has a threaded stud in its center. For me, I was able to simply take a pair of pliers and pull on the threaded stud. Probably a more correct way to remove or if yours does not come out as easy as did mine.
Then you have a cotter holding in place a castellated nut. I took a screw driver/needle nose pliers and worked in prying the cotter straight and then pushed out through the one and only hole on the outer hub. You will then need a socket to remove the nut (don't recall the size socket offhand).
The biggest challenge for me was determining the end float and drag after reinstalling. Luckily, the existing shims were okay. Be careful when reinstalling the shims found between the spacer and the outer bearings. Very easy to deform if not properly positioned or may even slide out of position, in my case due to excessive grease.
Also, I've remember how retightening the constellated nut should be between 40 to 70 PSI. I would check this again and it would be handy to have a torque wrench.
Hope the above helps.
Paul
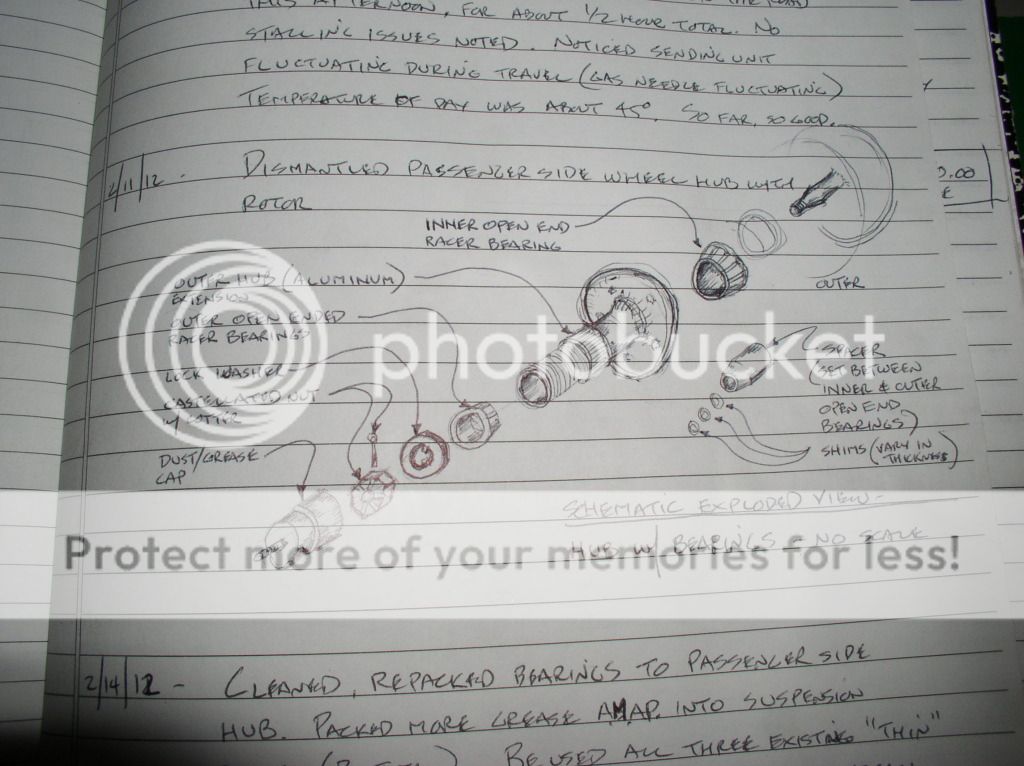
Below is a sketch I recorded as I was taking apart. But this is pretty much as already found in the workshop manual.
I remember people here suggesting using special testing equipment for inspecting end float, etc. Is there more to know, but from my notes, I can offer the following...
No special hub removal tool was needed for me. There is a dust/grease cap found within the outer hub and has a threaded stud in its center. For me, I was able to simply take a pair of pliers and pull on the threaded stud. Probably a more correct way to remove or if yours does not come out as easy as did mine.
Then you have a cotter holding in place a castellated nut. I took a screw driver/needle nose pliers and worked in prying the cotter straight and then pushed out through the one and only hole on the outer hub. You will then need a socket to remove the nut (don't recall the size socket offhand).
The biggest challenge for me was determining the end float and drag after reinstalling. Luckily, the existing shims were okay. Be careful when reinstalling the shims found between the spacer and the outer bearings. Very easy to deform if not properly positioned or may even slide out of position, in my case due to excessive grease.
Also, I've remember how retightening the constellated nut should be between 40 to 70 PSI. I would check this again and it would be handy to have a torque wrench.
Hope the above helps.
Paul
Below is a sketch I recorded as I was taking apart. But this is pretty much as already found in the workshop manual.

Randy Forbes
Yoda
Offline
Unless I've misunderstood the original question__it <span style="font-style: italic">could</span> happen__no, you do not need a hub puller to remove the front hubs.
At one time, and I'm really not sure where these wound up, it seems that I had a pair of BN4 drum brake/disc wheel hubs with ball bearings, and I'm pretty sure that they are the ones that required a "puller" to be removed from the stub-axles.
Or not...
At one time, and I'm really not sure where these wound up, it seems that I had a pair of BN4 drum brake/disc wheel hubs with ball bearings, and I'm pretty sure that they are the ones that required a "puller" to be removed from the stub-axles.
Or not...
Online
I'll try again, I was wrong the big healey dust cap does have a threaded stub, I looked in my toolbox and found my "special tool" I used to pull the cap on my 100.
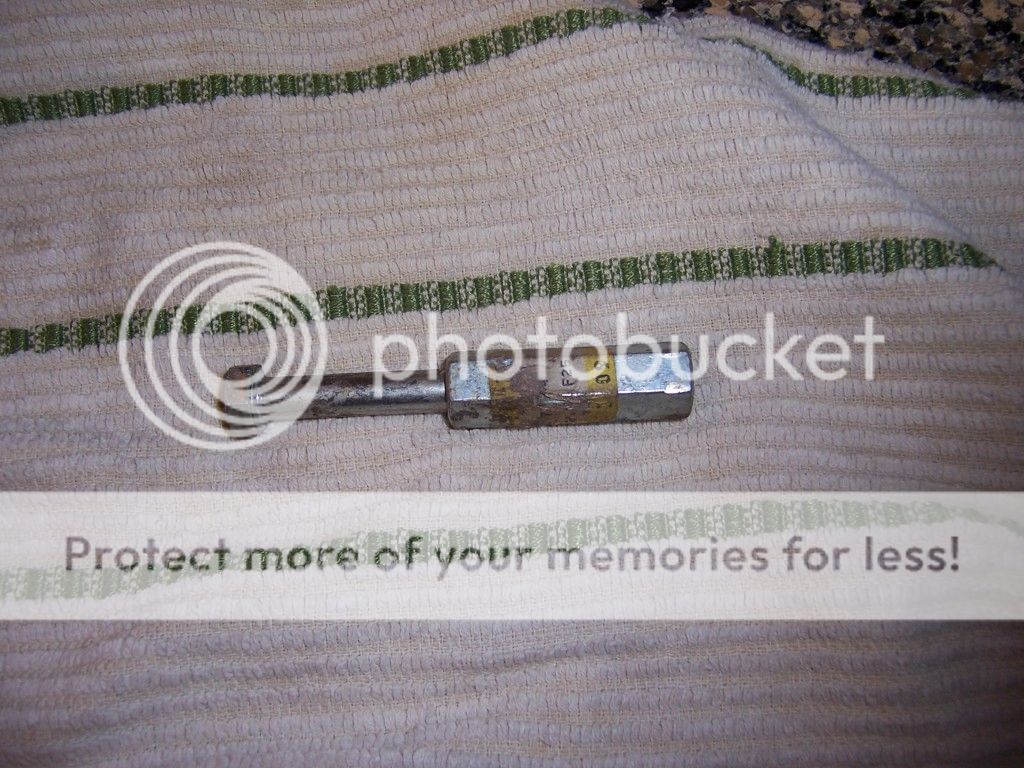
A 5/16" threaded coupler and bolt, could only find coarse thread coupler looks like the cap on my car was fine and I tapped the one end. All parts readily available at a hardware store.
Anyway, screw it on, grab the end with a vise grips or wrench, pull it out. If it doesn't pull attach the wrench perpendicular to the puller and pry with a screwdriver or py bar or something.
No this is not a "hub puller" but it is the closest thing I could think of to a special tool you might need to do the job, once you get the dust cap, pin and castellated nut off the hub, bearing etc. should all just pull off with minimal effort. As others have stated only tricky part is getting the float right with the shims when you reassemble.
pkmh
Jedi Warrior
Offline
"As others have stated only tricky part is getting the float right with the shims when you reassemble."
Yep, I can speak from experience. Not having the tools to measure end float meant trial and error with what shims I had. All those times of putting together and then pulling off the wheel and then taking away one or more shims, etc., as adjustment. Later, I decided to purchase a bunch more of those shims and for now, just saving for another day.
Yep, I can speak from experience. Not having the tools to measure end float meant trial and error with what shims I had. All those times of putting together and then pulling off the wheel and then taking away one or more shims, etc., as adjustment. Later, I decided to purchase a bunch more of those shims and for now, just saving for another day.
Johnny
Darth Vader
Offline
If my memory is correct the manual states to clean all shims and bearings and then soak in petrol. Then reinstall without grease to obtain the tightest fitting and still being able to rotate wheel easily. Then remove all again and grease thoroughly then re-assemble and tighten securely.
Worked for me.......
Worked for me.......
Randy Forbes
Yoda
Offline
Yes, just lightly oiled for all tests, then packed with grease prior to final assembly.Johnny said:If my memory is correct the manual states to clean all shims and bearings and then soak in petrol. Then reinstall without grease to obtain the tightest fitting and still being able to rotate wheel easily. Then remove all again and grease thoroughly then re-assemble and tighten securely.
Worked for me.......
(from the "Randy manual"...)

My car seems to be missing the spacer between the bearings. All I have is the hub inner with 2 cutouts to drive out the bearing outer races.
No wonder I thought 1 of the wheel bearings were bad
Before I go and order these, am I correct in thinking that this is just like a motorcycle and is a loose fitting spacer between the bearings. My parts manual shows this as a seperate piece
Is that the snout of the spacer that I see sticking out in the Randy Manual pic
Randy Forbes
Yoda
Offline
That is indeed the spacer, postioned between the inner bearing (, shims) and outer bearing.
Proper set up allows the inner races (I.D.) of both bearings to be "clamped" securely (40 to 70 Lb-ft, allowing latitude for aligning the castleated nut to split-pin hole).
Proper set up allows the inner races (I.D.) of both bearings to be "clamped" securely (40 to 70 Lb-ft, allowing latitude for aligning the castleated nut to split-pin hole).
Randy Forbes
Yoda
Offline
No, not at all__the inner races of both (inner & outer) wheel bearings are to be tightened together with the spacer (and shims) clamped in between.Hoghead said:Randy
Is it a loose fit between the two bearings
Hence the need for the shims: to set the correct end-float on the bearings outer races.
Those are "taper" bearings right? So the spacing between them sets the width in which the hub "rides."
If it's not tight, how do you maintain proper clearance? You can't :wink:
BJ8Healeys
Jedi Warrior
Offline
The proper installation of the bearings and spacer per the workshop manual requires different thicknesses of washer-shaped shims (0.003", 0.005", 0.010", etc., available from the usual suppliers. Order several shims of each thickness). The outer bearing can be trial fitted without grease until the proper thickness of shims is achieved, then lubricate the bearing for final installation after all adjustments are complete.
The hub/rotor assembly is installed with the spacer between the bearings and with a selection of shims so that when the hub nut is torqued there is detectable free-play when you move the hub in and out. Then, you try again after removing some shims and repeat until the free-play is gone, but the hub/rotor still rotates freely. It can be tedious, but ideally you want the free-play to be there, then remove a 0.003" shim and the free-play is gone.
It helps to lubricate the shims with grease so that they stick to each other and the spacer outer face and don't fall and get trapped out of place when you torque the nut. If that happens, you will smash and deform some of the shims.
Torque the hub nut to 40 - 70 lb-ft. If one of the castellations in the nut does not line up with the cotter pin hole between 40 - 70 lb-ft, you can use a suitable shim under the nut to adjust the position of the nut until it does line up at the correct torque.
BJ8Healeys
Jedi Warrior
Offline
There has been a lot of discussion and disagreement over the years concerning the true function of the spacer. Some think it "stiffens" the stub axle when the nut is torqued and that helps prevent axle cracking. From an engineering mechanics point of view, that explanation doesn't really make sense to me. The tensile stress applied to the axle by torquing the nut is insignificant, but it would be ADDED to the tensile stress due to bending at the bottom side of the base of the axle. That would only increase the possibility of cracking, if anything.
My argument (supported at one time on the autox.team.net Healey list by a Timken bearing engineer) is that the shims and spacer allow the inherent freeplay of the bearings to be removed in a controlled manner, and thereby allows a more precise steering due to less looseness in the bearings.
My argument (supported at one time on the autox.team.net Healey list by a Timken bearing engineer) is that the shims and spacer allow the inherent freeplay of the bearings to be removed in a controlled manner, and thereby allows a more precise steering due to less looseness in the bearings.
My question on fitting loosely was poorly worded and I am trying to determine if this spacer is a loose fit on the stub axle.
From the subsquent comments it appears that is is a loose fit ont he stub axle just like a motorcycle.
Sorry for the confusion, and thanks for all the help
From the subsquent comments it appears that is is a loose fit ont he stub axle just like a motorcycle.
Sorry for the confusion, and thanks for all the help
Bob_Spidell
Yoda
Offline
BJ8Healeys said:The proper installation of the bearings and spacer per the workshop manual requires different thicknesses of washer-shaped shims (0.003", 0.005", 0.010", etc., available from the usual suppliers. Order several shims of each thickness).
Probably cheaper here:
https://www.mcmaster.com/#steel-shim-washers/=ij5v9p
BJ8Healeys
Jedi Warrior
Offline
Hoghead said:My question on fitting loosely was poorly worded and I am trying to determine if this spacer is a loose fit on the stub axle.
From the subsquent comments it appears that is is a loose fit ont he stub axle just like a motorcycle.
Sorry for the confusion, and thanks for all the help
The spacer is a loose fit on the axle and merely slides onto it.
TRdarrel4
Freshman Member
Offline
A little late in the discussion, but regarding that dust cap removal (which I found to be quite a bear on my barn-find BJ8): I made up a version of glemon's tool using a fully threaded bolt / flat washer stack / nut setup (along with the all-important coupler). As with his model, the coupler threads onto the dustcap offering. The washer is then pressed up against the hub extension and the nut is tightened up against the washer to supply the pull on the cap. I'm thinking this is along the lines of the "puller" that Randy had referred to. In any case - along with a liberal application of penetrating oil - it worked to extract <span style="text-decoration: underline">my</span> stubborn cap (and get me on to that pesky crown nut / cotter pin challenge).
fwiw
fwiw