• Hi Guest!
    You can help ensure that British Car Forum (BCF) continues to provide a great place to engage in the British car hobby! If you find BCF a beneficial community, please consider supporting our efforts with a subscription.

    There are some perks with a member upgrade!
    **Upgrade Now**
    (PS: Subscribers don't see this gawd-aweful banner
Tips
Tips

TR2/3/3A Frame repair.

sp53

Yoda
Country flag
Offline
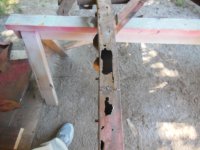
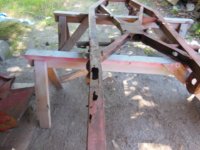
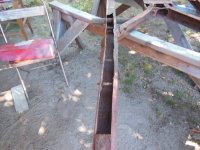
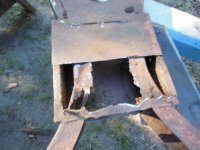
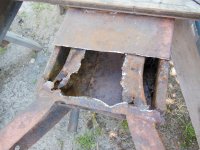
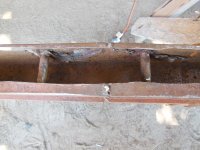
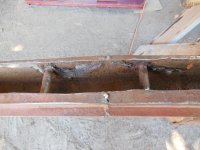
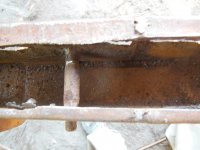
Frame repair. To me this frame looks too far gone, but I do not know. Maybe the sections can be cut out and welded. Probably is a good teaching tool for me to learn more about welding. So opinions about this Frame are very welcome.

I am thinking does anyone in the North West, like Washington, Oregon, and Idaho have a frame they would like to part with.

Steve
 

Attachments

  • DSCN0195.JPG
    DSCN0195.JPG
    3.3 MB · Views: 182
  • DSCN0196.JPG
    DSCN0196.JPG
    3.3 MB · Views: 163
It looks like from the photos it's been repaired before. Repair would be possible if you have the proper welding skills and sheet metal fabrication skills to go along with it. From the pics, it looks like only the bottom half of the frame is shot, but saying that the thickness of the frame elsewhere should be a concern also. I know those frames are in very short supply but if it was me, I'd be looking for another one in better shape somewhere. JMHO. PJ
 
That's a lot of rust. You could cut it out and see what the inside of the frame looks like. Probably there is a lot more rust that you can't see.

Frames rust at the bottom because that's where water sits. The upper part may well be OK, but you'll have to replace most of the bottom, I'll wager. If it were me, I'd just source a new one, but it may be possible to fix it. Keep in mind, you will have to do something to keep it straight while working on it, and it may still need to be straightened when you are done.
 
It doesn't look any worse than my TR2 frame did...but then...I've always said my TR2 should have gone to the junk yard, LOL. It really repairs faster than you'd think. I bought strips of 14 gage steel...4" wide by 48" long, if I remember right. I then blocked the frame upside down on saw horses and started grinding out the rusted sections in 4" strips. The frame is 16 gage steel, and doesn't warp nearly as much as the 18 gage body panels do.

So, it depends if you have the time to save money and do it for about $120 in steel, or you have the money to save the time.

 
Hi Steve, My frame was in bad shape and some felt better to get a replacement frame. I decided I was up for a challenge to repair the frame and I don't regret a minute of that repair. Yes I could have saved a lot of time but the knowledge I gained more than worth it. Good luck on your decision. Frank
 
Unusual for the chassis to rust in only one section.
If the rest of the chassis is Ok, then the cheapest option is a repair.
A "Ratco" replacement would be without any ongoing problems.
 
I went with the RATCO frame as well — powder coated and foam filled. ‘Sturdy’ doesn’t come close to describing it’s build quality. Haven’t put a body on it yet so I can’t speak to more than that, although these days, the shipping structure that it comes on is fairly valuable — 2”x6”s running the full length of the frame. 😁
 
I cut the bottom out with a saws-all and it went easy. In some spots the side looked good and in others not so good. Opening up the square frame box where the frame makes that X was unsettling because some of the pieces are rusted out on the ends, so that should be a learning experience.

I read most of the post and plan to reread it over a few times and I will probably try and fix this frame. I like the idea of having large U shaped channels built the size of the frame and then sliding them over the bottom. There are a couple of bolt holes that need to be worked around somehow for the U to work, but it does seem do able.

The top off the frame looks free from accident damage plus the spring towers look straight and strong. I would think the towers are important to keep everything geometrical in the steering.

Thanks John, Frank and all for the confidence in building this because I need it. Please keep responding and I will try and post pics and ask questions


I do have a fear of the torque of differential twisting the frame, but I guess the differential actually floats on the leaf springs. I guess I could reinforce the area somehow.

steve
 

Attachments

  • DSCN0211.JPG
    DSCN0211.JPG
    3.5 MB · Views: 124
  • DSCN0210.JPG
    DSCN0210.JPG
    3.4 MB · Views: 109
  • DSCN0214.JPG
    DSCN0214.JPG
    3.4 MB · Views: 123
It's all time and very little cost. I had the attitude of "if it checks out of square I'll throw the towel in". But it kept checking square, and before I knew it it was finished.

That is interesting in the center box. I think it collects all the mud that gets kicked up. If you repair the outer box it should remain plenty solid, even in twisting.
 
Steve, when I did the repair to my frame I was amazed at the amount of flex it took to get the frame to move. I welded supports to the welding table to clamp the frame to then used a bottle jack to flex the frame where the adjustments were needed. unclamp the frame then check measurements against the service manual drawing. Rinse and repeat till you are satisfied with the results. I will let you know that it is possible to get the frame to match the factory drawing and it will be as good or better than new. The frame is very strong but also resilient. Frank
 
Anything is possible...miracles take a little longer :smile::smile:
Seriously, if I was to repair the chassis, in absence of a large welding table, I would "borrow" 2 substantial "I Beams" from a steel shop and lay them on a concrete floor and adjust for perfect level. The main chassis rails can be clamped to the beams during repair/replacement.
All rusted areas should be cut out and replaced, not repaired, as you will never get the original strength back.
I would fabricate a complete new centre section, including the outer rails and then weld on the old front towers etc....ie, build a 75% new chassis.
 
Last edited:
The pictures are from the area where the metal rebound band sits for bottoming out. In this same area is a gusset that has a dual duty. The gusset stiffens the frame that connects the last 4 feet of the frame to the main frame plus provides backing for the 2 bolts that hold the rebound band.

Not sure what to do here, but I am thinking if I cut the side piece damage/rot out next, and put a new side piece in, I can use the top of factory reinforced piece they used for a gusset to join the frames then put new bolts in through the new 16 inch side section .

The length of the side pieces should only need to be about 16 inches or so then put the new top piece on in one large piece. Part of me wants to have a 90 bend or U shaped bend, but maybe some 4 inch wide 16 gauge strips would work and be cheaper and maybe easier. Just not sure, I guess I need to dive deeper into the work and see what happens. Any ideas very welcome.

The frame measures square or at least the large rectangular section has the same hypotenuse. I will check closer. Someone started to restore this frame before I got it. They cleaned it up kinda and put some primer on the frame and gave up fixing it. They basically stopped working on the whole car and I bought the complete car as an abandoned project many years ago.


steve
 

Attachments

  • DSCN0225.JPG
    DSCN0225.JPG
    3.4 MB · Views: 113
  • DSCN0224.JPG
    DSCN0224.JPG
    3.4 MB · Views: 111
  • DSCN0223.JPG
    DSCN0223.JPG
    3.2 MB · Views: 116
Have you yet looked inside the frame where the front suspension attaches? Repair in that area strikes me as posing a shadetree engineering challenge you might not get right no matter how careful you are.
Bob
 
I agree...I've never been sorry for cutting too much out. It gives you more room to work. The original bolts can definitely go too. Put new ones back once all the sides are finished. Try to cut out in a shape and/or angle that makes it easy to fit the new metal. In other words...keep the cutout sections simple...no fancy curves or intricate shapes. Just basic straight cuts.
 
I looked closely at the Ratco when I was debating what to do with my TR2 frame. The Ratco frame uses different shaped cross members, and has a few other obvious differences to a stock frame. My conclusion was that if I were going racing, where I planned to beat on the car and didn't care about resale at all, then the Ratco would be an option. But for a restored car, it has enough obvious differences to devalue the restoration. And...it is not cheap! My complete frame repair, which was in no better shape than Steve's, was about $180, including gas and MIG wire.
 
Back
Top