• Hey Guest!
    British Car Forum has been supporting enthusiasts for over 25 years by providing a great place to share our love for British cars. You can support our efforts by upgrading your membership for less than the dues of most car clubs. There are some perks with a member upgrade!

    **Upgrade Now**
    (PS: Upgraded members don't see this banner, nor will you see the Google ads that appear on the site.)
Tips
Tips

Found Antifreeze on the top of the head.

TRMark

Jedi Knight
Bronze
Country flag
Offline
I have been doing some maintenance on my TR4 getting ready for the summer driving season. Found a patch of antifreeze on top of the head. Took the picture after I suck my finger in it, the antifreeze was on top and around the edge of the aluminum plug.

4622305871_4e152dbb4b.jpg


4622306277_78c45ec01c.jpg


4622910654_1aa993f051_o.gif


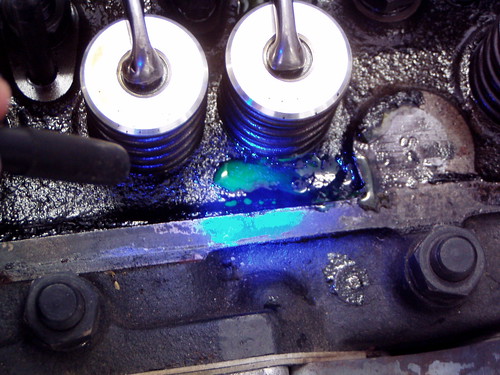
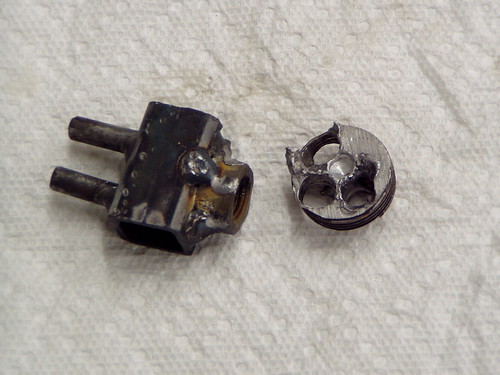
I think it is leaking at the plug, Moss sells them (item 12 in the diagram) but I can't find any info in my shop manual about how to remove and replace it. Can I do this myself and how?
 
If memory serves, you generally have to destroy the old plug to remove it. Eg, drill through the center and break the pieces apart. Hopefully you can do that without destroying the threads, but many racers re-tap for pipe threads and a standard pipe plug.
 
Thanks Randall, I was hoping I could repair without removing the head but I think not. I don't want a lot of crud floating around in the engine. So the current plug is threaded at a different pitch and taper than a standard plug?
 
It has a straight thread. After you get it out, determine the pitch and get a pipe tap of that pitch. Then get an NPT plug with hex socket top, that way it won't stick up.

Jim
 
Any crud would only fall into the water jacket, which a good backflush will clear.

As Jim says, I believe the original thread is 1-14 UNF, which you can retap to 3/4" NPT (also 14 tpi). However on the head I have with the pipe plug, the hole was not cut deep enough for the plug to be flush. Leaving it sticking up doesn't seem to hurt anything, except look strange with the rocker cover off. With it on, you can't see the plug at all.
 
What is the advantage to tapping to NPT as opposed to the replacement part? In either case, what type of sealant should I use on the threads?
 
Straight tread would require a locktite product which needs perfectly clean oil free treads to seal properly. Okay if you plan to remove head and can degrease it. NPT can use teflon tape or pipe tread sealant. taper helps to complete the seal.

Jim
 
Also, the 3/4" NPT thread is somewhat larger than the 1" UNF, meaning you get to cut new, clean threads into the head. The point being that the old threads are probably pretty badly corroded (hence the leak).
 
Thanks guys, I'll get after it the next couple of days and let you know how it comes out. I can tell already that this is not going to be much fun. I put some PB blaster on it and gently tapped the plug with a hammer and added more blaster.

And thank you Basil for this great website, providing us with access to hundreds of years of combined experience.
 
TRMark said:
...
And thank you Basil for this great website, providing us with access to hundreds of years of combined experience.
Hey Randall.Must be talking about you
 
Nah, not me! It only feels that way sometimes ...
 
Ah, you guys I did say combined. Then again, don't pass up an easy shot. :jester:
 
Pump up the cooling system with a radiator pressure tester and look for weepage around the plug. Sometimes it will leak only when the engine is hot. Gasp! Maybe try a can of radiator stop leak before diving into more major surgery? Some might disagree,but $10 bucks is a cheap shot that might work. Is the radiator cap,one of the correct presure? Many caps used as replacements are incorrect.Just some simple ideas.
 
I don't think I want to use a stop leak. The leak is in a place that contaminates the oil and I can't readily observe so I wouldn't know if it resumed leaking until I change the oil or noticed a loss of coolant. I would use a stop leak if I were on the road away from shop, parts and tools. I think the leak just started as the coolant level is correct. I had just changed the oil and didn't notice anything. To make sure, I poured the oil from the storage container into my catch pan and checked it with a black light. Thank goodness I decided to adjust the valves and found it.
 
You should be able to unscrew it using a hammer and centre punch (or chisel) around the top outer edge of the plug.
Use a small drill to put a dimple into the top against which you can drive the punch.
 
Got it done. I tried to get plug out using punch and hammer, not a chance. The plug was made of very soft aluminum, all I accomplished was driving holes. I built the gizmo shown and used an air impact on almost the lowest setting to remove it. I used a standard plug with Teflon tape after using the 3/4" tap suggested.

4626051428_49003a0412.jpg


4626051012_9f73e4b447.jpg


Thank you very much, I really appreciate your help.
 
Back
Top