• Hi Guest!
    If you appreciate British Car Forum and our 25 years of supporting British car enthusiasts with technical and anicdotal information, collected from our thousands of great members, please support us with a low-cost subscription. You can become a supporting member for less than the dues of most car clubs.

    There are some perks with a member upgrade!
    **Upgrade Now**
    (PS: Subscribers don't see this gawd-aweful banner
Tips
Tips

Folded hood

RAC68 said:
Bob/Patrick,

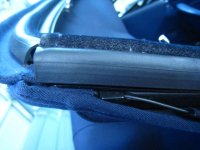
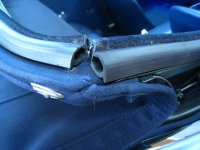
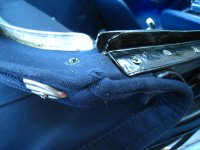
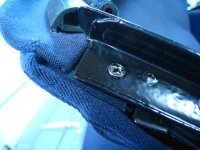
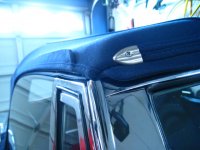
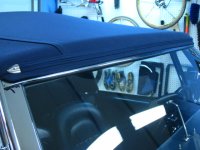
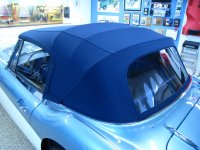
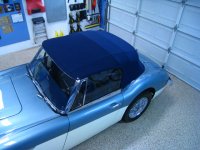
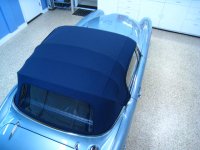
As you can see from the picture, the flap is a small piece of top material that pulls the front edge to the frame. Please note that the wood frame cover was changed to black when I replaced the original top in 1971.

Top%2520Flap.JPG


Hope this makes things clearer.

Ray (64BJ8P1)
It's clearer, but I don't remember mine having that but then again I replaced the original top with an AMCO top back in '72 and I did not watch the shop doing it.
 
I do want to help you out jeepster, and figure out why your top will not go in the rear cavity. But that small piece of material?

That piece of fabric should be glued or stapled to the side wood piece. It's purpose is to hold the front edge of the top in place. It gets wrapped around the wood edge and glued or stapled or glued/stapled in place. There should not be any extra material, for it should have been cut to size when the top was fit... how does that piece prevent the top from resting in the rear cavity?

You don't see that piece on my top. It is hidden under the aluminum side cantrail. You can see some of it, under the last screw holding the cantrail in place. Photos 3 & 4.
 

Attachments

  • 28113.jpg
    28113.jpg
    52.1 KB · Views: 190
  • 28114.jpg
    28114.jpg
    57.5 KB · Views: 188
  • 28115.jpg
    28115.jpg
    57.9 KB · Views: 192
  • 28116.jpg
    28116.jpg
    61.7 KB · Views: 190
  • 28117.jpg
    28117.jpg
    57.6 KB · Views: 197
Thank you, Patrick. That is the strap I was trying to explain and your is in the right spot. Roger, yours seems to fold at the right place at the front so you do not have that problem.
 
tahoe healey said:
Thank you, Patrick. That is the strap I was trying to explain and your is in the right spot. Roger, yours seems to fold at the right place at the front so you do not have that problem.

That piece is all part of installing the top. I would think if that piece is loose, hanging, whatever, then the top was not fit properly from the start and the end product would be a saging top. Those two pieces (right and left side) tensions the top across the front sides.

That being said, how can that prevent the top from seating in the rear cavity????

I went thru 3 top frames to fine one that would work - and till needed to tweak it. Made new wood, modified how the cantrails are positioned, shimmed everywhere I needed too; to get a top that fits and is water tight. I know, you think it's can't be done. Water tight? Yes it is!

Well if you spend 9 months like I did back engineeing everything, you can get a top that fits and works like we hope it would.

Cheers!
 

Attachments

  • 28118.jpg
    28118.jpg
    57.6 KB · Views: 174
  • 28125.jpg
    28125.jpg
    52.5 KB · Views: 178
  • 28126.jpg
    28126.jpg
    69.4 KB · Views: 168
  • 28130.jpg
    28130.jpg
    71.8 KB · Views: 175
  • 28133.jpg
    28133.jpg
    67.3 KB · Views: 167
  • 28134.jpg
    28134.jpg
    61.2 KB · Views: 175
Roger, your top is beautiful (I would expect to less). The point is that the piece is attached too far back and will not let the fold down. Maybe the strap can be repositioned more forward. It has nothing to do with the water tightness to the front or back. When I detached mine, it still fits very tight against the aluminum/wood side pieces.
By the way, your garage is way to clean and organized.
 
tahoe healey said:
Roger, your top is beautiful (I would expect to less). The point is that the piece is attached too far back and will not let the fold down. Maybe the strap can be repositioned more forward. It has nothing to do with the water tightness to the front or back. When I detached mine, it still fits very tight against the aluminum/wood side pieces.
By the way, your garage is way to clean and organized.

Thanks Richard.

Well I've tried to explain that, those two pieces of material are an integral part of pulling and keeping tension across the front of the top when the top is installed. If your adjusting them after the fact, then your top was not put on properly, and most likely it didn't look like mine.

I can only assume that whom ever installed your top did not make sure it would seat in the cavity. I would not go back to that shop for the fix. They don't know what they are doing; if you have to modify their work to get the top to seat in the holding area. Go to another shop and have them see what they can do.

A good shop makes sure the top goes up and down and confirms it will seat in the holding area. The end result should look like mine in the up position. Everything is taught, no wrinkles. The newly installed top should stay up for two weeks, to let it settle.

As a side note, tops should be kept in the up position. You should only put the top down right before you go for a ride. When back home, put the top back up and store it that way.

Sorry you and jeepster are having this problem.
 
tahoe healey said:
... By the way, your garage is way to clean and organized.

At first I thought it was his livingroom ;-)

Great pictures, saved for the future

Hans
 
That flap is missing from my top, but it all sits well, as I said, there was a tack through the hood into the side cant rail just inside the gutter so it did not show.

Roger

I am surprised that you have cut the rubber seal at the corners, that's how mine was when I first bought the old girl and where it was leaking , so I purchased a new seal and ran it around in one continuous piece as per the shot in the Anderson / Moment restoration guide - no leaks after that. Was there a reason for this, you being a stickler for perfection and all.

:cheers:

Bob
 
Bob Hughes said:
Roger

I am surprised that you have cut the rubber seal at the corners, that's how mine was when I first bought the old girl and where it was leaking , so I purchased a new seal and ran it around in one continuous piece as per the shot in the Anderson / Moment restoration guide - no leaks after that. Was there a reason for this, you being a stickler for perfection and all.

:cheers:

Bob

Hey Bob,

Good catch, and good question.
I don't want to hijack this thread, and it seems my answers are tending to go that way. Sorry about that jeepster.

I'm going to start another thead about this topic.
 
Back
Top