tahoe healey
Yoda
Offline
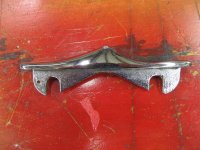
What an interesting look with the BJ7 and 8 vent windows. I'm thinking stabilizer fins.

 Hey Guest!
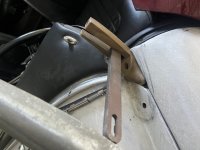
Dave, I'm refreshing this thread because I'm trying to do this on a BN6. So my question right now is: I have the two holes under the dash that bolts go through to hold the "feet" in place, but what actually holds them in place..the squeezing between the fender and shroud? The feet have 1/2 holes so they are not fully secured. Also, my fenders are aftermarket and don't have any captive nuts in the fender side, so I can see a bolt going through the fender as I look through the fender well, but how do i put a nut on the backside because i certainly can't run my hand up there. Hope this makes sense. Love some photos of your set up.Sory everybody, I was away last weekend. Yes the 100 windscreen can be installed on the early 3000. I don't know how it would work with roll-up window car but it's really pretty straightforward on the earlier sixes. Anybody wanting more detail can PM me & I'll be happy to go thru it & provide pics.
The side pillar mounts are exactly the same on the bottom where they bolt to the car, so all the bolt holes line up.
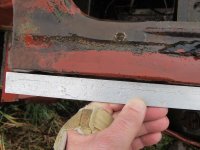
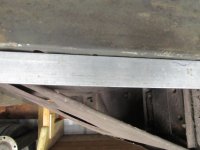
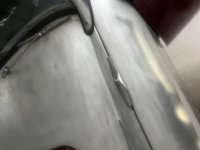
To install the 'feet' the screen goes into when down, you have to notch the inner edge of the fender to make room for the mounting blade that goes between the fender & shroud. Note: the mounting holes for these 'feet' are already in the bulkhead, but not the shroud - I'm guessing that it was cheaper and easier to leave the holes in the dies for stamping these pieces when they changed the windscreen.
If you want to run a top, you need to assemble the 100 windshield using the top piece from a later six cyl. windshield. This gives the flange for the top front bow to hook over and then you drill & tap for clamp pegs on the rear side of the 100 windshield post (same location as the early sixes). This way you can use the early BN4 type top.
BTW the glass is exactly the same curvature, width and height - it's just the extreem side curves that are different. In other words the top & bottom channels the glass sits in are interchangeable.
I have this set-up for two reasons: I can easily remove the windshield at the track (my small screen does not need to be removed & does not interfere with the 100 windshield).
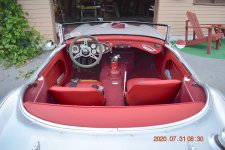
But mostly I have it because I originally fell in love with the windshield when I bought my first 100 in 1969. No other car in the world has one like a Healey. I will admit it is sometimes a bit difficult to see over & slightly obscures your view but the trade-off is wind in the face!!!!! I only have the glass up if its raining or below 40 degrees. It isn't even the wind in the face as much as driving through mountains and having an unobsructed view in any direction - closest thing to a motorcycle you can get. I have logged a lot of miles on my old Harley but now I prefer the Healey because, here in washington state we now have helmet laws and the bike just isn't as much fun anymore. Now I get the wind in the face and don't have to worry about falling over
Even my wife prefers the screen down.
My personal view: Driving a Healey with the windshield down through some twisty mountain roads on a nice sunny day is almost the best driving experience I have had - second only to racing a Healey.
Again, I ma happy to share the particulars if anyone has questions.
Dave
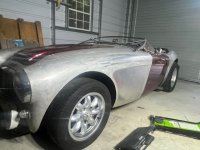
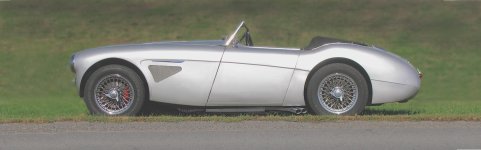
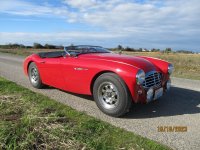
It has always crossed my mind how cool a 100/4 windscreen would look on a 100/6 or 3000. I have discounted this project for cost/effort vs. result as well as the departure away from the original look. I came across this in a youtube video (Healey Heaven). Hey, not so bad.
Do you think this is an unmodified 100/4 windscreen? What do you think of the look?

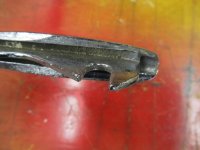
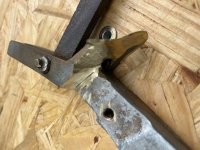
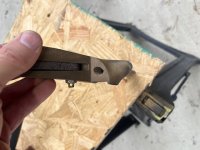
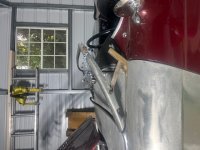
I always loved the way the HUNDREDS looked too with the windshield folded down and no door handles.As you can see in one of the photos, I mounted the feet and made sure they would fit prior to removing the 100-6 windshield. Obviouisly everything is aluminum in my car so when grinding the feet, I was able to "slide" them between the aluminum panels even before loosening the fender bolts. If I had it to do over, I might could have just left them the 1/8" thickness then they would really tightly sandwiched between the fender and shroud but no way they would have fit without loosening the fender bolts. If you have a show car it might mess your gaps up.
I love it. I looked at a MGA at one point and saw where they actually made a kit to chop the windshield so I knew all these 50's roadsters look so much better with a lower more race like windshield. When I read the 100-4 windscreen would fit with some "massaging" I knew I had to do it. Your car looks great. I also thought of doing the 100s windshield from Classic Car Performance but would have had to drill through the shroud but it does look great also.I always loved the way the HUNDREDS looked too with the windshield folded down and no door handles.
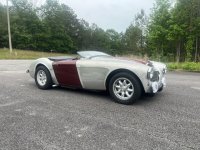
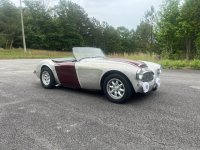
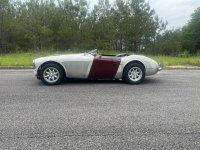
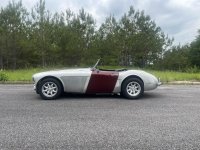
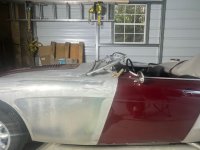
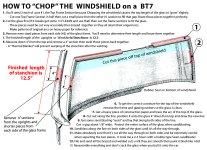
Being that my car will never be in a concours event I took the next step and decided to - Chop the Windshield 4"- and
"Shave the Door Handles".
Of course this creates it's own set of problems but "a photograph is worth a thousand words" and I'm glad I did it.
Peter C.
")
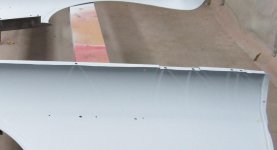
Hi Rob, Congratulations! I'm glad you have worked it out. I chose to rework the shroud a little by flattening the end of the raised area around the foot of the stanchions rather than grinding the base of the stanchion (also left a flat area for a foam rubber gasket to help seal against rain intrusion). I also welded the hole for the original vertical screw thru the base and bonded a wedge of 'kitty hair' body putty to the shroud edge to fill the small triangle opening not covered by the smaller 100 stanchion base (visible in your picture #9949).
Attached is an assembled picture of my BT7, I'm sorry I don't have any 'work-in-progress' pictures of those details of the shroud rework.
I do agree the windshield makes a very cool look (only car in the world with a windshield like this) but back in the '60s I originally fell in love with the wind in my face - like riding a motorcycle but no helmet requirement