• The Roadster Factory Recovery Fund - Friends, as you may have heard, The Roadster Factory, a respected British Car Parts business in PA, suffered a total loss in a fire on Christmas Day. Read about it, discuss or ask questions >> HERE. The Triumph Register of America is sponsoring a fund raiser to help TRF get back on their feet. If you can help, vist >> their GoFundMe page.
  • Hey there Guest!
    If you enjoy BCF and find our forum a useful resource, if you appreciate not having ads pop up all over the place and you want to ensure we can stay online - Please consider supporting with an "optional" low-cost annual subscription.
    **Upgrade Now**
    (PS: Subscribers don't see this UGLY banner)
Tips
Tips

TR2/3/3A Floor pan question

Frank Canale

Jedi Warrior
Silver
Country flag
Offline
E7AC32E7-0D0B-4C28-82A3-15ED1E6F54CB.jpg
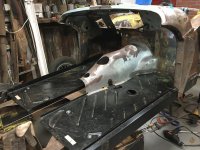
I was digging thru the parts bin and ran across this part. I think it is a reinforcement plate used to bolt the floor pan thru the inner sill to the outrigger. I did not see them listed in the moss catalogue so I don’t know if that is what this part is for. These would be easy enough to form so not worried about that. Looking for confirmation and comments about floor pan installation. I have had to stretch a couple of holes but fit looks to be good so far. Frank
 

M_Pied_Lourd

Darth Vader
Country flag
Offline
Haven’t seen that part on my 3’s Frank.

Cheers,
Tush
 
OP
F

Frank Canale

Jedi Warrior
Silver
Country flag
Offline
Thank you, Tush. So are you using flat washers in the recesses of the floor pan?
Frank

PS: I bet I know what this is now, this is part of the rusted out floor pan that was tossed aside when the floor was repaired with a big flat piece of galvanized sheetmetal pop riveted to the old floor. You never know if it’s a part or part of something else, or part to a different car. Thanks for the help.
 

CJD

Yoda
Country flag
Offline
I think that is what is left of the original floor pan. It just happens to look like a part...

Edit, I see you already figured that out!?!
 
OP
F

Frank Canale

Jedi Warrior
Silver
Country flag
Offline
View attachment 67269
The floor pans and inner sills are bolted in place. Some slotting to mounting holes. The driver side inner sill mounting brackets had to be moved forward as well as aligned to the inner sill. One bracket was pretty crooked. One of the brackets on the passenger side had to be straightened. The driver side floor pan in board mounting holes had to be relocated. Both were off by the diameter of the hole. Those two holes just too much for me to stretch. I don’t like stretching holes but this seems to be acceptable so I am going with it for now. Transmission cover fits and lines up pretty good. The passenger side is off a little bit at the front of the trans cover so I will address that soon. The door frames look to be aligned pretty good. There is a 3/8” to 1/2” gap between the bottom of the door frame and the inner sill. Once the A post is tacked in place I can put the outer sill in place and check the clearance again. Still a lot to check before any welding but seems to be lining up and square so far. Frank
 

Attachments

  • 8AF0FB69-8E99-45A8-98AD-F2A0E81B2E12.jpg
    8AF0FB69-8E99-45A8-98AD-F2A0E81B2E12.jpg
    83.5 KB · Views: 169

sp53

Yoda
Country flag
Offline
Nice mac up Frank--- I like your style, it gets real now after you weld, but the car is in good hands. Heck I like the cars a lot, so I really care, anyways your talents will save that girl. Are the B posts next???
Looking good --- steve
 

Graham H

Jedi Warrior
Country flag
Offline
Won't be long before you are bolting the seats in and driving off around the block?

Graham
 
OP
F

Frank Canale

Jedi Warrior
Silver
Country flag
Offline
I don't think we will be taking it around the block any time soon. Old man winter has shown up, low 20s and teens at night this week, snow first of next week. I have a repair to the driver side scuttle where the wind shield mounts to the scuttle. I would like to get that done first of the week before it gets too cold to work in the shop. Frank
 

mctriumph

Jedi Warrior
Silver
Country flag
Online
Just my humble opinion after having built 14 or 15 Tr2,Tr3 Tr3A and Tr3b's THE SCUTTLE AND THE"A" PILLAR ASSY ARE SET ON LAST!!! Never first.
go the other way and possibility of big problems rears its ugly head. In other words dont mount a bull facing back!!
MD(mad dog)
 

sp53

Yoda
Country flag
Offline
Interesting thought mad dog have not seen you for a while, I think I understand. I set the front clip first once and found getting the rear clip into a friendly position difficult because of the size and weight made matching the A to the B post vertically difficult. So you are saying get the rear clip B post held down first? If I do it again, I would look into that, because such a small area of the rear clip sits on the inner sill. Not sure about mounting the bull, but is that so the bull does not see you?
 

mctriumph

Jedi Warrior
Silver
Country flag
Online
That is the just of it , the B post will go where ever it likes give or take a bit but when you establish a door aperture on a Tr3,
you have a very easy time of setting the A post up where it HAS TO GO. True story ....My good friend had me over to help save
his 57 that had the firewall/scuttle butchered for a V8. He had a parts car out back and his tube was up on saw horses. I looked
him in the eye and said "trust me" I broke the welds on the A pillar on both sides and the whole mess fell onto the floor in a chunk.
He dropped his beer.....but 45 minutes later the donor front cowl assy was set up in place and the doors fitted .More beer flowed...
MD(mad dog)
 
OP
F

Frank Canale

Jedi Warrior
Silver
Country flag
Offline
I am having to work with what I have. The front of the car was in the best shape such as it was. The middle of the car and back including the doors and dog leg quarter panels have not left me any references so I am having to build the car from the front back and using a centerline. I understand this may not be the best way but I spent an enormous amount of time to get the frame to the factory drawings and I intend to continue to build the car on the frame because this is the only piece I can trust to be right. I am a welder/ fabricator by trade and know that nothing will be welded till I am sure it is right. I tack pieces as I feel comfortable with the location understanding fully that I might have to break a few tacks and make adjustments. The biggest adjustment was with myself to realize that I am not going to make this car perfect as it never was perfect to begin with. I feel that when I am done it will be way better than it was when it was new. I am learning as I go. Slow and steady wins the race. Frank

I did not want to sound defensive . The only help I have is this forum and I certainly can use all the advice I can get. The rear section is on hold till I can get the rear closing section finished. The rear section will have to go on the chassis in order to position the rear mounts. At that time I will be able to look at B post position and repairs to the B post
 
Last edited:

Graham H

Jedi Warrior
Country flag
Offline
Frank, I noticed you don't have any protection on the pointy ends of the scuttle yet, I have still got dents in my head from butting into them, even a dab of white paint will help.

Graham
 
OP
F

Frank Canale

Jedi Warrior
Silver
Country flag
Offline
Thank you Graham, Great point (no pun intended) and I admit i have had a couple of close calls. I have plenty of florescent gaff tape and I will take care of this. Safety first, Frank
 

DavidApp

Yoda
Country flag
Offline
I used a shop towel and white duct tape. Only took one dig in the top of my head to convince me it was necessary.

David
 

mctriumph

Jedi Warrior
Silver
Country flag
Online
Frank ,I very much LIKE & ADMIRE the work you have done on what will be very soon be a great TR3
I was only giving you the heads up, that the welds to the new sill boxes around the scuttle area, are in my
opinion, likely to need to be broken latter. Leave them for now ,but do not be shocked if they need to be moved
1 or 2mm later to achieve proper fit. Just last week I got ahead of my self on a sill re-construction.
Was only off 2mm, but the door fit had gone. The welds had to be broken, I was just glad I had not welded
further than I had.
MD(mad dog)
 
OP
F

Frank Canale

Jedi Warrior
Silver
Country flag
Offline
Thank you Mad Dog, The post is only tacked to the side wall back as it was originally. The bottom is not tacked to the sill as I am still checking floor pans and sill alignment. I still have a long way to go before we can start welding. It is a dance to get everything to work together. Thank you for the advice as I had not heard that the B post should be set first. I will be looking at this as the passenger side B post quarter panel and its support is not attached to the back of the car. A lot to think about. Frank
 
Similar threads
Thread starter Title Forum Replies Date
71TR6 TR2/3/3A TR3 floor pan to firewall question Triumph 2
John_Mc TR6 Floor pan to frame mount question/Miata seats Triumph 2
H MGB MGB floor pan question MG 4
B How big is the floor pan drain hole? Spridgets 0
B BE floor pan welds aren't everywhere? Spridgets 2
B TR4/4A Floor pan replacement Triumph 4
B Rear shroud connection to the floor pan on a BJ7 Austin Healey 21
T For Sale Triumph TR6 pass floor pan Triumph Classifieds 0
71TR6 TR2/3/3A Inner sill or floor pan- which to replace first? Triumph 5
H trunk floor pan replacement 1964 BJ8 Austin Healey 2
S TR4/4A Floor pan mountings Triumph 8
C TR2/3/3A Floor Pan Crack Triumph 5
Zitch TR4/4A Floor pan replacement Triumph 18
S TR2/3/3A On installing the floor pan Triumph 4
bugedd Floor pan replacement Spridgets 12
A TR2/3/3A Floor pan measurement Triumph 1
M needed rt. ft. be floor pan Spridgets 1
Psevins TR2/3/3A TR3 Floor pan Triumph 22
P Interior - right floor pan Triumph 8
M Do you REALLY need drain holes in the floor pan? Spridgets 3
T Anyone used Moss front floor pan replacement panel Spridgets 2
B Holes for sets in BJ7 floor pan Austin Healey 2
Jim_Newman BN1 floor pan Austin Healey 6
W Floor pan comparison Spridgets 7
Stewart floor pan replacement MG 34
jjbunn Floor Pan Replacement Cost Triumph 10
S TR2/3/3A Tr3 floor pan removal Triumph 5
T What do you guys use to cut floor pan sheet metal? Triumph 7
T TR4/4A TR4A floor pan removal - easy or hard? Triumph 7
chicken Floor pan insulation panel Austin Healey 7
HAN8L1965 Replacement Floor Pan Spridgets 1
T Should floor pan be replaced? MG 15
bcbennett Floor pan replacement Triumph 4
F TR6 Rust and small hole on floor pan- TR6 Triumph 6
svtmikey GT6 Floor Pan replacement [GT6] any helpful hints Triumph 1
A Rocker panel or floor pan first Triumph 1
C Floor Pan Replacement by Novice MG 2
aeronca65t Sill and Floor pan replacement MG 3
HealeyRick Perfect Healey Floor Jack Austin Healey 14
LAW75 Driver's and Passenger's Floor Carpets Austin Healey 7
K For Sale TR3 front passenger side fiberglass floor panel.....$100 CAD OBO plus shipping. Triumph Classifieds 3
B Two questions about Bugeye floor panel weld drilling Spridgets 15
Healey Nut Insulating Floor Covering Austin Healey 7
B A plan to replace BE floor pans Spridgets 0
Joel Lester TR2/3/3A Any advice for new floor install on my TR3? Triumph 9
J TR2/3/3A Pads under new floor Triumph 7
F TR2/3/3A Boot floor Triumph 50
K TR2/3/3A Headlight Hi beam floor button fail? Triumph 5
A TR2/3/3A Brakes, exhaust and trunk floor Triumph 2
E BJ8 Seats, Exhaust Hanger, Heat Shield Locations in Floor Austin Healey 7

Similar threads

Top