I am stripping down my flared fenders to see whats under the paint...the guy that made these was a REAL panel beater. Just amazing,rolled beaded edge,hammer/dolly made contours,leaded joints.No english wheel for him.Amazing work.Just a very thin skim coat over the lead/over the hammer marks.Most of the hammer marks are where he made the beaded edge. I'm gonna tell everyone I MADE EM. Maybe get free food at the car shows. If I post a photo of them,you guys wont commit mass suicde will ya.

-
 Hey Guest!
British Car Forum has been supporting enthusiasts for over 25 years by providing a great place to share our love for British cars. You can support our efforts by upgrading your membership for less than the dues of most car clubs. There are some perks with a member upgrade!**Upgrade Now**
(PS: Upgraded members don't see this banner, nor will you see the Google ads that appear on the site.)
You are using an out of date browser. It may not display this or other websites correctly.
You should upgrade or use an alternative browser.
You should upgrade or use an alternative browser.
Flared fenders
- Thread starter BOXoROCKS
- Start date
tony barnhill
Great Pumpkin - R.I.P
Offline
Cool, good article,but nope. These are good sized flares,the one I am stripping is a front fender. They are very similar to the sebring flares.An extra piece of flat sheet contoured and beaded then welded into the cut out wheel opening, then leaded.I will TRY to get a photo on Friday.
one more time please,how do I get a pix posted, do I hit the preview reply button or what.
one more time please,how do I get a pix posted, do I hit the preview reply button or what.
swift6
Yoda
Offline
Or, if you have the photos hosted elsewhere and want them to appear in the post like this...

Once you use the 'Reply' OR the 'Quote' button, then look for the icon buttons above the posting area (the white box you type in). The third button from the left, in between the envelope and the three lines is the 'enter an image' button. If you hold the mouse pointer over that button (without clicking it) then it should show a little box that says "enter an image". Once you press this button it will ask for the URL (the address of the photo hosted elsewhere on the web), it looks like (and is) a website address. You can copy and past this address into the dialog box. Make sure you don't double up the "https://" as it adds it automatically in the dialog box.
If you have hosted images on a site like photobucket.com then look for the "URL Link" under the photo. That is the address you need. This allows the image to appear in the body of the text without having to open a new window to view the attachment.
You don't need to use 'Preview Post', it will only show you what it looks like before you 'Submit'. If the photo doesn't show up in the preview, it won't show up in the submited post.
Hope that helps you out some BOX.
That cut, pull, braze a strip, and fill with bondo technique is exactly how the clown who owned my car did it. Rust infiltrated the layer between the metal and the body filler. I was left no other option but to cut it entirely away. I left about one inch of metal fender and made up fiberglass flared fenders that are riveted and bonded to what's left of the metal. The shape of the car was just too cool not to put it back that way.
Attachments
Re: Flared fenders: photos
OK Jack,lets see if you fly me in without a crash and burn.
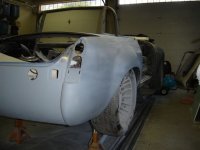
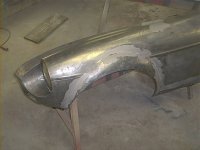
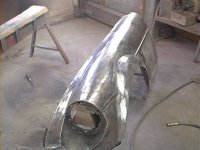
Paint stripped,and metal phosphated. The dull areas are the lead work. Check out the beaded edge, if you can see it. I believe it to be a 1969 fender. This guy,whomever he was did fine work. Hand made and all 4 fender flairs match perfectly.When I get ready to use them I will have to skim coat some areas,but they are nice.
Ya missed it, I was doing a indian magic dance around the sawhorses.
OK Jack,lets see if you fly me in without a crash and burn.
Paint stripped,and metal phosphated. The dull areas are the lead work. Check out the beaded edge, if you can see it. I believe it to be a 1969 fender. This guy,whomever he was did fine work. Hand made and all 4 fender flairs match perfectly.When I get ready to use them I will have to skim coat some areas,but they are nice.
Ya missed it, I was doing a indian magic dance around the sawhorses.
Attachments
tony barnhill
Great Pumpkin - R.I.P
Offline
Holy Moly!