Hey Guest!

 Hey - did you know if you click on the title of a thread it will take you to the first unread post since you last visited that thread?
 but were afraid to ask:
  STOP!! Never post your email address in open forums. Bots can "harvest" your email! If you must share your email use a Private Message or use the
  smilie in place of the real @
 Pretty Please - add it to our Events forum(s) and add to the calendar! >>
angelfj1
Yoda
Offline
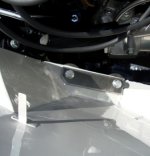
I realize this is a fine detail, but I am looking for the correct finish of these reinforcement plates. They are used at the forward most body to chassis attachment point. Since Triumph would have bolted the shell to the body at Canley, my guess is that the plates are either painted black or bare metal finish, but I'm not sure.
Also, I have seen cars restored beautifully, some with unpainted wing attachment bolts and some that are painted. Mulliners painted the shells, doors , bonnets, wings and boot/spare tire lid at their works and trucked them to Canley. From what I have read and seen in books these pieces were attached to the shell "loosely". So, I assume that Canley reused the same (painted) hardware when making the final assembly on the line. Is this the general consensus?
Also, I have seen cars restored beautifully, some with unpainted wing attachment bolts and some that are painted. Mulliners painted the shells, doors , bonnets, wings and boot/spare tire lid at their works and trucked them to Canley. From what I have read and seen in books these pieces were attached to the shell "loosely". So, I assume that Canley reused the same (painted) hardware when making the final assembly on the line. Is this the general consensus?