• Hi Guest!
    You can help ensure that British Car Forum (BCF) continues to provide a great place to engage in the British car hobby! If you find BCF a beneficial community, please consider supporting our efforts with a subscription.

    There are some perks with a member upgrade!
    **Upgrade Now**
    (PS: Subscribers don't see this gawd-aweful banner
Tips
Tips

TR2/3/3A Finding top dead center

mmgwhite

Member
Silver
Country flag
Offline
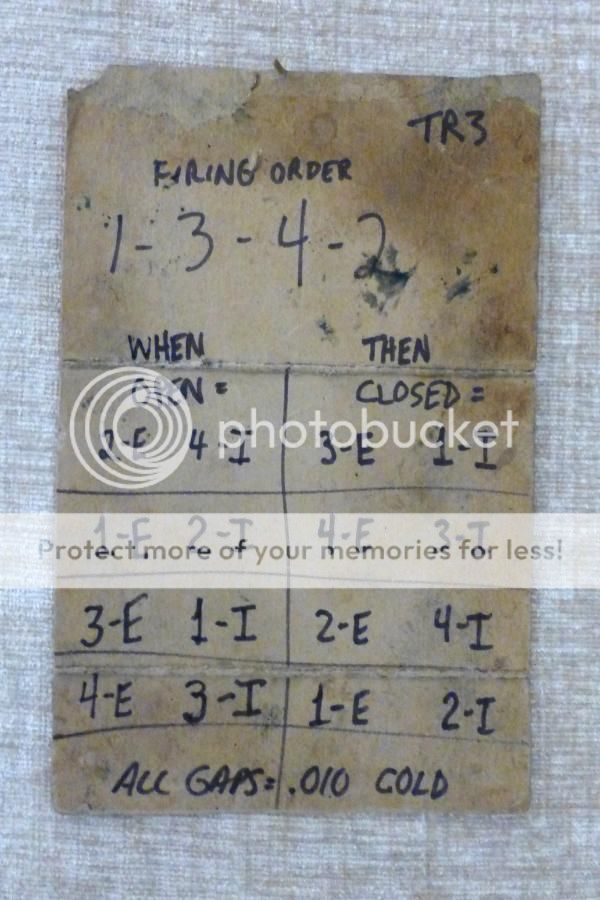
How do you guys turn the crank in your TR3 whilst searching for TDC in order to do the valve clearances?
I have a remote start switch so can use the starter motor but that isn't real precise. I would like to be able to turn the crank by hand but
even with all the plugs removed i can't get enough torque on the radiator fan to turn it over.
Alas, no hole in the radiator for a hand crank
Thanks for your input
 
Well, it doesn't have to be all that precise for setting valves. Both valves will be fully closed (meaning you can check the lash) for at least 1/4 turn before and after TDC. So, I generally just use the starter pushbutton under the hood and watch the opposite cylinder for both valves to be partially open.

But for more accurate positioning, put the gearbox in 4th gear and move the car. If you run out of room, shift to neutral, move to the other end of your space, and put it back in 4th. Pushing on the top of a tire gives you a bit of a mechanical advantage, but I usually just use my hand on the corner of the firewall.

PS, the Stag workshop manual talks about using a pipe wrench on the extension for the front pulley. Stags have a viscous drive for the fan, so turning the fan doesn't work; and no provisions for a hand crank. Many Stags came with automatic transmissions, so moving the car doesn't work either.
 
Yep, standing on the left side of the engine bay it is pretty easy to push the top of the LF tire to move the valve train (gearbox in 4th, plugs out help).

Just watch for what valves are open to know which valves to adjust. Years ago I made a little chart that has been in the lid of the tool chest ever since:

ValveAdjust_zps606664c7.jpg


The note says .010 cold but later I started doing .012 on the exhaust valves.
 
The method I use seems to be less popular, and yet I find it much easier. No chart needed, no "rule of 9" to remember (or is that "rule of 13"?), no timing marks needed, the engine needs to be positioned only once per cylinder (not once per valve), and it works on any Triumph regardless of the number of cylinders (almost any car although there are a few exceptions). It also works just as well turning backwards. Just turn the engine until any pair of valves (intake and exhaust for one cylinder) are both slightly open at the same time. This is known as the overlap period. Although you can't see it, this is what the cam lobes for that cylinder look like
Overlap%20period.jpg~original

Then find the cylinder that is opposite in the firing order. For Triumphs, you can simply follow the plug wire back to the distributor cap, skip to the opposite wire and follow it back out to a cylinder. Or just recite the firing order (which is 1-3-4-2 for all 4 cylinder Triumphs) and pick out the opposite cylinder. For example, if #4 is on overlap, set the valves on #1. Since Triumphs are even-fire engines, the cam lobes for the opposite cylinder will look like
base%20circle.jpg~original


Check (and adjust if needed) both valves on that cylinder.

Now bump the starter (or push the car) until the next cylinder comes on overlap. Again, for example, if you started with #4 and turn backwards, that would be #3. Set the valves on the opposite cylinder (which would be #2).

Do it twice more and you are done!
 
That's pretty much how the service manual calls it. It says to turn the crank to the TDC mark, where #4 is on the "rocker", then set the #1 intake and exhaust. Then turn the crank 180 degrees at a time and follow the firing order, so 3,4, and 2.
 
Back
Top