 but were afraid to ask:
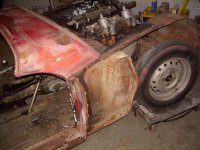
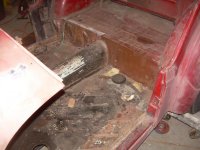
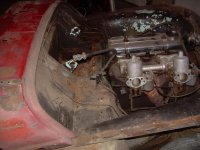
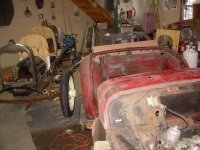
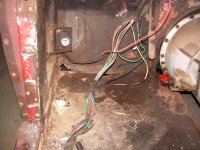
 I finally started the disassembly of my 61 TR3A. I have had it. for awhile but needed to finish my last project before really digging into this one. In the past week I've made a good amount of progress. I'll be reinforcing the cockpit getting ready to replace the floors, and Inner and outer rocker panels which are all rusted out. I will keep posting pictures of my progress and pit falls as I go along. This is my first restoration so I'm guessing there will be a lot of questions.

-
 Hey Guest!
British Car Forum has been supporting enthusiasts for over 25 years by providing a great place to share our love for British cars. You can support our efforts by upgrading your membership for less than the dues of most car clubs. There are some perks with a member upgrade!**Upgrade Now**
(PS: Upgraded members don't see this banner, nor will you see the Google ads that appear on the site.)

Tips
- We have a special forum called "Member Articles" where you can submit actual articles for consideration for publication. Learn More
- Don't have an Avatar? If not, your avatar will default to the 1st character in your username. Go into "Account Details" to change your Avatar.
- Some basic forum navigation info: click
 Hey - did you know if you click on the title of a thread it will take you to the first unread post since you last visited that thread?
- Hey Guest - Is your British Car Club in our Clubs database? If not, send me a PM - Basil

- Looking for a local club? Click the "Clubs" tab above and browse hundreds of clubs world-wide.
- Add Android or iPhone APP: click
- Did you know - any picture or video you add in your posts in any marque-specific forum will also get added to the Media Gallery automatically.
- A few more tips about posting and replying: click
- Hey there Guest - be sure to keep your profile page up to date with interesting info about yourself: learn more
- More tips and tricks on Posting and Replying: click
 STOP!! Never post your email address in open forums. Bots can "harvest" your email! If you must share your email use a Private Message or use the
  smilie in place of the real @
- Want to mention another member in a post & get their attention? WATCH THIS

- So, you created a "Group" here at BCF and would like to invite other members to join? Watch this!
- Hey Guest - A post a day keeps Basil from visiting you in the small hours and putting a bat up your nightdress!
- Hey Guest - do you know of an upcoming British car event?
 Pretty Please - add it to our Events forum(s) and add to the calendar! >> Here's How <<
- Hey Guest - you be stylin' Change the look and feel of the forum to fit your taste. Check it out
- If you run across an inappropriate post, for example a post that breaks our rules or looks like it might be spam, you can report the post to the moderators: Learn More
- If you would like to try some different "looks" or styles for the site, scroll to the very bottom, on the left and click the Style Selector.
You are using an out of date browser. It may not display this or other websites correctly.
You should upgrade or use an alternative browser.
You should upgrade or use an alternative browser.
TR2/3/3A Finally getting started
- Thread starter JeffW
- Start date

M_Pied_Lourd
Darth Vader
Offline
Excellent. We all look forward to regular updates. We shall be here if you need us!
Good luck and most importantly, have fun!
Cheers
Tush
Good luck and most importantly, have fun!
Cheers
Tush
STeve 1958
Jedi Hopeful
Offline
I have a 58 TR3A but in 1974 I had a 61. These pictures are bringing back memories. Actually making me a little sick to my stomach haha. So glad I'm not starting from scratch again.
In the 70's we didn't have the internet or TRF. so you have a great advantage.
In the 70's we didn't have the internet or TRF. so you have a great advantage.
Jeff,
Great bunch of folks here, always willing to lend a hand as I have found out. Best of luck on your journey! I'm on my first one too.
Mine is a 60, dad's is a 61. He's had his for 50 years, I've had mine for 3 months.
I can't help with the technical yet, but I can get a measurement or a pic pretty quick, but some of these guys are really quick on the draw.
Cheers!
Ron
Hello Jeff
Looks like you have made a good start on the TR strip down.
Make sure you weld in good bracing to keep everything in line. Front to back and diagonals. I presume you will be separating the body from the frame. I lifted mine with a bar bolted to the bonnet hinge holes, a tube bolted between the rear wheel arches near the hood frame mounting and had a tube welded to both. So when I lifted there was no tenancy for the body to fold up. The PO had already done a number on the body.
David
Thank you for all the responses and encouragement.
David, it looks like you had a good bracing set up and I am planning something similar.
Gil, you are right about the odd couple. The other car is my 1922 speedster project that I'm building to hopefully race at The Race Of Gentlemen in October. As time goes on my cars are getting older and slower. an even odder garage mate to these two was my last project which was a Factory Five Daytona Coupe and Has been sold. I've decide at my age I would rather go a bit slower and enjoy the ride than fast and make a lot of noise.
I am building the TR3 for my wife in hopes that we will be able to cruise together down the road. She in the TR and myself in a 54 MG TF that I have in my barn.
Hello Jeff
My setup had the advantage that I could set the body down and get it on my body buggy on its side. Put one edge of the body on the buggy, unhook the chains on that side then lift the other side up till the body is vertical. All done without assistance. Could also move the body around.
David

My setup had the advantage that I could set the body down and get it on my body buggy on its side. Put one edge of the body on the buggy, unhook the chains on that side then lift the other side up till the body is vertical. All done without assistance. Could also move the body around.
David
martx-5
Yoda
Offline
Here's a couple of pics of the bracing I made up. The hole in the middle of the cross brace was used to hook to the engine hoist chain. I could lift the body right off the chassis and roll it around. I had to mess with the position of the cross brace to get it perfectly balanced before I welded it in.


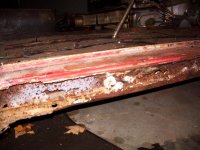
Steve,My previous pictures don't tell the real story. The P.O. did a lot of cover up. here are some pictures of the pas side after I removed the cosmetic repairs, I haven't dug into the drivers side but expect to find much the same thing.
David, I like your dolly set up. A couple of questions. It looks like they are new floors. Did you replace them with the tub on the chassis? Also did you do one side at a time as I have read is the way to go or just brace it all and do them at once. Did you have to replace the rocker panels?
David, I like your dolly set up. A couple of questions. It looks like they are new floors. Did you replace them with the tub on the chassis? Also did you do one side at a time as I have read is the way to go or just brace it all and do them at once. Did you have to replace the rocker panels?

Hello Jeff
Thank you. It worked very well. I can post more photos that show my construction if you want.
They are new floors, inner and outer sills but the work was done by the PO. I am not sure what his method of working was but I did find that the passenger door opening was about 1/2" too big and the drivers door would not fit by about 1/4" so I am assuming the body was removed during the repair.
Hence my suggestion to brace everything before you unbolt the body from the frame. Doing one panel at a time makes sense and that is what they recommend in Roger Williams book "How to restore Triumph TR2,3,3A,4, and 4A" a great book to have by your side as you work.
By Rocker Panel are you referring to the outer sill? Yes they were replaced.
Reading another thread it seems that the ones made by K.A.S. in Australia are made correctly with the slight curve in them. The seats I got from them were very good.
https://www.kas-kilmartin.com.au
David
David, I do have Roger Williams book which is why I asked how you had done it. I plan to do one at a time but I like your set up for working on the underside. Much easier than laying on the floor underneath the body.
I'd love to see more pictures of your construction.
Jeff
I'd love to see more pictures of your construction.
Jeff
Frank Canale
Jedi Warrior
Offline
Hi Jeff,
I am restoring a 1960 TR3A as well. I wish mine looked as good as yours. Repairing and forming new parts is time consuming but that is why I got mine. I wanted to learn more about metal forming and there is plenty to learn. I am waiting for the outer sills that I have on order from KAS- Kilmartin in Australia. The sills should be finished this week and I expect to receive them by the end of January. When they arrive I will be posting pictures as there seems to be an interest in the bowed sills to match the doors. I am doing my first restoration and the Triumph guys have been very helpful to me and I am sure they will be a great help to you. Feel free to post questions and I am sure someone has run into any situation and will offer their knowledge.Good luck, take your time and enjoy your car.
Frank