• The Roadster Factory Recovery Fund - Friends, as you may have heard, The Roadster Factory, a respected British Car Parts business in PA, suffered a total loss in a fire on Christmas Day. Read about it, discuss or ask questions >> HERE. The Triumph Register of America is sponsoring a fund raiser to help TRF get back on their feet. If you can help, vist >> their GoFundMe page.
  • Hey there Guest!
    If you enjoy BCF and find our forum a useful resource, if you appreciate not having ads pop up all over the place and you want to ensure we can stay online - Please consider supporting with an "optional" low-cost annual subscription.
    **Upgrade Now**
    (PS: Subscribers don't see this UGLY banner)
Tips
Tips

Final Timing Question [I hope]

T

Tinster

Guest
Guest
Offline
Ok, here is exactly what I have.

1968 TR250 engine block

Everything below is new with less than 200 miles on them:

Jeff Schlemmer rebuilt dizzy to standard specs with
a petronix ignition inside it.

Standard coil ( I have a FlameThrower but not installed)

New Paul Rego throttle linkage shaft bushings

Plugs new and gapped gapped at .025"

Valves adjusted properly

New plug wires

Jeff Palya rebuilt carbs set to standard specs.
Rear carb running rich.

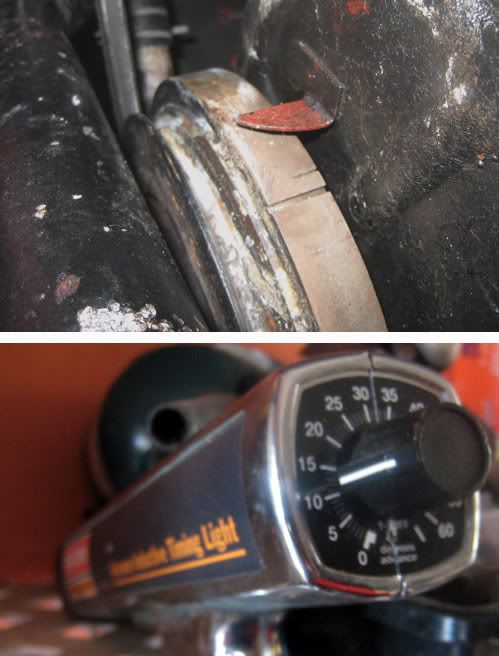
The photo shows my timing wheel and timing pistol.

IF I cap off BOTH carb pipes and I cap off both dizzy ears-
(eliminate the advance/retard system completely)

with the equipment and TR components I have installed....
How do I now proceed?

I am sorry to be so stone dead stupid on this one. It
escapes me.

Thanks,

dale

timingLight.jpg
 

Brosky

Great Pumpkin
Offline
Dale,

From what I see, you have a replacement damper. That is why there are no marks other than TDC (bigger slot) and the ATDC (thinner slot).

I have attached the only picture that I have of mine from when I was painting the engine way back that shows the two slots. All of the degree markings should be below the big slot from the drivers side view, with the ATDC slot above.

I have since installed degree wheel tape (a lot of work, don't go there!) and I don't have a picture of that yet. If someone can measure from TDC down to 4-8-12-16 on their damper, you could measure and mark yours accordingly and then time it more accurately from there.

I don't want to guess and give you the wrong info.

However, if you mark the slots so they are easy to see and use Ron's vacuum method you will get pretty close.
 

Brosky

Great Pumpkin
Offline
Actually Dale, now that I look at yours and think of mine, that mark will probably represent 4* ATDC. So the distance from TDC to there will be the same in the other direction for each 4* increment, which is how the dampers are marked. If you download my image and blow it up, you will see the markings to the right of the white lines on the wheel.

Sorry, it was never intended for this detail. I would still like someone else to check the measurements.
 
OP
G

Guest

Guest
Guest
Offline
Mark the same distance as the small line on the other side of the big line, block off your carb vacuums and proceed to time to the new mark, which should be about 4*BTDC, and go a bit farther if you want 8*BTDC. That would be centrifugal advance then, not vacuum advance. Both work, I like BTDC timing.
 

Brosky

Great Pumpkin
Offline
OR, now that I see what type of light you have, you can leave it set for 12 and turn the distributor until you are on TDC, then lock it down. If you then turn the knob on the light to ZERO, you will see the "imaginary" mark move down below TDC to where 12 should be.

The car should be warmed up for this and as close to 850-950 RPM's as possible. You may have to readjust the idle and timing again after setting, as one affects the other, but it will be minor tweaking.
 
OP
T

Tinster

Guest
Guest
Offline
Thanks Paul and Bill and everyone-

I'll ponder this for a few days.

Crypty's up on jacks right now having his
front end suspension gutted out.
Giving me DPO Pedro fits? Oh Yeah!!

Amos is sitting out on the terrace having a pina
colada and smiling while he looks at all his brand
front suspension parts that Crypty hasn't seen.

dale
 

dklawson

Yoda
Offline
As was said above by Paul....

CONFIRM which of the two marks on the pulley line up with the pointer when you have #1 at TDC. After that, start the engine, warm it up, and set the timing light to your desired advance at idle. Loosen the dizzy clamp and turn the dizzy housing until the zero mark on the pulley lines up, then clamp the dizzy down.

Advance timing lights make this a pleasant experience. Lacking that you have to make the marks on the pulley as was mentioned above.
 
OP
R

RonMacPherson

Guest
Guest
Offline
They've given you advice that I can not add to.

However, You state the distributor is rebuilt. Call the dizzy man and find out from him what advance cure is in it.

I'd like to hear his recommendations on total advance on his setup. Which version Pertronix do you have installed?

I have heard and read of the Pertronix's burning themselves out if the ignition is left on(and not running) for any time over 3 minutes.

If you do install a stronger output coil you should be able to open the plugs up to at least .030. make sure your rotor and cap are in great condition.
 

71TR6

Jedi Hopeful
Country flag
Offline
Dale,
Here's an image showing my damper. Since I rebuilt the engine, I had the opportunity to take some paint and wipe it into the grooves of the markings to make them more visible (the ol peepers aren't what they used to be!). It clearly shows the ATDC & BTDC markings. Hope this helps!

RonW.
TR6damper.jpg
 

Brosky

Great Pumpkin
Offline
OK, now I'm gonna have to find the pictures of the degree tape on mine. It's black and gold lettering and even my bad old eyes can see it.
 
Similar threads
Thread starter Title Forum Replies Date
Joel Lester TR2/3/3A What final front suspension torque settings needed? Triumph 7
tr6nitjulius General TR Final solution to no 1st/2nd gear issues Triumph 2
Bayless Ready for final block sanding Spridgets 5
R TR6 1973 Final drive issues Triumph 5
pbraun Bug i nearing final completion Spridgets 11
CJD TR2/3/3A TR2/3 Guru Final Exam Triumph 59
warwick-steve Final fix for clutch pipe to master cylinder leak?? Austin Healey 13
J Final painting detail questions Austin Healey 16
B Final painting of all body panels - with panels on or off car? Pros and Cons? Austin Healey 7
DornTRoriginal TR2/3/3A Final Check Items Restoration nearing completion Triumph 9
MadMarx TR4/4A [VIDEO] NĂĽrburgring RGB Seasons final race Triumph 12
dougie SOVREN Fall Final PRW Racing 2
B Final MARRS race of the season - free admission Racing 0
Pythias 1275 Transplant --- Final Report Spridgets 4
Jim_Gruber Bugsy's Final Goodbye Spridgets 4
KVH Final Testing of OD Triumph 2
glemon Final Rocker Shaft Question Triumph 5
F Final touches- a few detail questions for a BJ7 Austin Healey 11
hondo402000 Stag TR6 Engine rebuild in final stage, dyno date 7=22 Triumph 23
PAUL161 MGA Doc, Do You Know MGAs final gear ratio? MG 11
hondo402000 TR6 TR6 Final Paint pics and Putting it back together Triumph 31
drooartz Progress: garage space and the final list Spridgets 3
Tinkerman TR2/3/3A Final drive ratio for TR 3A Triumph 8
MadMarx [Video] RGB Seasons Final Nurburgring GP Track Racing 7
mikecyc72usa The final push Triumph 0
ncbugeye What tool to remove final drive filler plug? Spridgets 12
dougie HMSA Portland Historics 2009 Group # 7 Final Racing 4
zimmy 74 midget..............final price drop! Spridgets 7
ncbugeye Final drive on Bugeye Spridgets 17
SilentUnicorn The final straw Spridgets 26
reinaldo Stag Final stage in the restoration of my TR4A Triumph 23
Brosky Under windshield frame and final prep for paint Triumph 6
Brosky Final panel fitting & new mirrors Triumph 38
PATR8 Wedge TR8 repair mostly final tally Triumph 40
Brosky New Engine, the final chapter Triumph 3
Glen_B My final Ozark slide show Spridgets 1
regularman Well, just placed a final [hopefully] order Spridgets 8
JPSmit final question [tonight] - cleaning transmission Spridgets 5
bcliff Stuck Intake Valves.. The Final Chapter! MG 4
B Final Exhaust pics Spridgets 26
J Weber final adjustments-I hope Spridgets 2
M Rear axle [final drive] tools or information Restoration & Tools 5
billspohn Final Jamaican Pictures MG 22
regularman Can anyone tell me what the exact final ratio is.. Spridgets 15
jollyroger Sprite Parts Vortex final closing deals. Spridgets 0
A E-Type rear suspension/final drive continued.... Jaguar 4
David_K **Final Interior Combo Choice** Austin Healey 39
Simon TR4a Final cleaning before paint. Restoration & Tools 3
J MG plays its final act..[its sad and final] MG 3
Bruce Bowker eBay B - final price? MG 18

Similar threads

Top