• Hi Guest!
    You can help ensure that British Car Forum (BCF) continues to provide a great place to engage in the British car hobby! If you find BCF a beneficial community, please consider supporting our efforts with a subscription.

    There are some perks with a member upgrade!
    **Upgrade Now**
    (PS: Subscribers don't see this gawd-aweful banner
Tips
Tips

GT6 Fan shroud help

svtmikey

Jedi Trainee
Silver
Country flag
Offline
OK, I finally bought one of the expensive (but cheap) cardboard Fan Shrouds fro my 69 GT6+ and I was wondering if anyone has a picture of how it is installed on the radiator?
I thought an intelligent guy like myself would be able to figure it out from the maintenance manual, but I guess i have been giving myself too much credit!
I can't seem to place it correctly and since it is cardboard, I only have so many bends before i will need to put it in the recycling.
My Gt6 didn't come with one so I have no point of reference.

Thanks :smile:
 
When it stops raining I will try and get you a picture of how it is installed on our Mk1 which should be the same. While it is on our car, it is a bit of a disappointment. As you pointed out, it is cardboard and I clipped some aluminum bar from the home center underneath the front edge to keep it from collapsing over time.
 
I would really appreciate that....hmmm....maybe a bit if a market for aluminum replacements........

Thanks
 
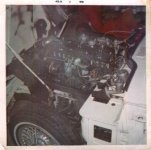
This is one of the few pics I have of the '67 I had. Don't know if it will help.

67 5.jpg
 
Just as Doug did, I used two strips of aluminum on each side of the radiator to give reinforcement to the shroud.


Jay's pictures are better than what I could provide. However, after the holiday I'll try and get some shots of where I added the aluminum.
 
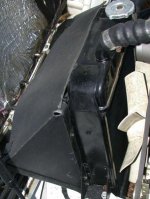
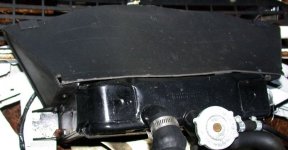
As expected, Jay's pictures are better than the ones I took so I am only showing a couple of non-standard things I did.

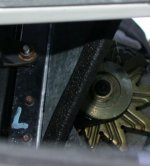
The first picture is a side view of the installed shroud. You will notice some metal clips on the top edge and vinyl edge molding along the sides. You can also see a bit of galvanized sheet metal poking out from the top edge of the shroud. The second picture is a top-down view of the shroud and you'll notice the two metal clips (office binder clips) shown on the leading edge of the shroud. The third picture is a view up through the grille showing the galvanized metal and vinyl edge moulding.

This is the second shroud I installed. The first one deformed badly after a couple of seasons so I removed it. Until I took these photographs I had forgotten that I formed inner metal panels out of galvanized steel sheet (pieces of old ductwork). They were cut and formed to follow the profile of the triangular side gussets of the shroud. Those are held in place by the aluminum flat stock (not clearly seen in the pictures) that was cut to reinforce the "mounting edge" of the cardboard shroud (the edge with the clearance holes for the screws). The front edge of the shroud also has a tendency to bow and sag over time. Rather than make a galvanized panel for that surface, I took a piece of the flat aluminum and simply held it to the underside of the shroud with those black binder clips. The binder clips were supposed to be temporary but they worked so well I just left them and haven't given serious thought to replacing them.

Regardless, the aluminum flat stock stiffens the mounting edges of the cardboard, the triangular gussets are reinforced by the galvanized sheet, the aluminum bar keeps the top surface from sagging, and the vinyl edge moulding hold the galvanized parts in place while concealing their presence in all locations except the top. I suppose I should paint those.


GT6FanShroud02.jpg

GT6FanShroud03.jpg

GT6FanShroud04.jpg
 
Wow! Thanks everyone for replying!
I would never have figured that out without your help.....It is nothing like I thought.......LOL.
I imagine it won't last too long (being cardboard) out in the rainy Northwest here, so I better coat or paint it with something before a start driving to much.
Although it looks easy enough to make out of aluminum...now that I have a template and understand how it attaches.
Thanks again!
 
You certainly could use the cardboard piece as a template to make an aluminum shroud. I expect you could also protect the cardboard quite well by coating it with black POR-15 and a fog coat of chassis black satin paint if you wanted to keep a more original look.
 
Back
Top