-
 Hey Guest!
British Car Forum has been supporting enthusiasts for over 25 years by providing a great place to share our love for British cars. You can support our efforts by upgrading your membership for less than the dues of most car clubs. There are some perks with a member upgrade!**Upgrade Now**
(PS: Upgraded members don't see this banner, nor will you see the Google ads that appear on the site.)

Tips
- We have a special forum called "Member Articles" where you can submit actual articles for consideration for publication. Learn More
- Don't have an Avatar? If not, your avatar will default to the 1st character in your username. Go into "Account Details" to change your Avatar.
- Some basic forum navigation info: click
 Hey - did you know if you click on the title of a thread it will take you to the first unread post since you last visited that thread?
- Hey Guest - Is your British Car Club in our Clubs database? If not, send me a PM - Basil

- Looking for a local club? Click the "Clubs" tab above and browse hundreds of clubs world-wide.
- Add Android or iPhone APP: click
- Did you know - any picture or video you add in your posts in any marque-specific forum will also get added to the Media Gallery automatically.
- A few more tips about posting and replying: click
- Hey there Guest - be sure to keep your profile page up to date with interesting info about yourself: learn more
- More tips and tricks on Posting and Replying: click
 but were afraid to ask:
  STOP!! Never post your email address in open forums. Bots can "harvest" your email! If you must share your email use a Private Message or use the
  smilie in place of the real @
- Want to mention another member in a post & get their attention? WATCH THIS

- So, you created a "Group" here at BCF and would like to invite other members to join? Watch this!
- Hey Guest - A post a day keeps Basil from visiting you in the small hours and putting a bat up your nightdress!
- Hey Guest - do you know of an upcoming British car event?
 Pretty Please - add it to our Events forum(s) and add to the calendar! >> Here's How <<
- Hey Guest - you be stylin' Change the look and feel of the forum to fit your taste. Check it out
- If you run across an inappropriate post, for example a post that breaks our rules or looks like it might be spam, you can report the post to the moderators: Learn More
- If you would like to try some different "looks" or styles for the site, scroll to the very bottom, on the left and click the Style Selector.
You are using an out of date browser. It may not display this or other websites correctly.
You should upgrade or use an alternative browser.
You should upgrade or use an alternative browser.
TR2/3/3A Fabricating inner sills?
- Thread starter wifegonnakillme
- Start date

OP
wifegonnakillme
Jedi Hopeful
Offline
I just re-measured my originals, by the B pillar at the thinnest point (and after removing the rocker) I measured 3.29 mm or about .130 inch for the joined metal (2 sides)... this is thinner than before when I quickly measured from the front where there had been some bulging due to rust in the joint.
Regarding gauge:
18 is 1/20"; 0.0375"; or 1.27mm
16 is 1/16"; 0.0625; or 1.58mm
14 is 5/64"; 0.078125"; or 1.98mm, and for completeness:
12 is 7/64"; .1094"; or 2.77mm
so you are right 12 was way off, 16 is the nearest, but slight under thickness by my measurements on 50+year old steel that has been media blasted.
The max for the cheap spot welder is 1/8th inch or 2x 16 gauge is so i guess if we agree the originals are 16, I should be good with the spot welder.
At the end of the day, I can always forgo the spot welder and just plug weld these, so I could go with 14 in that regard -
Thoughts?
M_Pied_Lourd
Darth Vader
Offline
I think 14 is overkill personally...
Cheers
Tush
Cheers
Tush
OP
wifegonnakillme
Jedi Hopeful
Offline
Thanks Tush, that's what I was hoping to hear (means I can buy a new tool )
On another note, do you think the radius of the folds are important to communicate to the fabricator? I imagine with 16 gauge they can make pretty sharp corners where the originals have a radius of 1/4" Maybe I am over thinking it - will not make much of a difference at the pillars as all 4 need repair and the connection is hidden and the rockers should have enough clearance regardless - just hate to make an error that won't be known until a fair bit of work is invested.
)On another note, do you think the radius of the folds are important to communicate to the fabricator? I imagine with 16 gauge they can make pretty sharp corners where the originals have a radius of 1/4" Maybe I am over thinking it - will not make much of a difference at the pillars as all 4 need repair and the connection is hidden and the rockers should have enough clearance regardless - just hate to make an error that won't be known until a fair bit of work is invested.
Offline
18 is 1/20"; 0.0375"; or 1.27mm
16 is 1/16"; 0.0625; or 1.58mm
14 is 5/64"; 0.078125"; or 1.98mm, and for completeness:
12 is 7/64"; .1094"; or 2.77mm
Thoughts?
??
Doesn't match any of my tables:
https://www.sheetmetalguy.com/sheet_metal_gauge_chart.htm
As for the radii of the folds, the original sills have nearly none, only what you would expect from a largel brake or press. I wouldn't try to take all the radius out. That would weaken the metal at the fold.
Here's a link on bending radii::
https://www.thefabricator.com/article/bending/bending-basics-how-the-inside-bend-radius-forms
Tom
OP
wifegonnakillme
Jedi Hopeful
Offline
Hi Tom,
I just used the first to pop up on google:
https://www.tedpella.com/company_html/gauge.htm
It's google, so who knows, maybe they paid more for their ads and got to be first...
Anyway, your reference is thinner still making it easier for the tool, but further off of my measurements of the original -
I think I will just go with 16 and be done with it - there doesn't seem to be vehement opposition.
Interesting re the radius, I will take this up with the fabricator and show him the original to see what he can come up with,
Thanks,
Kerry
OP
wifegonnakillme
Jedi Hopeful
Offline
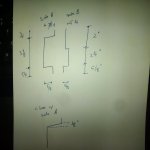
This is what I will send to the fabricator tomorrow. At different points on mine it looks like the outer piece of the sill has angles that are over 90 degrees. I couldn't figure out if it was an optical illusion or not, but when I measured side "a" in the attached was 1/8 inch shorter than side "b" so i decided it must be at that point.. again, probably fussing too much on a part no one will see.
Attachments
Offline
I suggest that you cut a section from the old sill and bring that to the fabricator. Find a section that is undamaged. Make the new one exactly like that section. Perhaps no one will see it but it is a real PITA to fit the thing if it isn't right. Remember that the suppliers of reproduction parts got all tooled up to make and sell hundreds of these sills and they got several critical details wrong at first.
As far as I can tell, the top outside edge seems a couple of degrees short of 90, giving a slight slope downward. In addition to several other problems with earlier reproduction sills documented on this forum, that slope is a bit exaggerated on the sill that I started to install and then removed to replace with the newer more correct version.
Tom
OP
wifegonnakillme
Jedi Hopeful
Offline
With the fulcrum pins replaced, I turned my attention last night to the blanks that had been languishing in the corner since May...
Tom, you may well be right and I could be headed for challenges - I knew that angle on my "A" side was going to be off as the fabricator noted that he wasn't able to reproduce that slope. Also, as I look at my measurements, I somehow miss measured and the upper ledge on the "B" side is measured and pressed at 2" where it should be about 2 and 1/8th. I think (am hopeful) that I will have some flexibility as I am the one positioning the mounting plates to the frame...
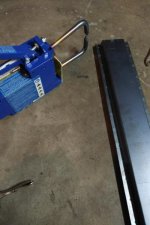
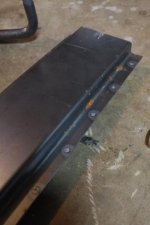
So, last night I unpackaged the spot welder I bought on sale this summer - what a fun tool - and spot welded the two blanks together (learned tips on the spot welder - keep the tips filed to 1/8"; keep the work clamped tight; hold the welder in place for a few seconds after you release the power).
Starting on the PS, I plan on using the pulled sill from the car to cut the angles from the ends on my cut off saw then folding and tack welding in place the mounting plates...
I plan on taking a look at thinks when partially assembled and deciding if I will order or have the outer sills fabricated - leaning toward the latter not for cost this time, but because I can ensure the fit.
Slow and sometimes steady...
Tom, you may well be right and I could be headed for challenges - I knew that angle on my "A" side was going to be off as the fabricator noted that he wasn't able to reproduce that slope. Also, as I look at my measurements, I somehow miss measured and the upper ledge on the "B" side is measured and pressed at 2" where it should be about 2 and 1/8th. I think (am hopeful) that I will have some flexibility as I am the one positioning the mounting plates to the frame...
So, last night I unpackaged the spot welder I bought on sale this summer - what a fun tool - and spot welded the two blanks together (learned tips on the spot welder - keep the tips filed to 1/8"; keep the work clamped tight; hold the welder in place for a few seconds after you release the power).
Starting on the PS, I plan on using the pulled sill from the car to cut the angles from the ends on my cut off saw then folding and tack welding in place the mounting plates...
I plan on taking a look at thinks when partially assembled and deciding if I will order or have the outer sills fabricated - leaning toward the latter not for cost this time, but because I can ensure the fit.
Slow and sometimes steady...
Attachments

I have one of those 220v Harbor Freight spot welders. They work. Less so as the metal gets thicker. You have to keep the tips clean and learn to count while you pull the trigger. Too long and you burn a hole, too short and it does not weld. For the price, it works.
Jerry
Jerry
Offline
Yes, great tool. (I got mine on eBay back when you could get bargains, an ancient ARO brand with a timer and amperage control). Nice job on the sills too.
A for fabricating the outer sills, if you really want to get fancy, you could add the almost imperceptible radius that was rolled into the originals. Lots of little bends and folds in the things, which accounts for the poor reproductions that I got (I had to weld a little piece onto the reproduction sills I bought in order to get them to fit the b post. I think some of the more recent reproductions are better), but with some ingenuity, which you certainly have, and some hand work, you can get them right.
Tom
Nice work Kerry, I am impressed. I replaced both mine at once with store bought ones from VB on sale, but if I would have saw yours first I probably would have tried it also. But like said, the shops around here that have the equipment charge probably 100.00 an hour shop time and there are less and less sheet metal shops. I hope the local craftsman has a rebirth in the future.
Anyways if I had to do over again, I wish I would have used some large bar clamps or some band/cloth clamp to hold the front clip tighter to the floors and sills because the front clip wanted to blow out. I used sheet metal screws and smaller clamps to hold things in place until I was happy, then welded. Plus I wish I would have bought one of those spot welders, but my concern was getting penetration once I stacked the outer- sill, inner-sill, and floor plans, so went ahead and plug welded most of it.
steve
OP
wifegonnakillme
Jedi Hopeful
Offline
Steve, you are right re the clamps for all welding, but even with the compression from the spot welder, I found I got more consistent penetration when the metal was well clamped.
By the way, we do have a few local fabrication shops, I was lucky to find one that didn't really jack the price just because it was a small job - taxes in the fabrication and extra 16 gauge for the supports was 178$ (Canadian).
I do expect though, since I couldn't find a cheap 240V spot welder, that I will have to plug weld the rocker, sill, floor joint, not too worried about that as I can plug from alternating sides.
Tom, I do not mind bending metal, but the rockers since they are mass produced and relatively cheap may be the way to go in the end. I did a quick dry fit with the ones I removed from my car and they seem to fit the new sill relatively well - if not, I can always modify or start from scratch and dump them on ebay or something..
Cheers,
Kerry
Offline
Tom, I do not mind bending metal, but the rockers since they are mass produced and relatively cheap may be the way to go in the end. I did a quick dry fit with the ones I removed from my car and they seem to fit the new sill relatively well - if not, I can always modify or start from scratch and dump them on ebay or something..
Cheers,
Kerry
I agree. My reproductions were certainly much easier than from scratch and with a bit of work can be bade to fit perfectly. Not much to gain from DIY with those really, I suppose.
Tom
OP
wifegonnakillme
Jedi Hopeful
Offline
You know, there are days when I remember my buddy telling me 18 years ago (an engineer who grew up with and will someday have his dad's 1.5 e-type) - "I am just going to buy a miata, it will do what I want when I want" and I wonder...
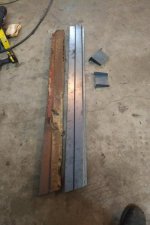
Anyway, take a look at the attached photo -see any major difference between my fabricated sills and the original? I had wondered why after measuring several times how I could be a 1/4inch out on my inner sill edge.. well, it's sloped and I completely missed that.
I am giving up here on this exercise, I am going to switch to another activity and order a pair from one of the big guys once I can find some "loose" funds. $300 in, but at least I have a spot welder out of it. It's frustrating that shipping costs almost as much as the part..
Good thing my other hobby is brewing large amounts of beer.
Cheers,
Kerry
Attachments
I have built things inside and backwards before as a carpenter. Heck now you know for sure. Take a break have some coffee go back to the shop that helped the first time; they will understand and give you a deal, I am betting. Besides you did all that stuff in the front. This is a hobby/therapy for a capitalist, consumerist, everything made in China—world.
steve
steve
Kevork Erer
Freshman Member
Offline
has anyone fabricated and replaced drain troughs around trunk that the lid sits on, any picks would be appreciated thanks.
Kevork
Kevork
Joel Lester
Senior Member
Offline
Just my two cents here... check out Fitz's Fabrication on you tube. That guy taught me how to weld - just by watching his videos. Fantastic teacher. He gave me the confidence to do all the bodywork on my TR3 myself and at home. If you check it out he says you can make all kinds of metal pieces when they are either too expensive or hard to find. I bought a Mastercraft welder at Canadian Tire and it's work great - it was cheap too. I would make my own sills. Just think of all the skills you'll learn!