• Hi Guest!
    If you appreciate British Car Forum and our 25 years of supporting British car enthusiasts with technical and anicdotal information, collected from our thousands of great members, please support us with a low-cost subscription. You can become a supporting member for less than the dues of most car clubs.

    There are some perks with a member upgrade!
    **Upgrade Now**
    (PS: Subscribers don't see this gawd-aweful banner
Tips
Tips

exhaust questions for BN1

deluxe

Freshman Member
Offline
Hello,

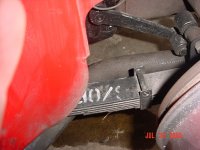
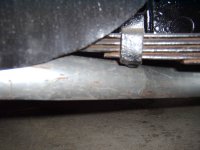
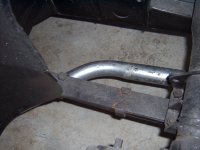
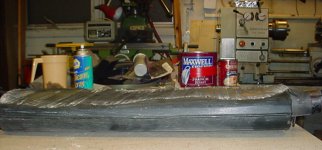
I'm installing a new exhaust system on my BN1. Everything is stock but parts are after market (Not M***). The long tail pipe doesn't seem to give any clearence around the rear drivers side tire? It seems way too close and I expect would bind once the car hit any bumps.. Also I'm sand blasting my EX manifold and when I attempted to remove the bolts that hold the heat sheild and carb linkage two of the three sheared off. I am wondering if once these bolts are removed do the holes go into the inside of the mainfold. It appears they do, but before I tap the bits out I want to know if I should stop or go straight through. Thanks.
 
On my BN2, which should be similar, the manifold holes were tapped through.

The tail pipe makes a straight exit from the muffler for a few inches, jogs inboard at about 45 degrees, Straightens & continues straight to the rear. At the point where it passes inboard of the axle/spring U bolts, it is about 2 inches further inboard. The pipe exits almost inline with the LH bumper bracket. There are two tapped holes on the rear cross frame to hold an original type exhaust hanger that line up with a hanger welded to the pipe. Near the forward end of the pipe is another bracket welded to it which lines up with another set of tapped holes in the frame to hold a hanger.

You can get an idea from this illustration, item3.
https://www.mossmotors.com/Shop/ViewProducts.aspx?PlateIndexID=28861

Also note the hanger tab on the front of the muffler which bolts to a hanger secured at two more tapped frame holes.

Maybe you "should" have used a Moss pipe & hangers?
D
 
Hi Dave,

Thanks for the info on both. I'll go ahead and tap through the remaining bolts. The exhaust seems to fit the hangers just fine, at the back and just under the seats, but as you mentioned where it makes that turn and goes by the axel it is too close. I'm wondering based on your previous post on fitting your header from DW if I may need to heat up the pipe and try and bend it slightly to get a better fit? Honestly it would be helpful if I had another 100/4 to look at.. since I'm rebuilding mine and haven't seen most of it together before. Thanks. Trevor
 
[ QUOTE ]
Hi Dave,

Thanks for the info on both. I'll go ahead and tap through the remaining bolts. The exhaust seems to fit the hangers just fine, at the back and just under the seats, but as you mentioned where it makes that turn and goes by the axle it is too close. I'm wondering based on your previous post on fitting your header from DW if I may need to heat up the pipe and try and bend it slightly to get a better fit? Honestly it would be helpful if I had another 100/4 to look at.. since I'm rebuilding mine and haven't seen most of it together before. Thanks. Trevor

[/ QUOTE ]
Hi Trevor,
It may be that the muffler/pipe is too far back. From the attached pic you should be able to see the bend location. The back of the muffler connection should be a bit forward of the outrigger U cutout. You might need to shorten the forward end of the tailpipe or move the muffler forwardto get the bend in the right place. But it's hanger still has to line up with it's body mount. The muffler itself should fit between the two outrigger U's with room to spare. If the bend isn't perfectly placed the pipe will foul the forward part of the spring. In the pic, the axle is at full droop & the spring clip just barely clears the pipe.

When I previously mentioned bending the header itself, it was to align the header flanges. The rest of the system fit perfectly except I had to heat & bend the very end of the tailpipe up a bit more.

If needed, I will try to get another pic showing a different part, but photo access is rather limited, without turning the car on it's side.
D
 

Attachments

  • 126523-Tailpipe.jpg
    126523-Tailpipe.jpg
    78.7 KB · Views: 130
Hi Dave,

I really appreciate the picture. I'll check it against mine and see how they compare. Keep you posted.

Trevor
 
Hi Dave,

Well, I got under there and had a good look.. I can't seem to find a way to get room between the pipe and the spring.. See pics attached.

Any ideas? Thanks, Trevor
 

Attachments

  • 126595-Muff3.jpg
    126595-Muff3.jpg
    91.5 KB · Views: 128
here it is..
 

Attachments

  • 126598-Muff4.jpg
    126598-Muff4.jpg
    94.8 KB · Views: 119
Hi Trevor,
From the pics, your pipe appears to be approximately correct. At the location where the pipe leaves the muffler, there is 3 3/8" between pipe center & bottom of the car floor. With the springs at full droop, the spring clears the pipe by only a couple of thousandths of an inch. At normal ride height the spring is well clear of the pipe, & there is 5" clearance between the bottom of the pipe & ground. From the bottom of the muffler to ground is 4 1/4".

You might have to adjust the hanger heights to get the exact vertical position. From your pics, it appears that the pipe is well clear of the tire.

The real problem appears to be that the designers gave no thought to exhaust system clearance & didn't leave room for anything. See attached pic of what happens to the muffler if you are not careful.
 

Attachments

  • 126621-muffler.jpg
    126621-muffler.jpg
    86.2 KB · Views: 119
Trevor,
Just for laughs, a pic of how the flattened muffler happened. LOL!
D
 

Attachments

  • 126623-howithappened.jpg
    126623-howithappened.jpg
    40.1 KB · Views: 121
Hi Dave,

Thanks. I'll see about tweaking the fit and hope for the best. Great shot of the squished muffler.

Trevor
 
Back
Top