• Hi Guest!
    You can help ensure that British Car Forum (BCF) continues to provide a great place to engage in the British car hobby! If you find BCF a beneficial community, please consider supporting our efforts with a subscription.

    There are some perks with a member upgrade!
    **Upgrade Now**
    (PS: Subscribers don't see this gawd-aweful banner
Tips
Tips

TR6 Easy way to install rear gaiter on TR6?

SCguy

Jedi Warrior
Country flag
Offline
So is there an easy way to install the rear axel gaiters on a TR6? Part #65. Everything is clean, newly rebuilt, greased... its just the installed gaiters need to be replaced before they completely fall apart. /bcforum/images/%%GRAEMLIN_URL%%/sick.gif

tr6-1.jpg
 
Hello SCguy,

as DNk so succinctly put it, "Take it apart ???", they slide on very easily. Just be sure that the splines are well lubricated with Moly grease before you reassemble them. They are originally secured with steel wire but you can use a cable tie if you like. (You will see a groove around the two halves of the axle shafts where this fastening locates.)

Alec
 
Larry,

This MIGHT work for you. It somehow worked for me.

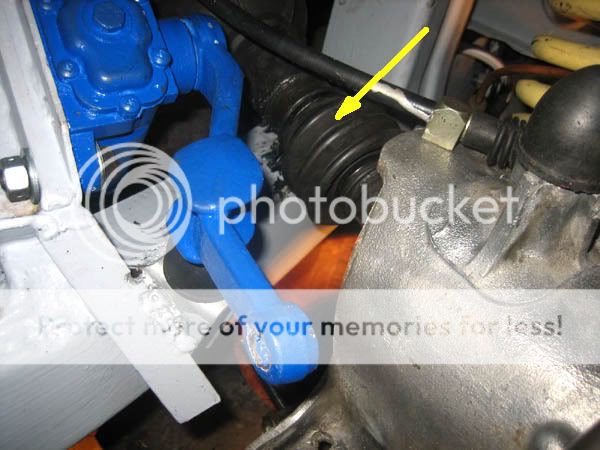
Put your car on jack stands, remove both rear wheels.
Put a sissor jack under the trailing arm just below the
shock link attachment. Push the T/A upward a little
with the sissor jack, 1/2". Remove the shock link assembly.

Now lower the sissor jack slowly and the coil spring
will push the T/A downward. The axle will move downward
and the U-joint will permit the middle to rotate upward
as well. The axle will bump the frame on it's way downward
and then seperate enough for you to slide the gaiter in place.

If that doesn't work, take a time out cruise. I hope this
helps a bit. If not, the experts will have better methods.
/bcforum/images/%%GRAEMLIN_URL%%/yesnod.gif

boot1.jpg


pool04.jpg
 
Larry,
I just went through this exersize while replacing the trailing arm bushings.
The first side was difficult because of self inflicted wounds. The second side was easy.
As mentioned above you can use a jack to raise and lower the trailing arm as needed. Be careful not to try and raise it too much or you will begin to lift tha car off the jackstands.
After you remove the half shaft. Slide the gaiter onto the half shaft that you removed. I used nylon wire ties to secure it.
Rotate the shaft still attached to the diff so the key way or slot is at the top. I'm referring to the extra wide slot in the female part of the splines. Apply the lubricant liberally to the inside of the female splines. I used Never Seez Moly.
As you start to install the outer half shaft, rotate it so the male key is at the top. Pull the gaiter back so you can see the splines. You need to line up the key with the key slot and align the centerlines of inner and outer half shafts as close as possible. In otherwords there should be no angle between the centerlines of the inner and outer shafts. The better the alignment and the match of the key the easier and quicker you'll mate the splines. Once they are mated, slide them together, slide the ga
 
Larry,
I just went through this exersize while replacing the trailing arm bushings.
The first side was difficult because of self inflicted wounds. The second side was easy.
As mentioned above you can use a jack to raise and lower the trailing arm as needed. Be careful not to try and raise it too much or you will begin to lift tha car off the jackstands.
After you remove the half shaft. Slide the gaiter onto the half shaft that you removed. I used nylon wire ties to secure it.
Rotate the shaft still attached to the diff so the key way or slot is at the top. I'm referring to the extra wide slot in the female part of the splines. Apply the lubricant liberally to the inside of the female splines. I used Never Seez Moly.
As you start to install the outer half shaft, rotate it so the male key is at the top. Pull the gaiter back so you can see the splines. You need to line up the key with the key slot and align the centerlines of inner and outer half shafts as close as possible. In otherwords there should be no angle between the centerlines of the inner and outer shafts. The better the alignment and the match of the key the easier and quicker you'll mate the splines. Once they are mated, slide them together, slide the gaiter over the inner shaft and secure with a wire tie.
Applying the grease to the female splines keeps you from having to handle a greasy male spline. Installing the gaiter on the outer shaft first allows you to pull it back and hold it out of the way with the hand that is holding and aligning the splines. If you install it on the inner shaft first you have to fight it to gain clearance to see the splines.
If you don't have a wire tie tool you should consider buying ne. Home Depot has one for about $10. So does Wally World. You want to be sure your tie is tight.
Remember the 6 nuts that hols the hub flange to the trailing arm only require around 15 Ft-Lbs of torque. Check the manual for the exact number.
Hope this helps,
BOBH
 
Back
Top